Admin Settings
This documentation covers all the essential admin settings available in QuickDine. As a restaurant
administrator, you can configure various aspects of your business operation, from basic information to
payment methods and customer-facing interfaces. Follow this guide to optimize your restaurant's settings
for the best operational efficiency.
Administrator Access Required
You need administrator privileges to access and modify these settings. Any changes made here will
affect the entire restaurant operation.
Restaurant Business Settings
Configure your restaurant's basic business information including name, contact details, and branding
elements. This information appears on receipts, the customer-facing site, and in communications with
customers.
Business Information Configuration
Enter accurate business details to ensure proper identification on receipts, customer communications,
and legal documentation.
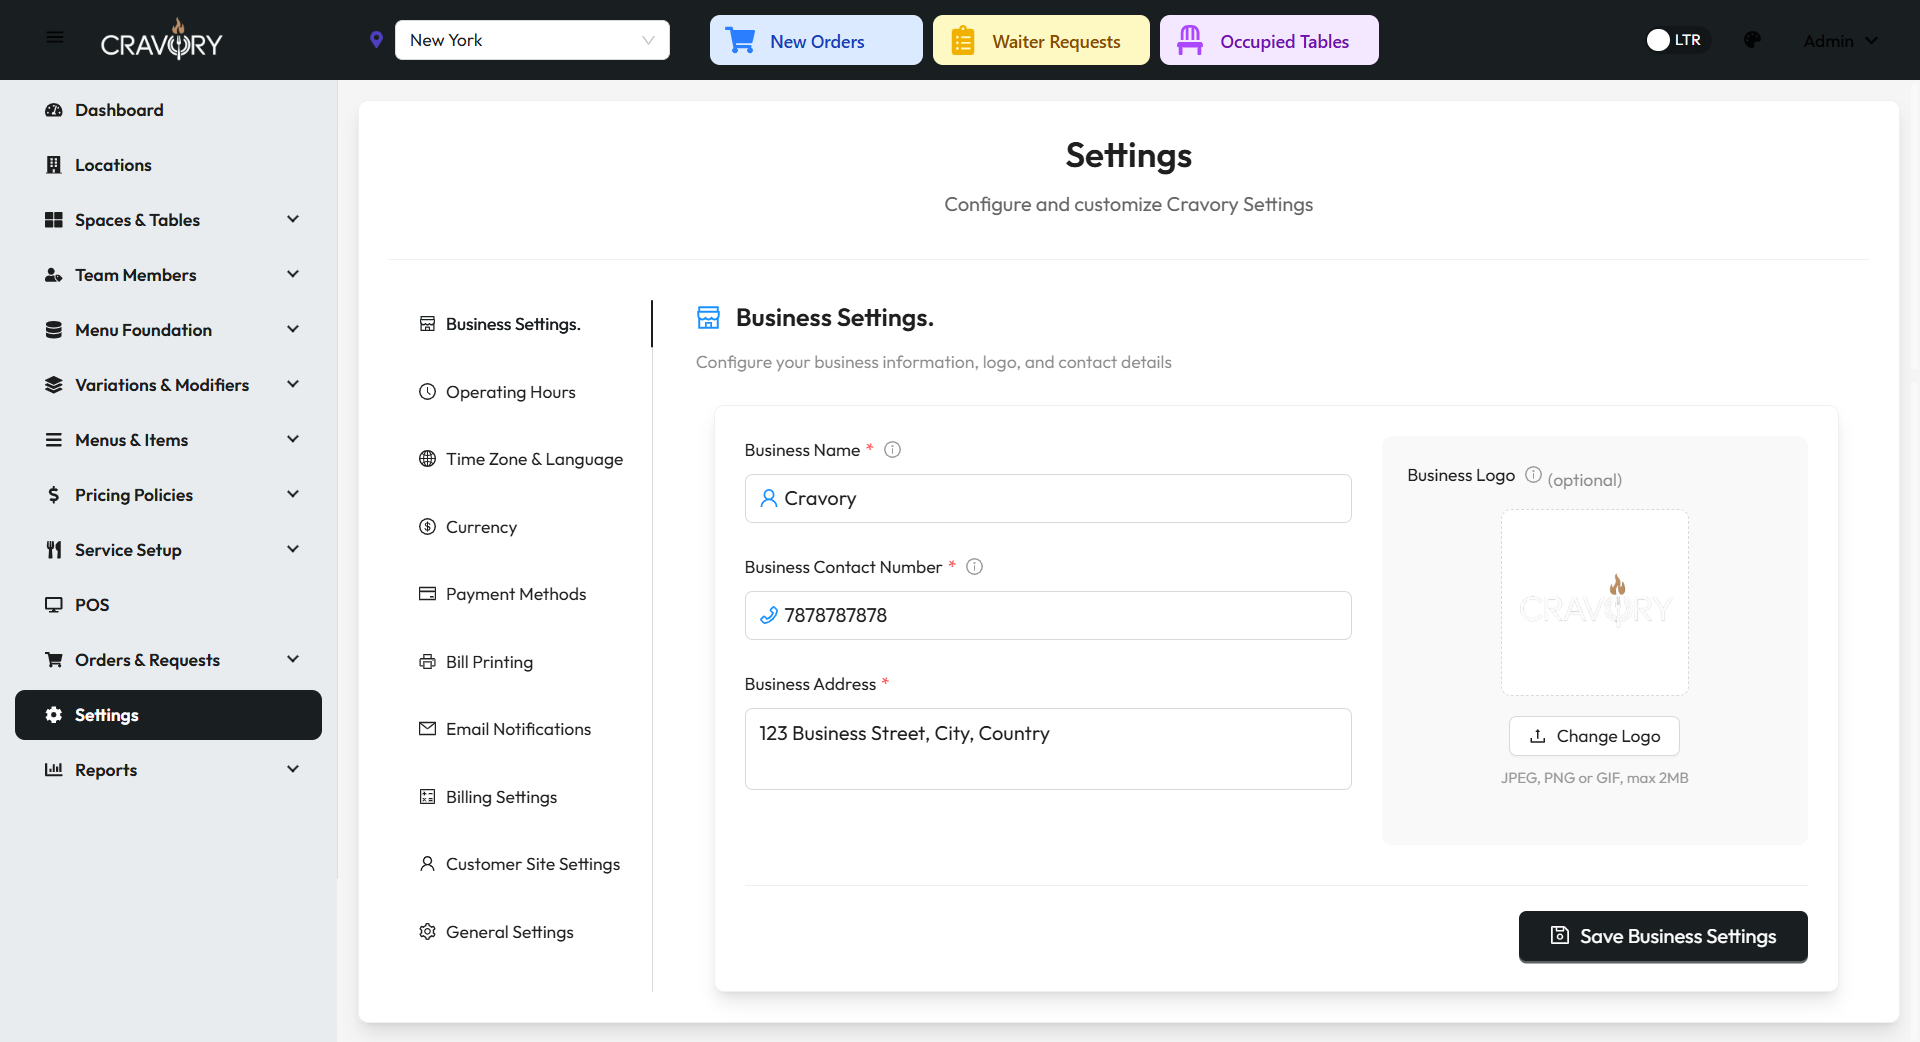
Restaurant Business Information Configuration
1 Navigate to Settings > Business Information in
the admin dashboard.
2 Enter your restaurant's legal name, trade name, and contact
information.
3 Upload your restaurant logo (recommended size: 500x500 pixels,
PNG format with transparent background).
4 Provide your business address and tax identification number if
applicable.
5 Click Save Changes to apply your settings.
Note: Your business logo will appear on receipts, the customer-facing website, and in
email communications. Use a high-quality image with good resolution for best results.
Operation Hours Settings
Define your restaurant's operating hours for each day of the week. This information is displayed on your
customer website and also determines when online ordering is available.
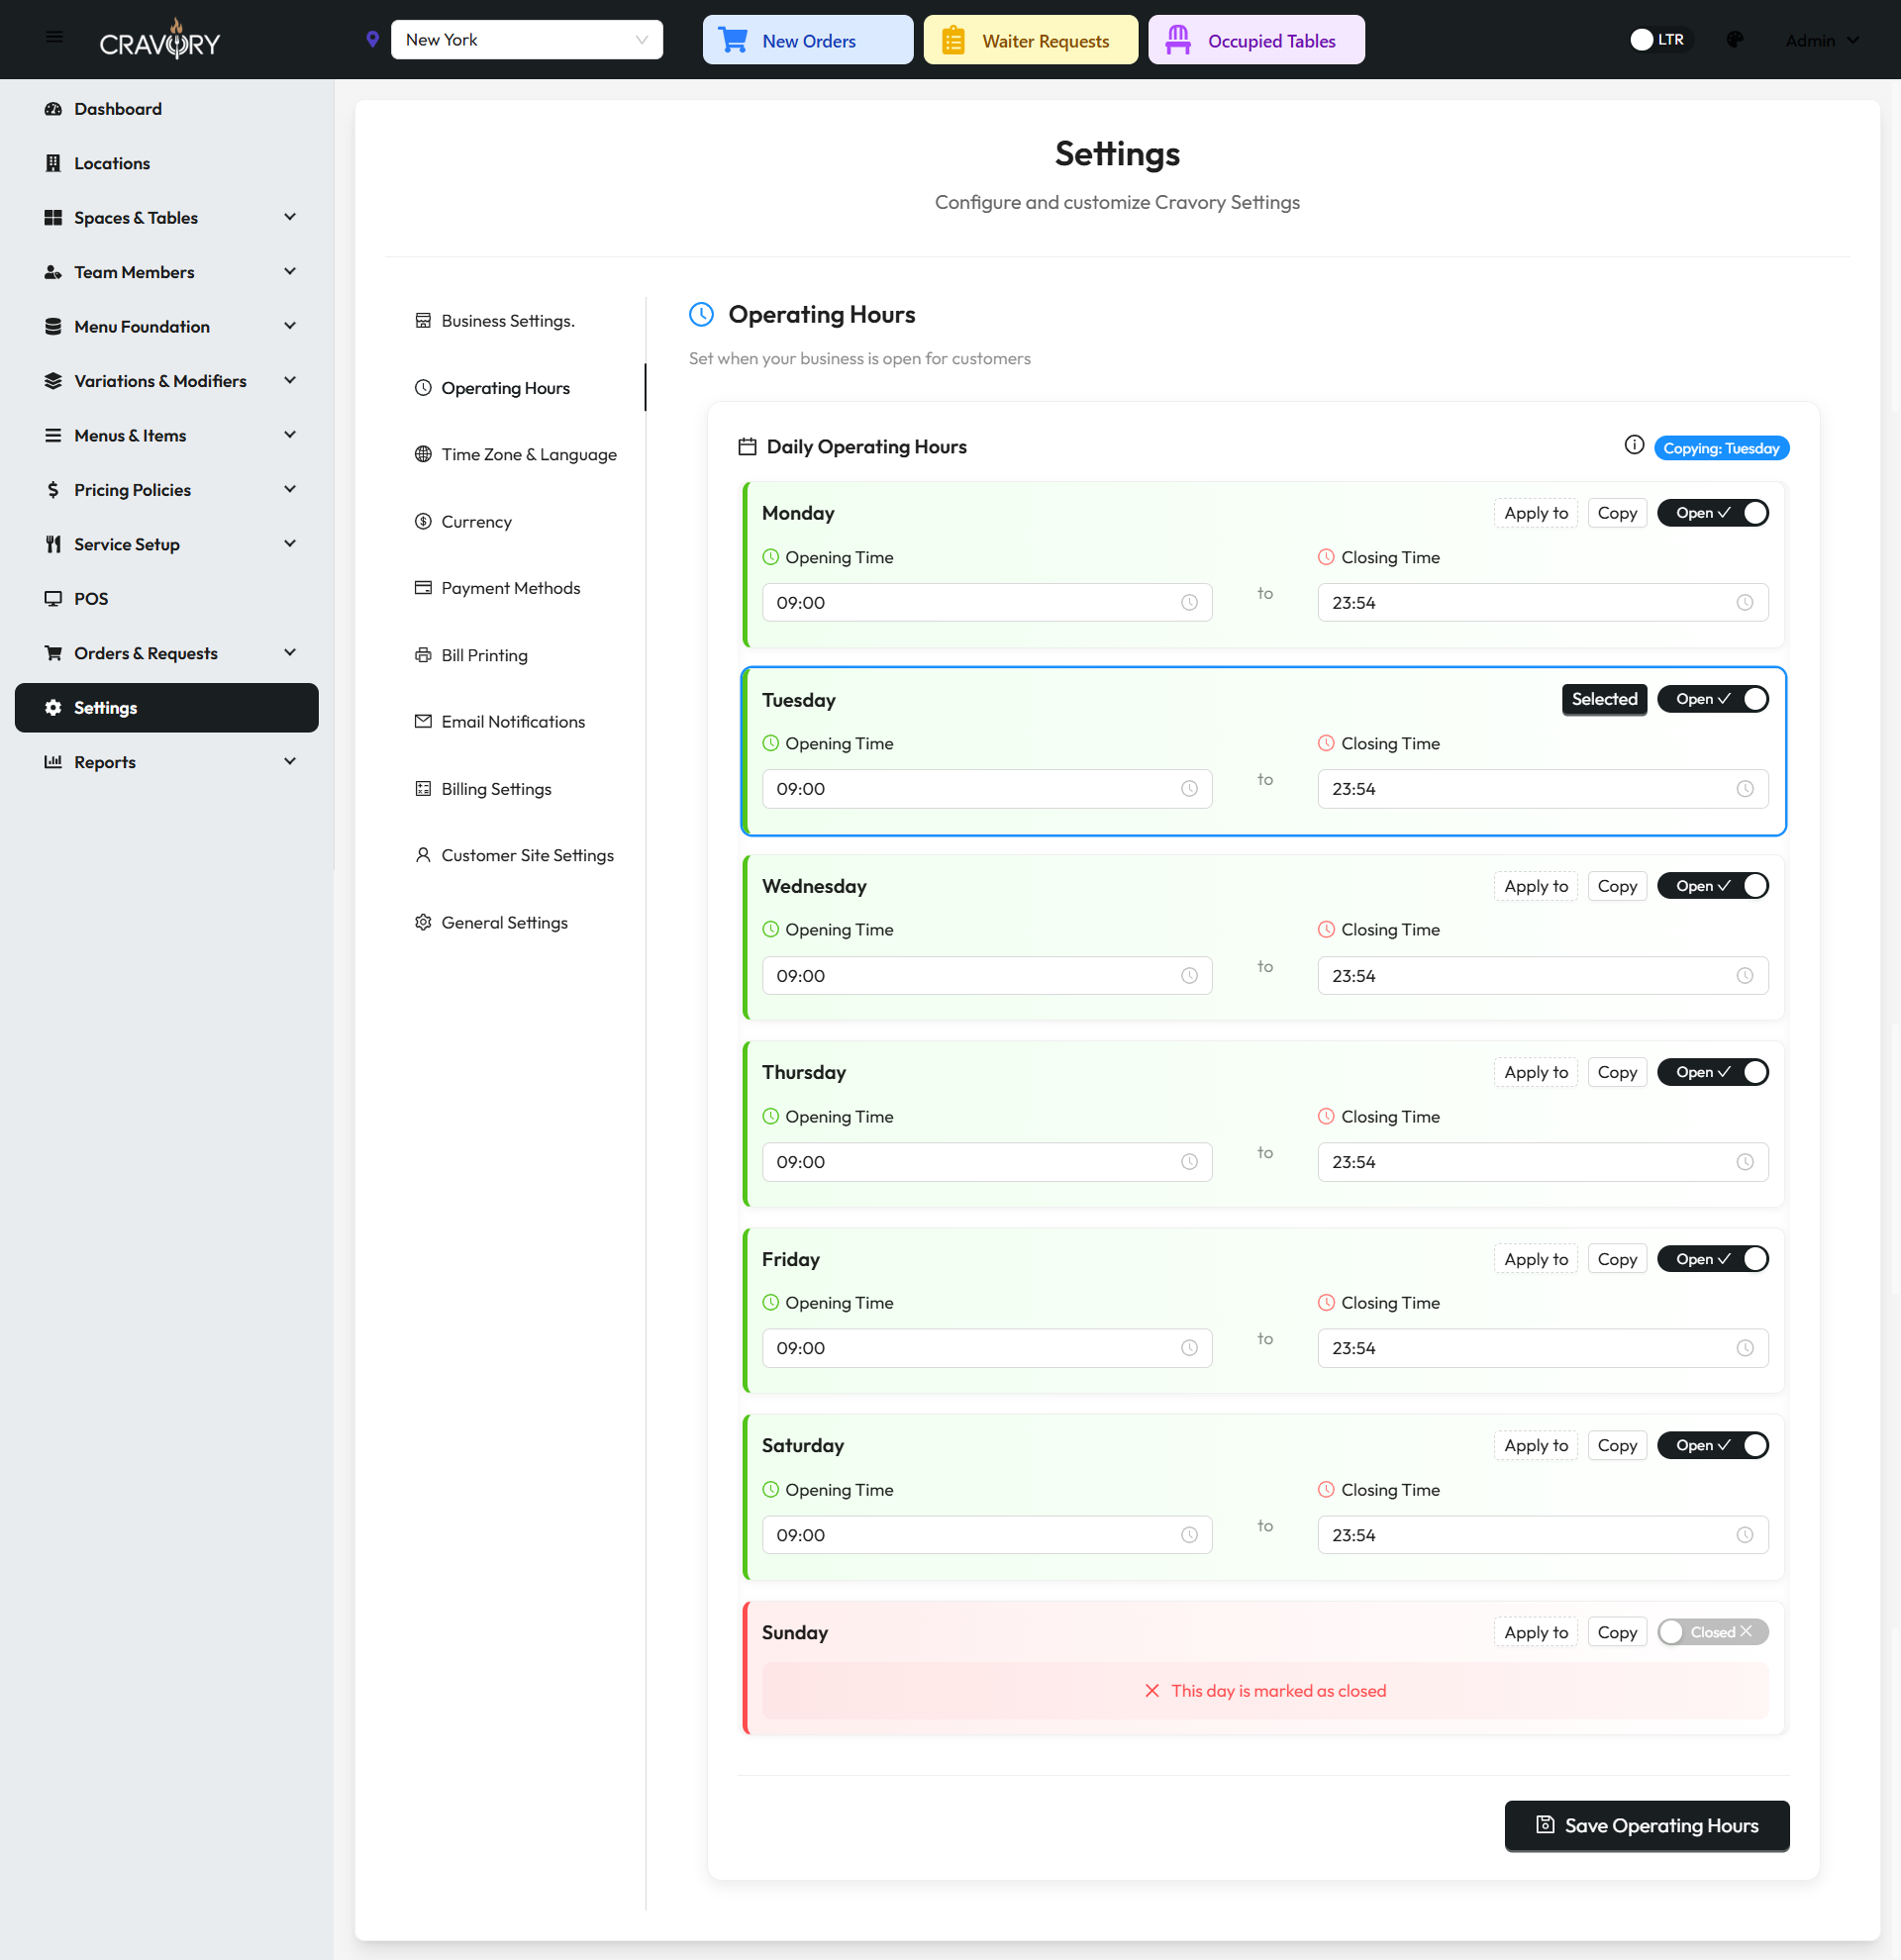
Restaurant Operating Hours Configuration
1 Go to Settings > Operation Hours in the admin
panel.
2 Set opening and closing times for each day of the week.
3 For days with split hours (like lunch and dinner service), click
Add Time Slot.
4 Mark days as closed by toggling the Closed
switch.
5 Click Save to apply your operating schedule.
Important: The operating hours determine when customers can place online orders. Orders
placed outside operating hours will be scheduled for the next available time slot.
Timezone and Language Settings
Configure your restaurant's timezone and preferred language settings. These settings affect how dates,
times, and system messages are displayed throughout the platform.
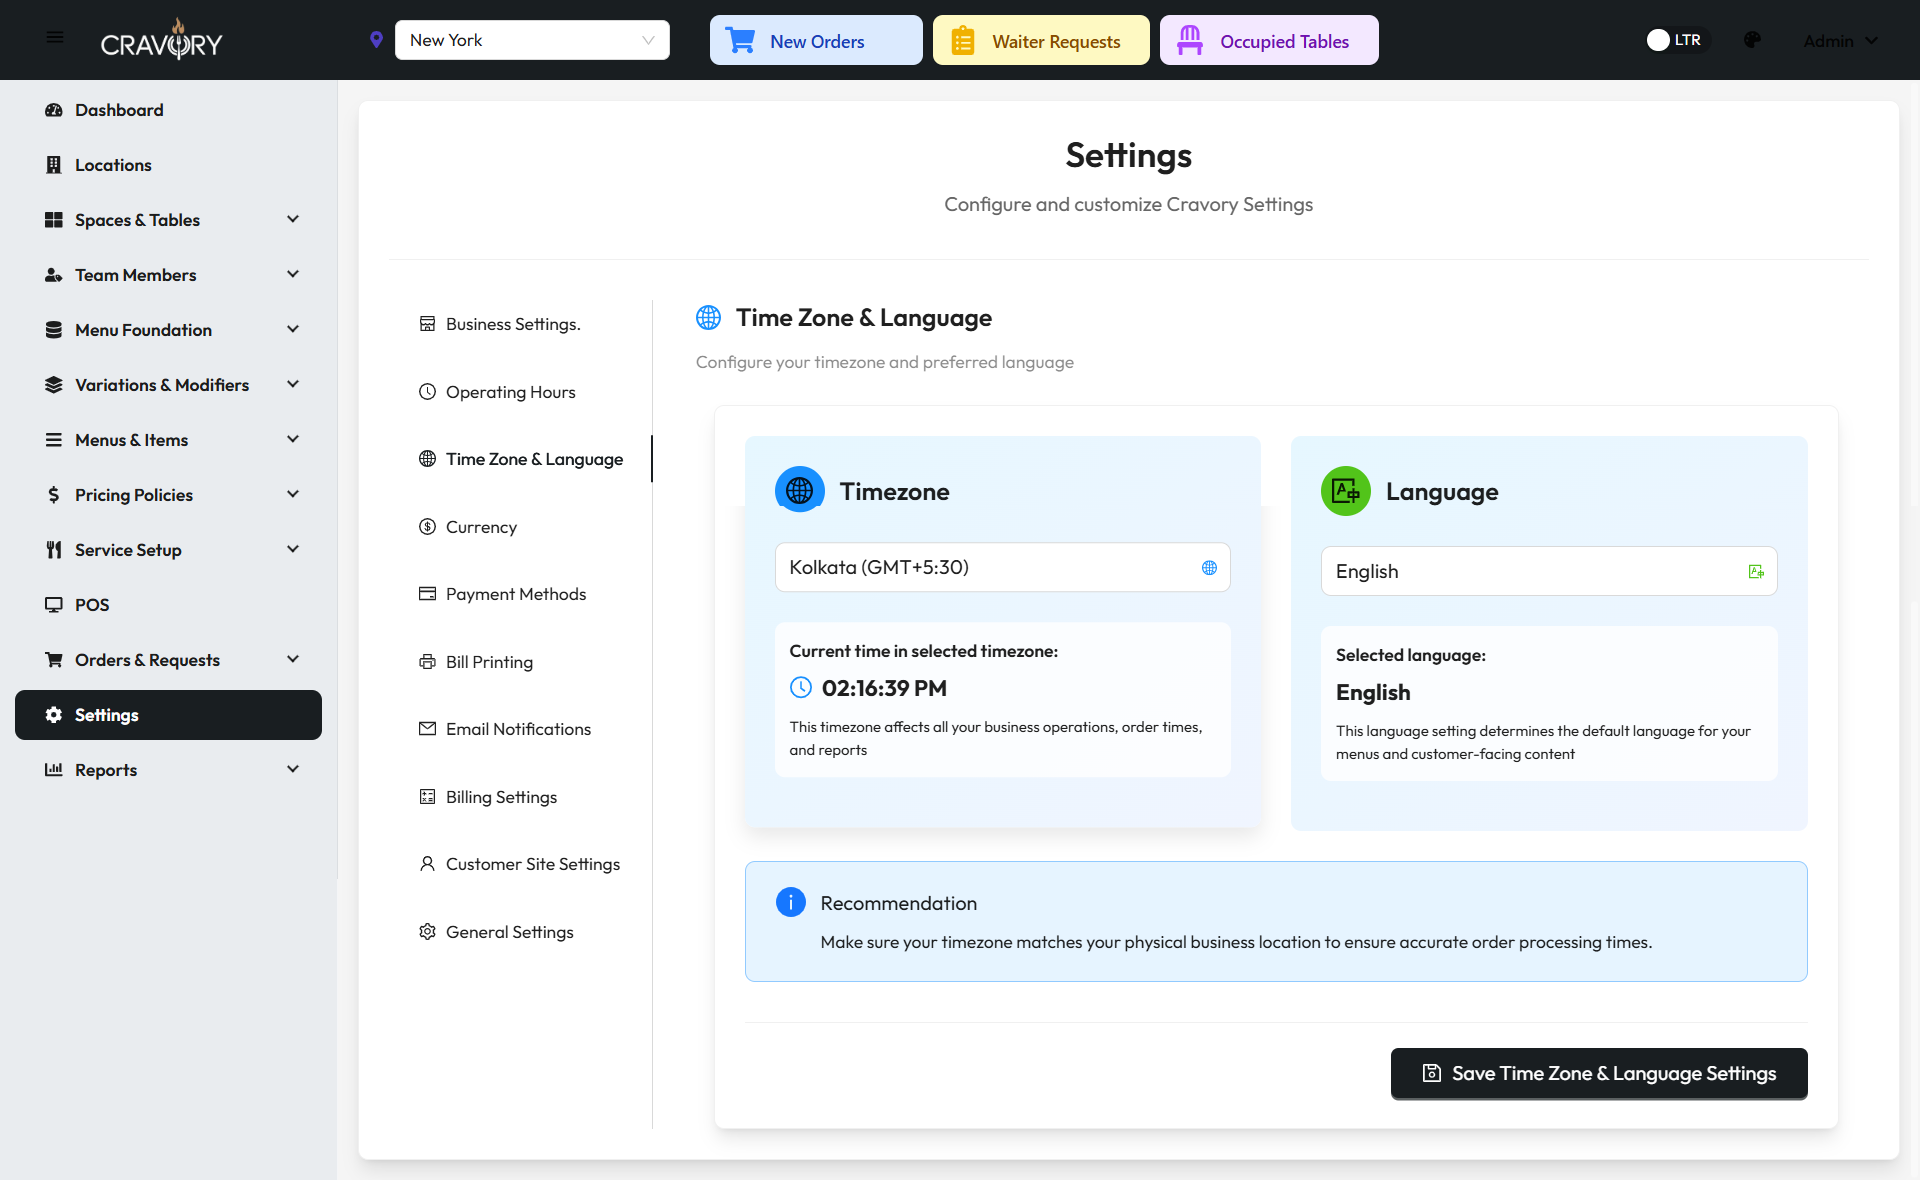
Timezone and Language Configuration
1 Navigate to Settings > Regional Settings.
2 Select your restaurant's timezone from the dropdown menu.
3 Choose your preferred language for the admin interface.
4 Set date and time format preferences.
5 Click Save to apply these settings.
Timezone Importance
Setting the correct timezone is critical for accurate order timing, reporting, and scheduling.
Incorrect timezone settings may cause confusion with order preparation times and business
analytics.
Currency Settings
Configure the currency used throughout your restaurant system, including symbol placement, decimal
settings, and formatting options.
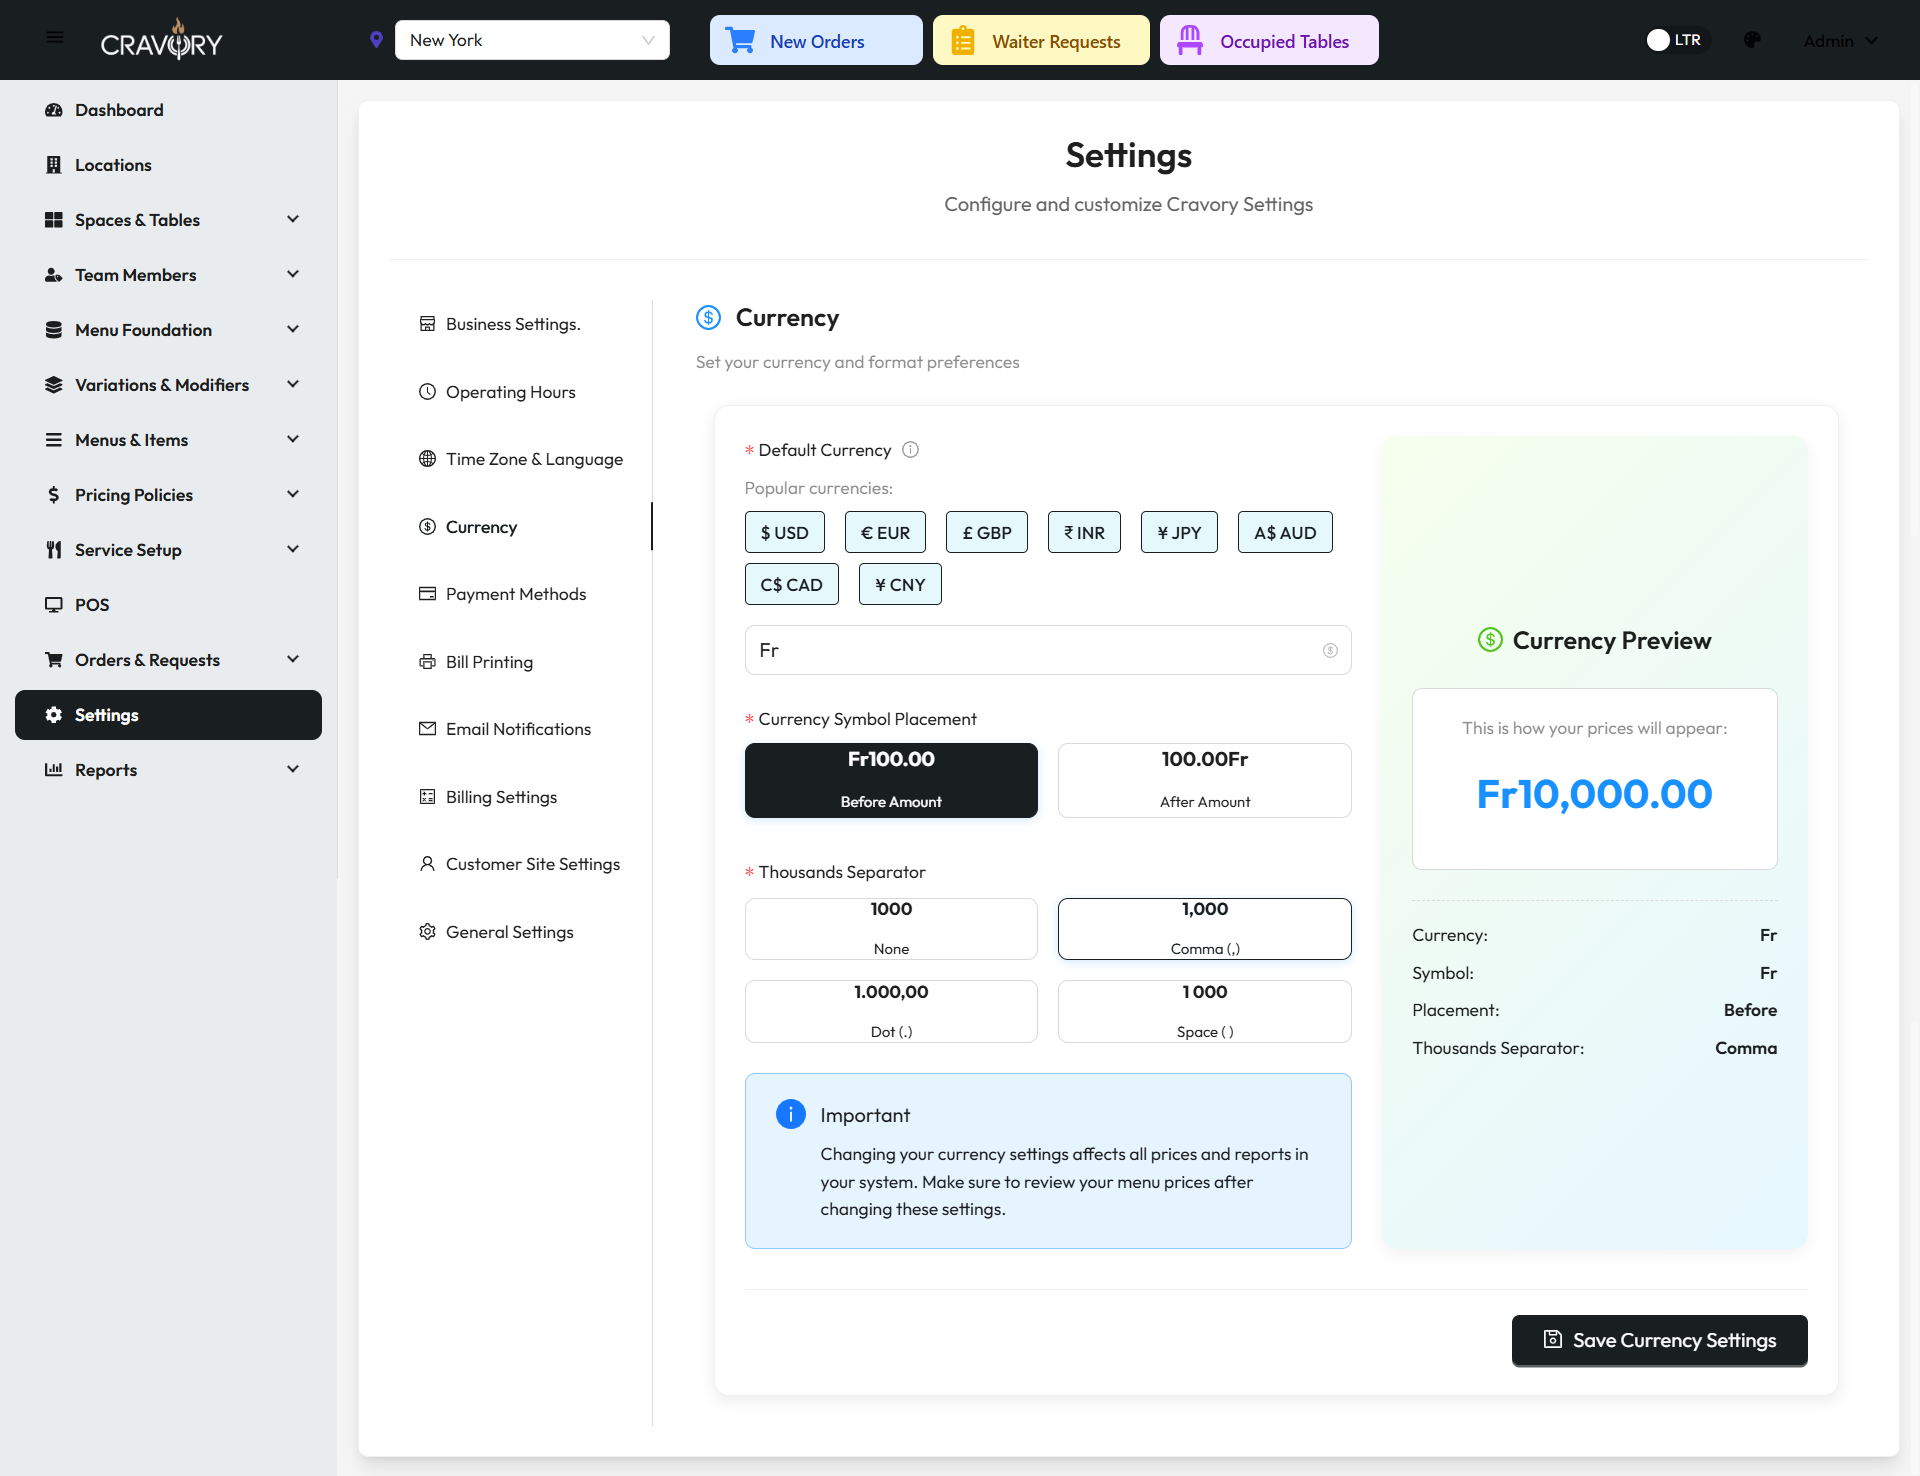
Currency Configuration Options
1 Go to Settings > Currency in the admin
dashboard.
2 Select your primary currency from the dropdown list.
3 Choose symbol placement (before or after amount).
4 Set decimal places for price display.
5 Configure thousand separator and decimal point styles.
6 Click Save Currency Settings to apply your
changes.
Note: Currency settings affect how prices are displayed across the entire platform,
including menus, receipts, and reports. Make sure to select the correct currency for your region.
Payment Method Settings
Enable and configure various payment methods available to your customers, including cash, credit cards,
and digital payment options.
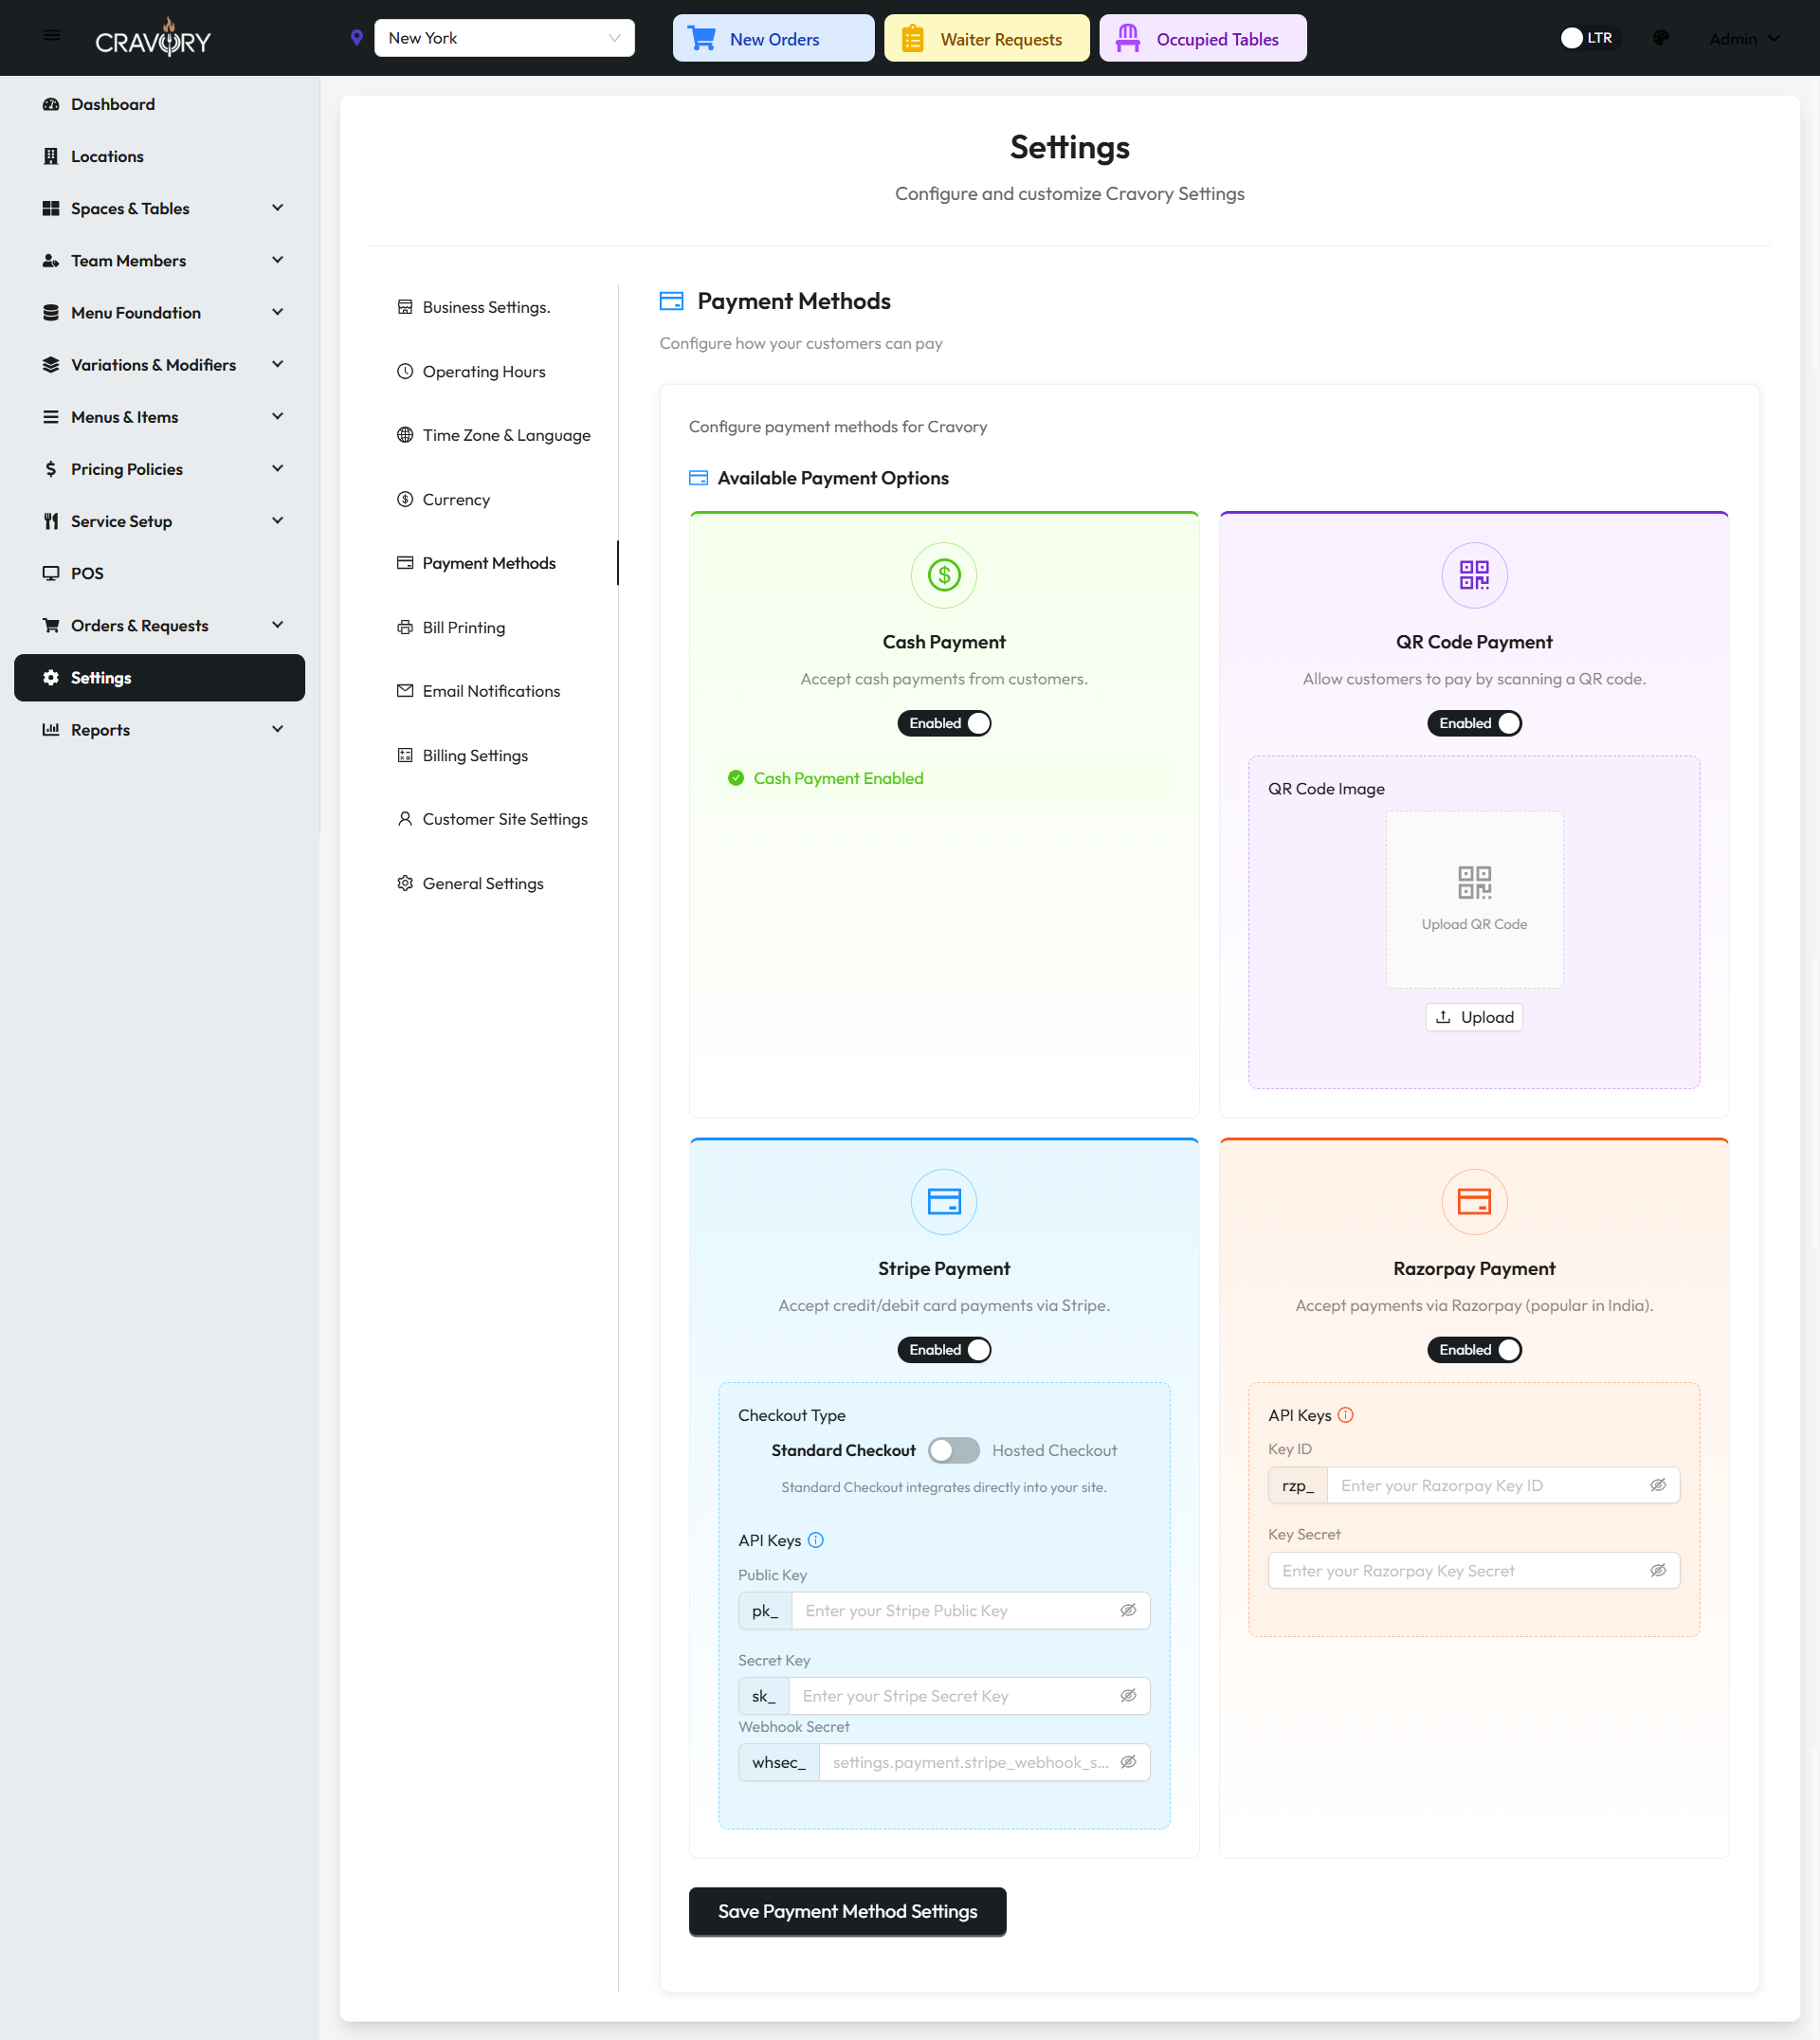
Payment Methods Configuration
1 Navigate to Settings > Payment Methods.
2 Enable or disable available payment methods by toggling their
respective switches.
3 For online payments, enter your payment gateway credentials (API
keys, merchant IDs, etc.).
4 Configure settings for each payment method, such as minimum order
amounts.
5 Set the display order of payment options in the checkout process.
6 Click Save to apply your payment method
configuration.
Payment Integration
To configure digital payment methods like credit cards or mobile payments, you'll need to set up
accounts with the respective payment processors and obtain API credentials. See separate
documentation for specific payment gateway integrations.
Invoice Print Settings
Customize the appearance and content of invoices and receipts generated by your restaurant system.
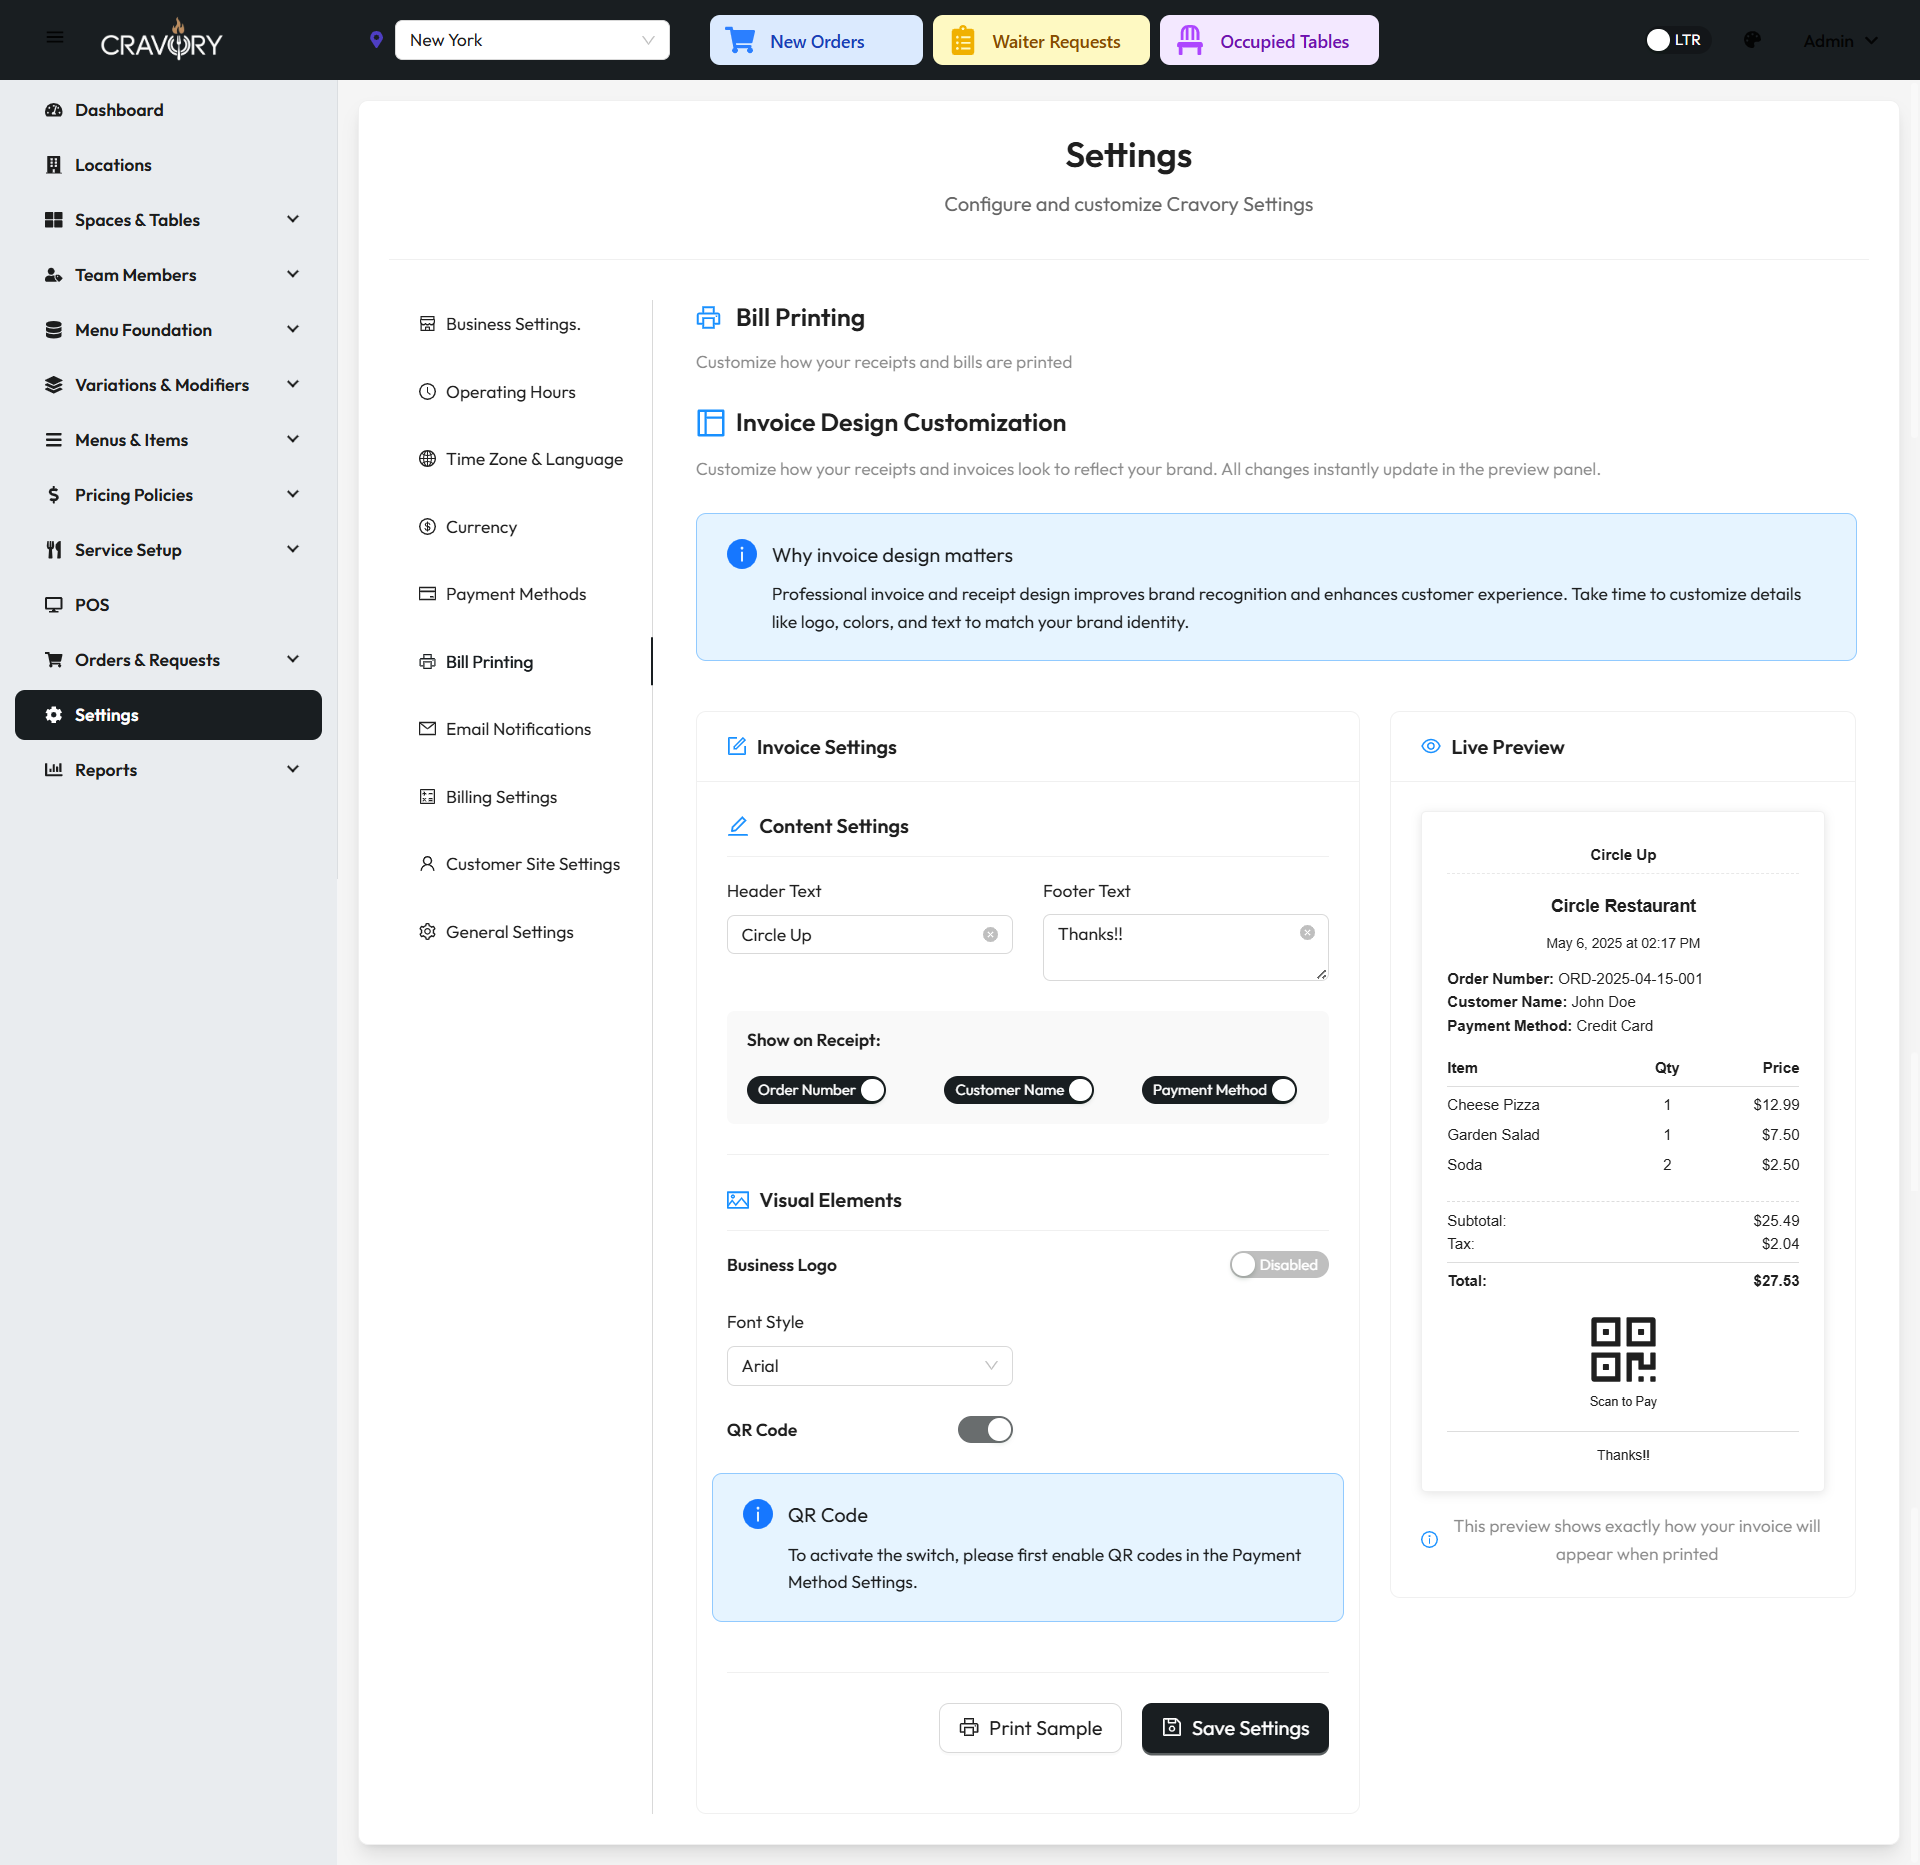
Invoice and Receipt Configuration
1 Go to Settings > Invoice/Receipt in the admin
panel.
2 Configure receipt header information, including business name and
contact details.
3 Customize receipt footer text, such as return policies or thank
you messages.
4 Set up receipt numbering format and sequence.
5 Configure thermal printer settings if applicable.
6 Choose which details to include on receipts (tax breakdown,
server name, etc.).
7 Click Save Receipt Settings to apply your
configuration.
Tip: You can preview your receipt layout by clicking the Preview
button before saving changes to ensure everything appears as expected.
Email SMTP Settings
Configure email delivery settings for order confirmations, notifications, and other automated
communications with your customers and staff.
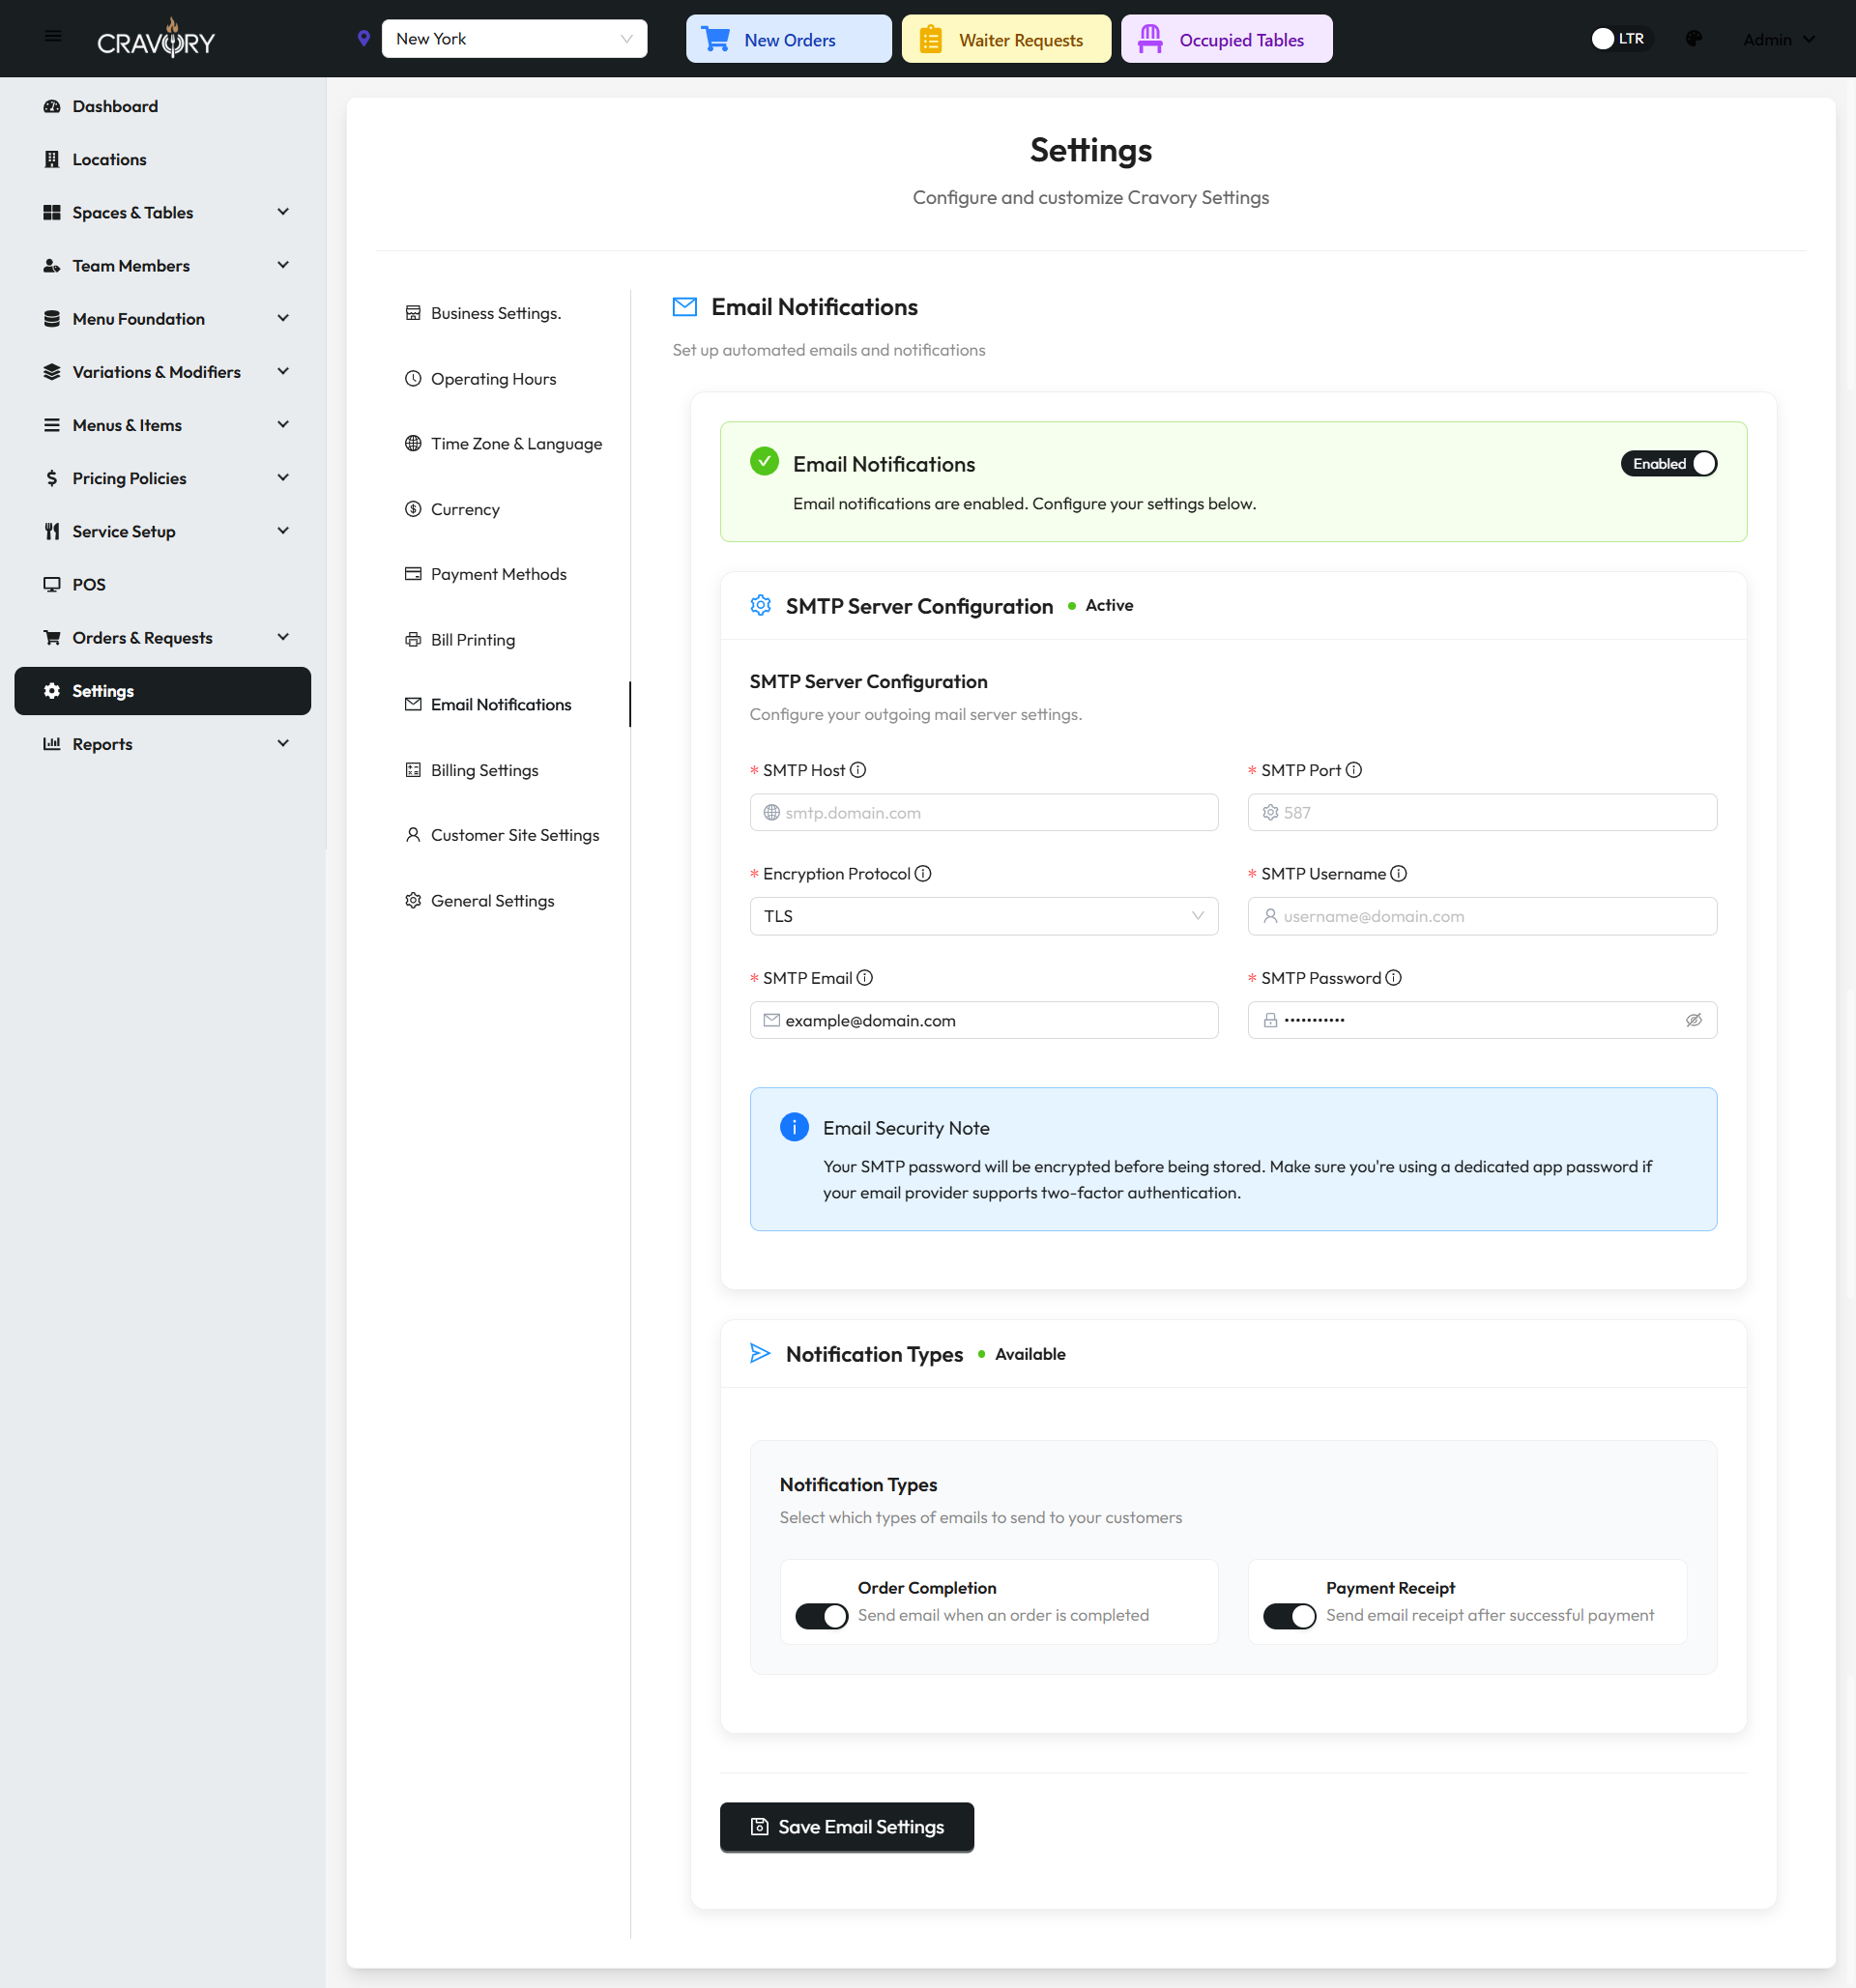
Email SMTP Configuration
1 Navigate to Settings > Email Configuration.
2 Enter your SMTP server address (e.g., smtp.gmail.com).
3 Configure the port number (typically 587 for TLS or 465 for SSL).
4 Enter your email account username and password.
5 Select the appropriate encryption method (TLS/SSL).
6 Set sender name and email address for outgoing messages.
7 Click Test Connection to verify your settings.
8 Save your SMTP configuration after successful testing.
Email Security
For some email providers (like Gmail), you may need to enable "Less Secure Apps" or create an
app-specific password if you have two-factor authentication enabled.
Cash Payment Rounding Settings
Configure how cash payments are rounded to accommodate currency denominations and simplify cash
handling.
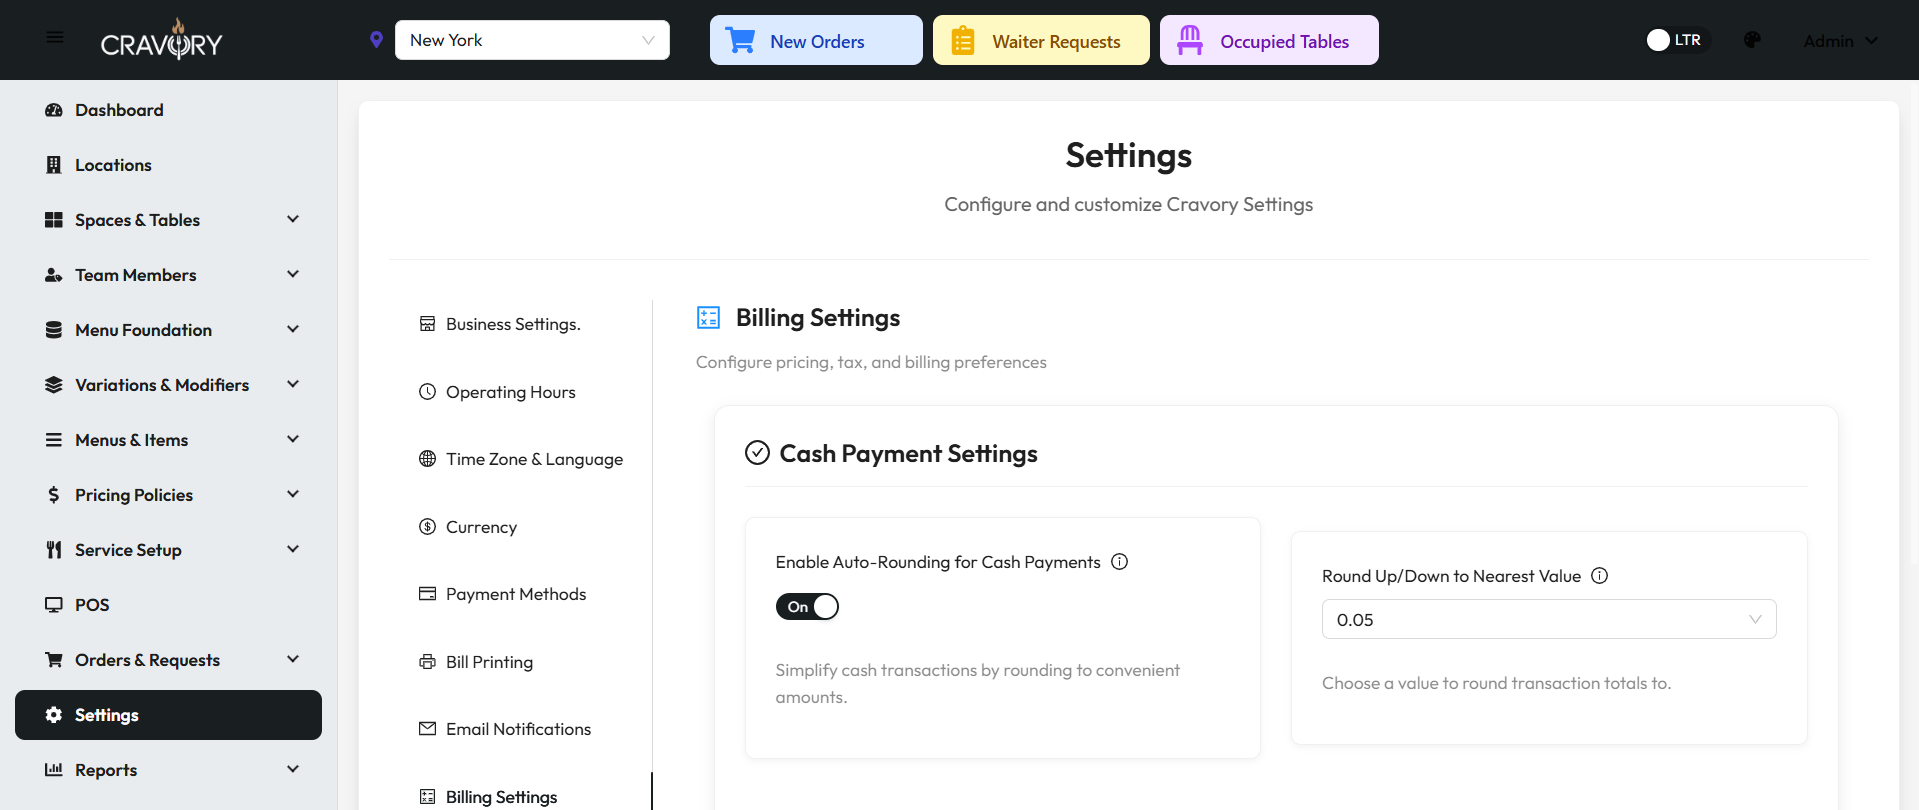
Cash Payment Rounding Configuration
1 Go to Settings > Payment > Cash Rounding.
2 Enable cash rounding by toggling the switch to ON.
3 Select rounding method (nearest, up, or down).
4 Set the rounding increment (e.g., 0.05, 0.10, 0.25, etc.).
5 Choose whether to apply rounding to the final total or to
individual line items.
6 Click Save Rounding Settings to apply your
configuration.
Note: Cash rounding is particularly useful in regions where certain coin denominations
are no longer in circulation. For example, in Canada, where pennies are no longer used, amounts are
typically rounded to the nearest 5 cents.
Customer Site Settings
Configure the appearance and functionality of your customer-facing website, including online ordering
options, menu display, and branding elements.
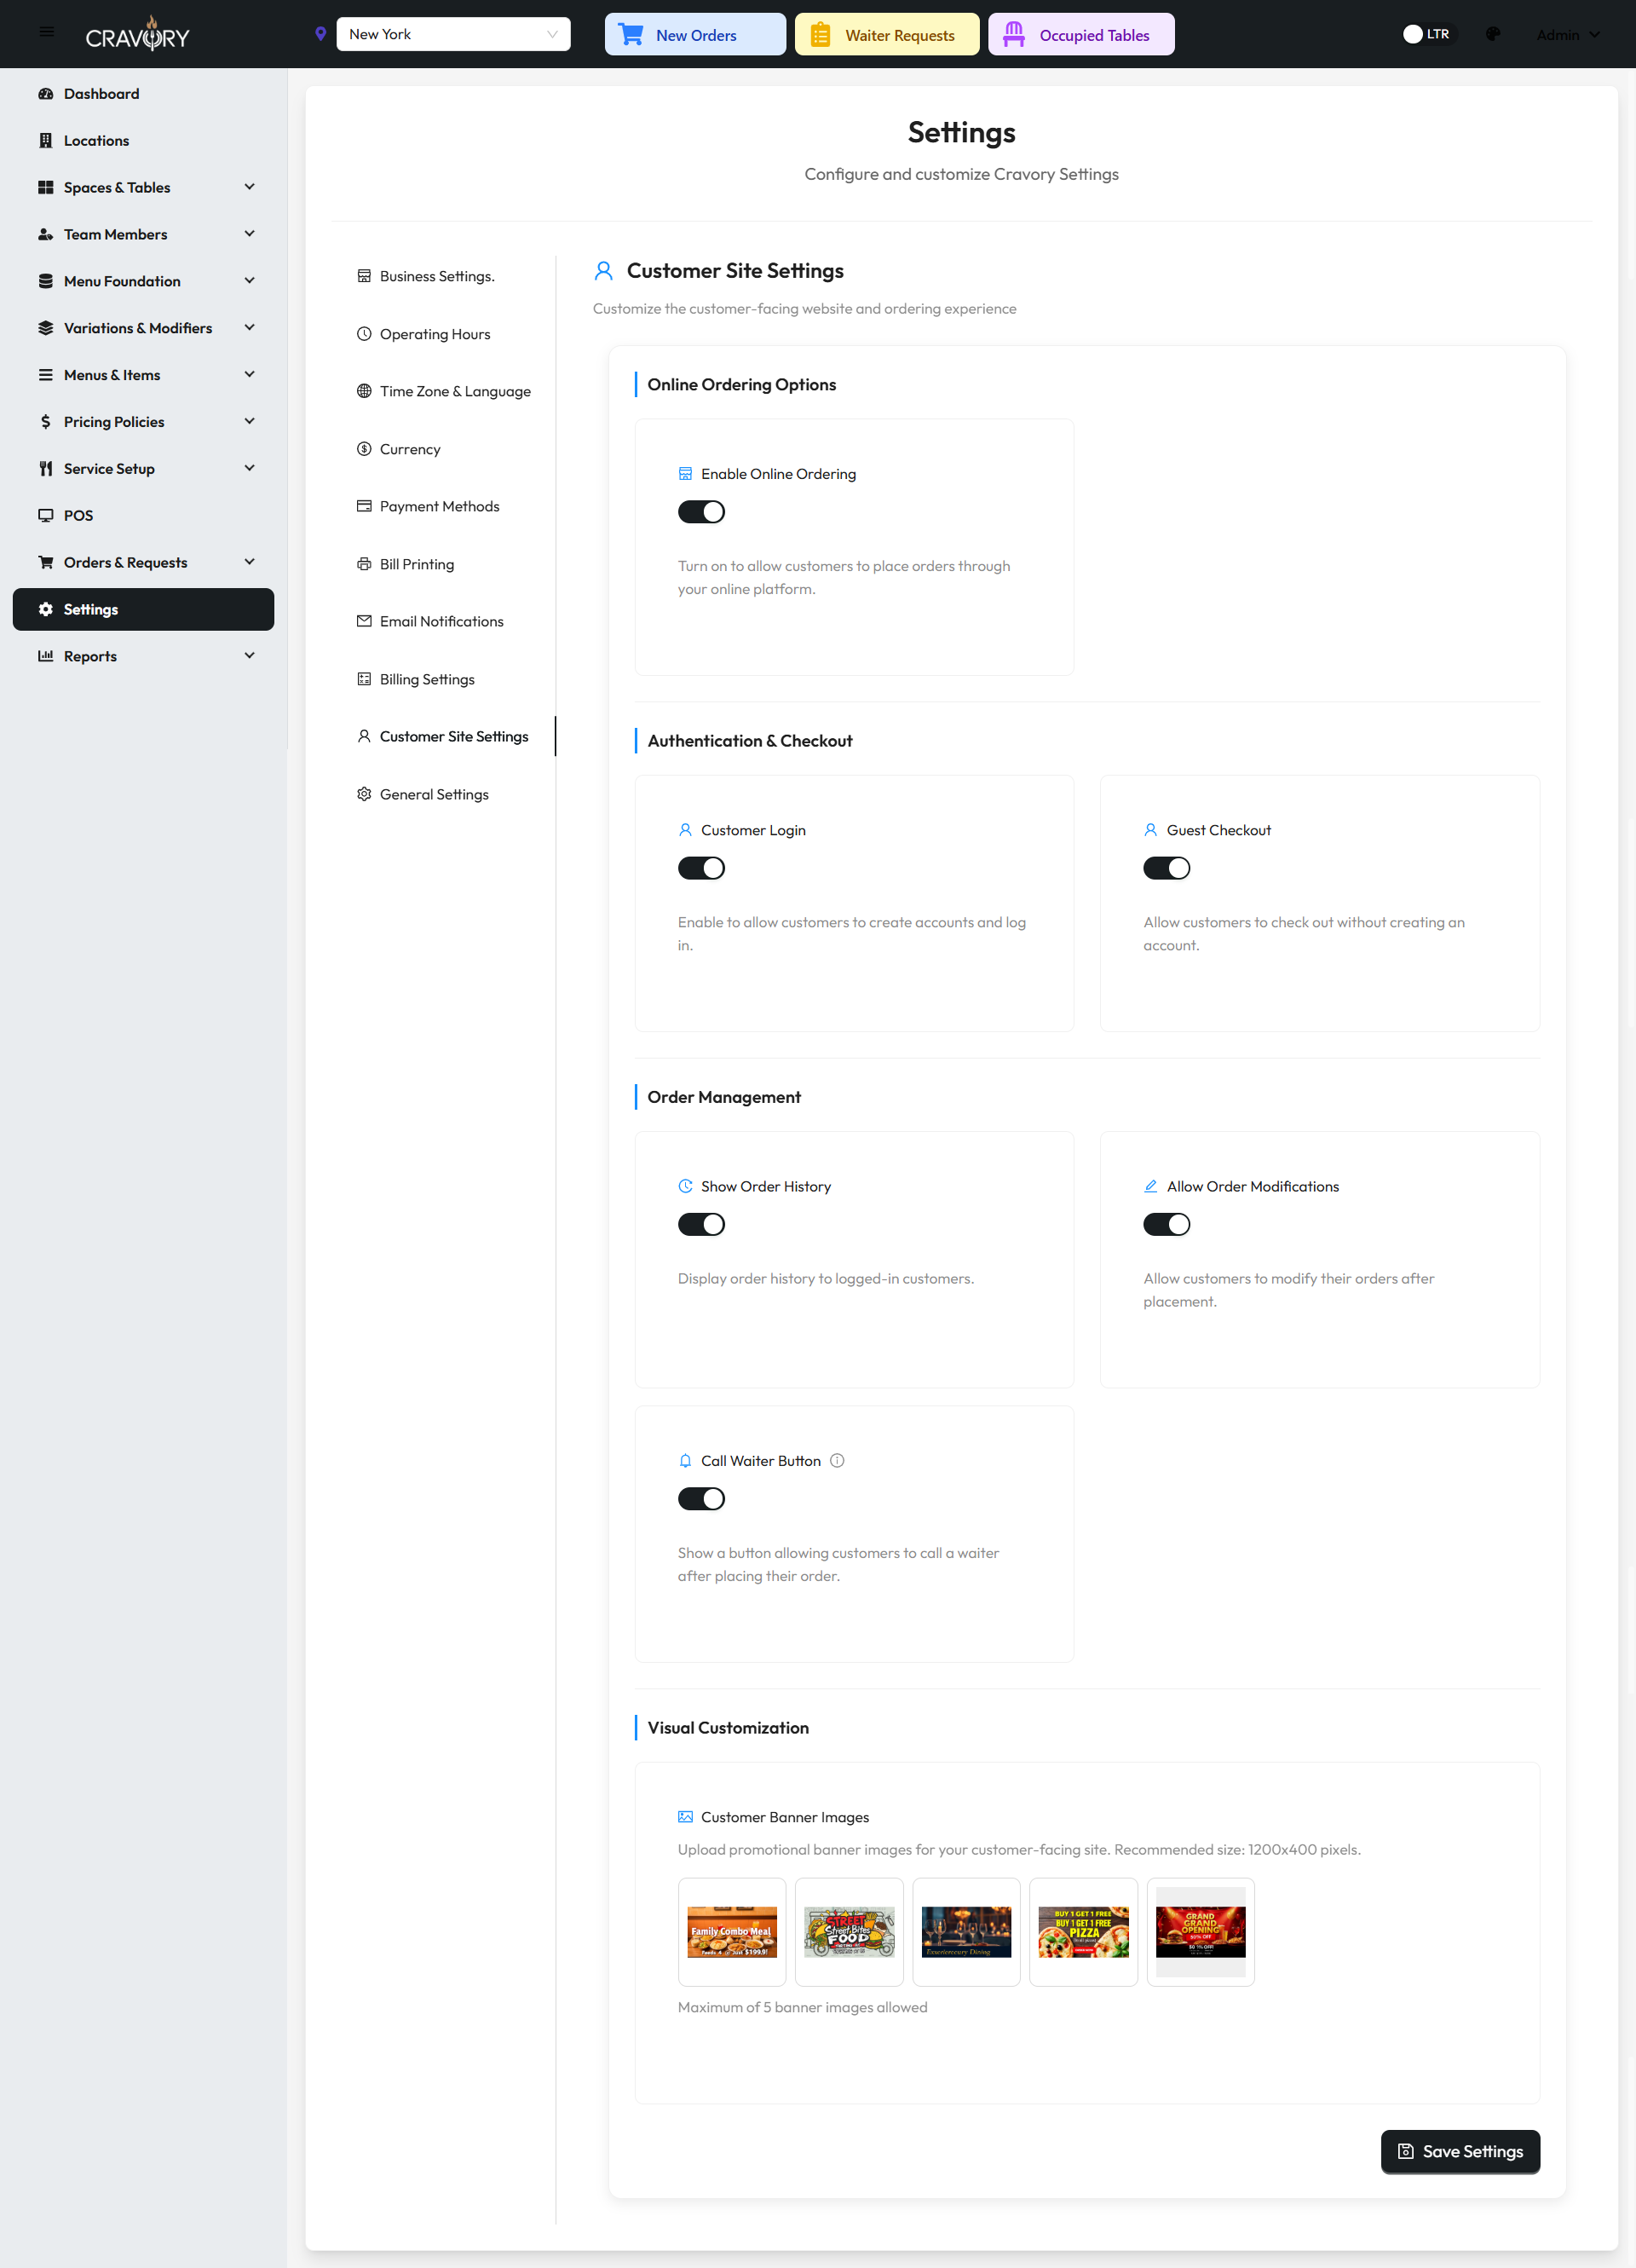
Customer Website Configuration
1 Navigate to Settings > Customer Website.
2 Upload website banner images and configure carousel settings.
3 Customize website color scheme to match your brand.
4 Set up menu display preferences (categories, images,
descriptions).
5 Configure customer account requirements for ordering.
6 Set minimum order values for delivery and pickup.
7 Customize order confirmation and thank you messages.
8 Click Save Website Settings to apply your
configuration.
Mobile Optimization
Customer site settings are automatically optimized for mobile devices. You can preview the mobile
appearance by using the "Mobile Preview" button.
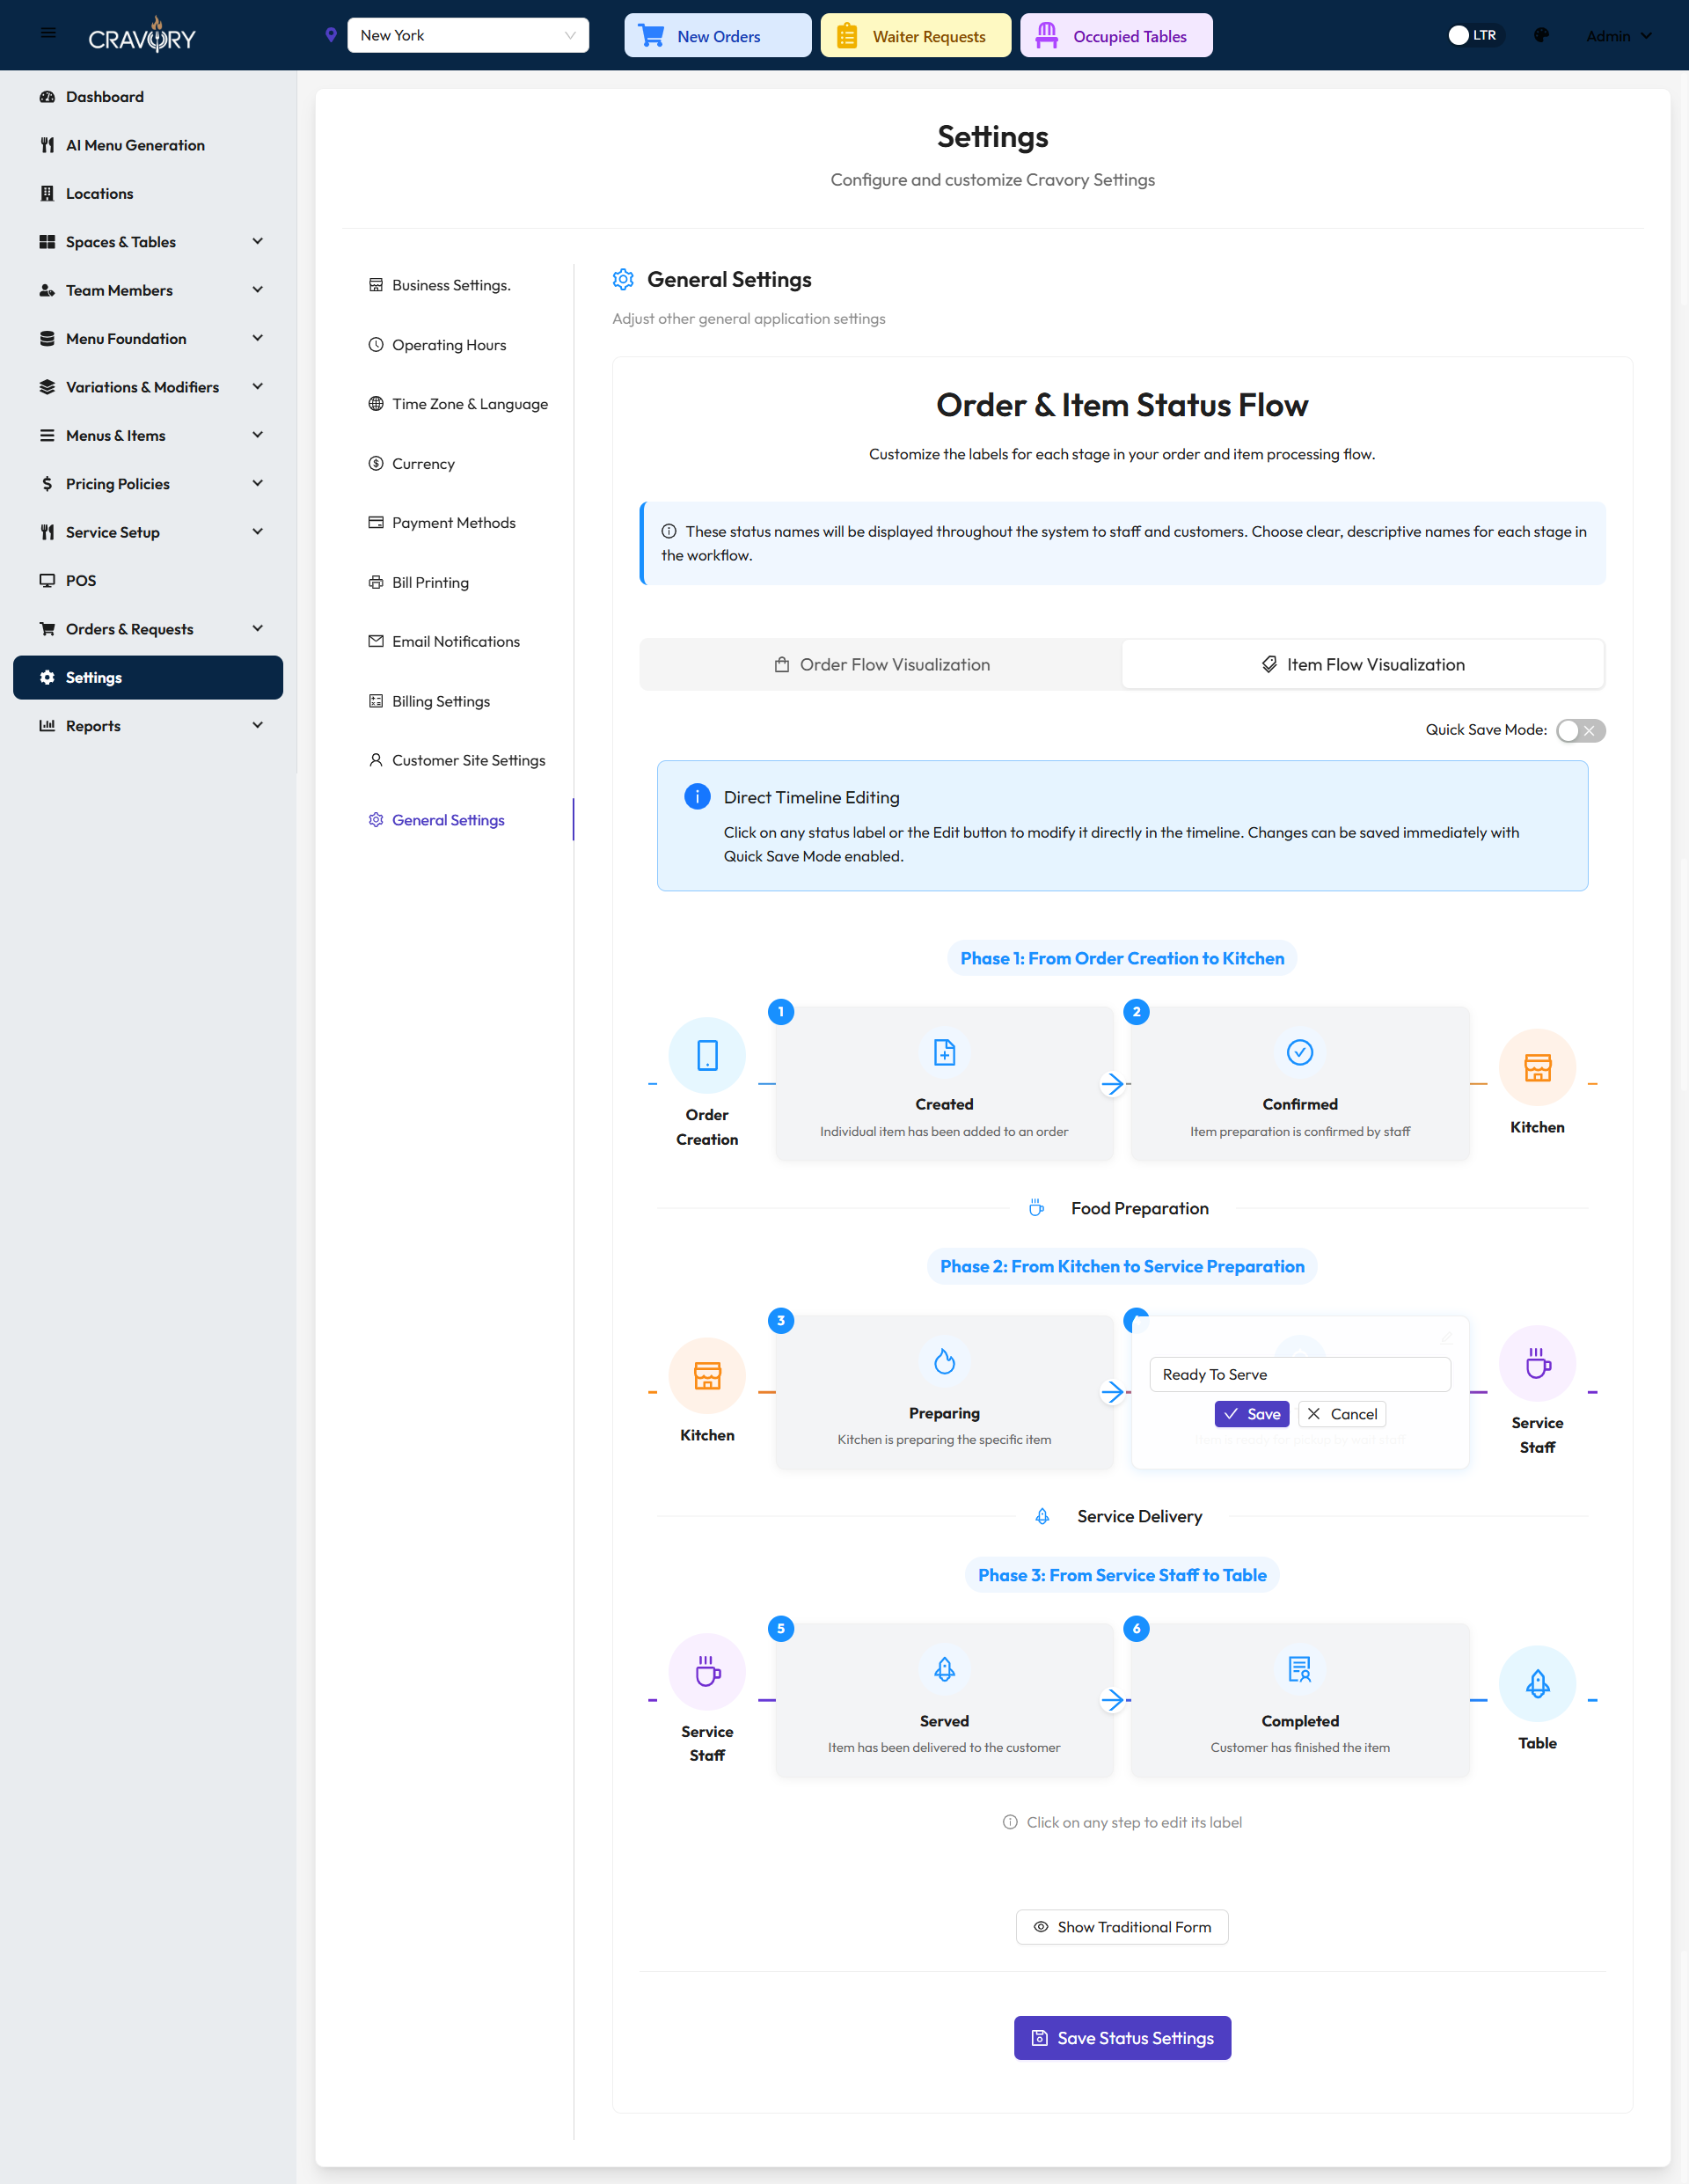
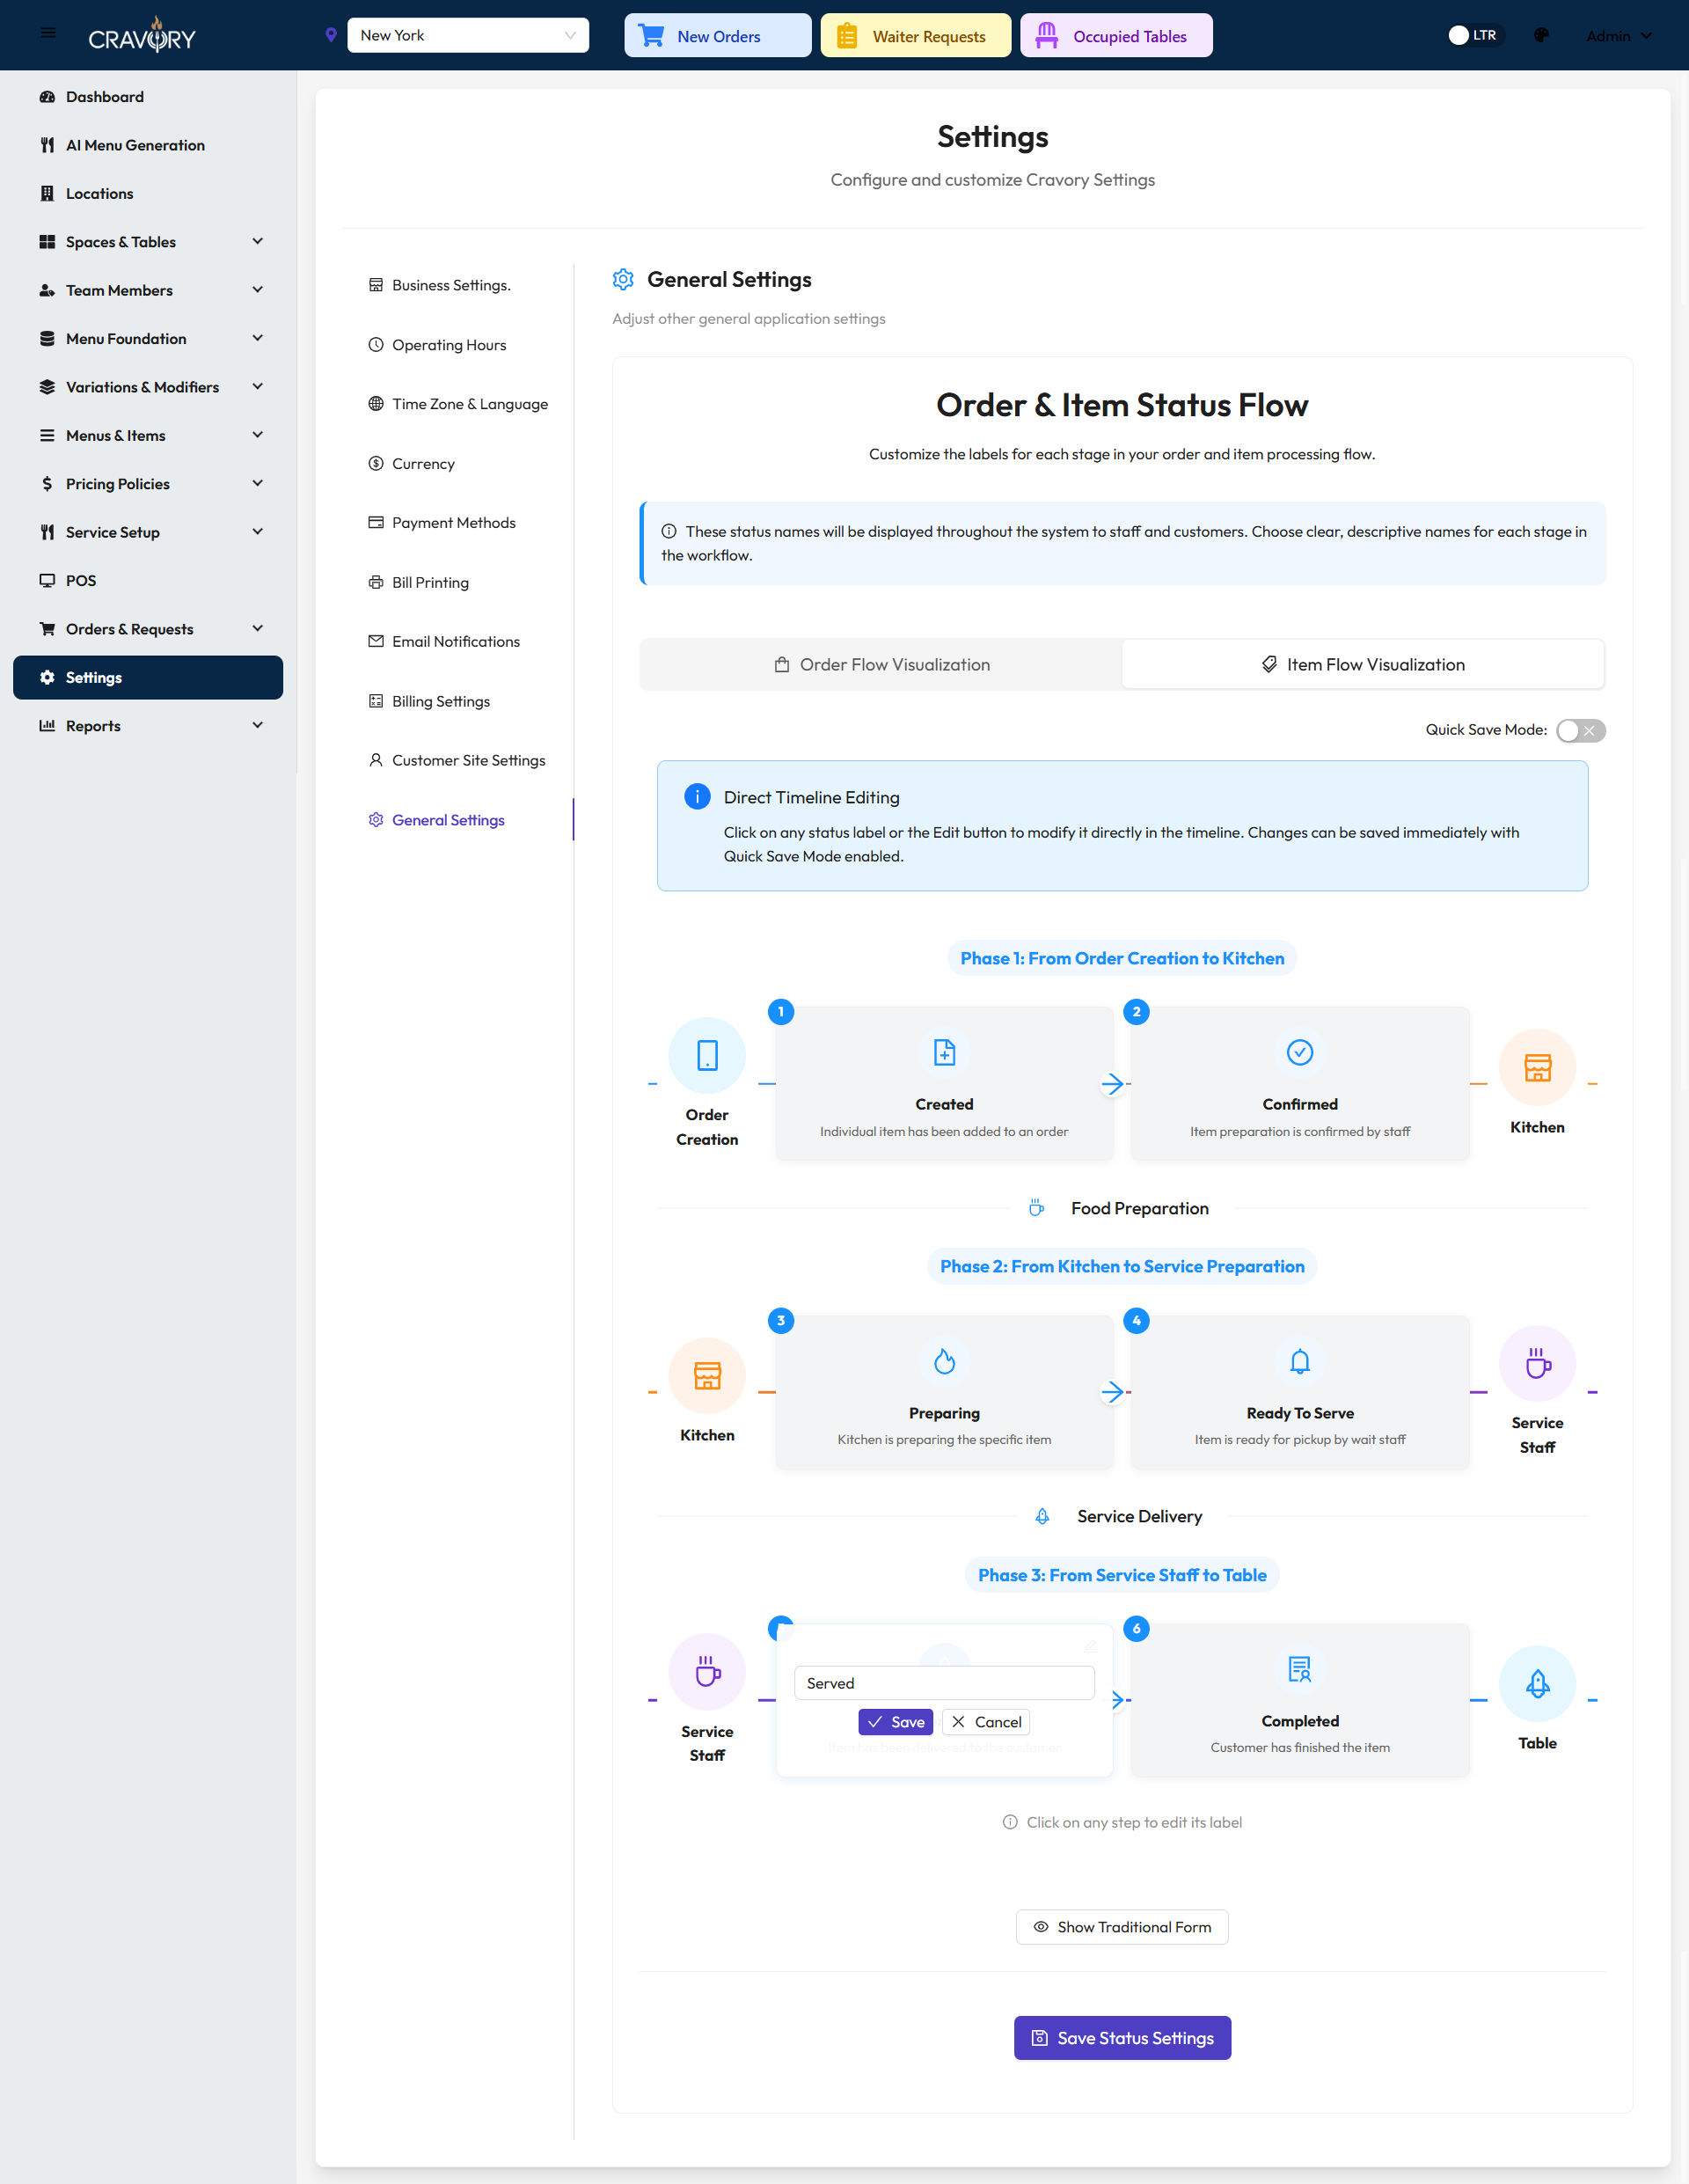
Custom Text for Order Status
Customize the text messages displayed to customers at each stage of the order fulfillment process. QuickDine offers two types of custom text options: one for orders and one for items. Each can be configured using either the traditional UI approach or with a rich visual representation.
Two Ways to Customize Status Text
QuickDine provides flexibility in how you customize status messages with two different interfaces:
- Traditional UI: Simple text input fields for quick edits
- Rich Visual Interface: More detailed customization with visual context
Both methods update the same settings, so choose whichever interface you prefer.
Traditional UI for Status Text Customization
The traditional interface provides a straightforward form with text fields for each status message. This approach is quick and efficient for simple text changes.
1 Order Status Text: Customize text messages for each order status (Created, Confirmed, Preparing, etc.) using simple text fields.
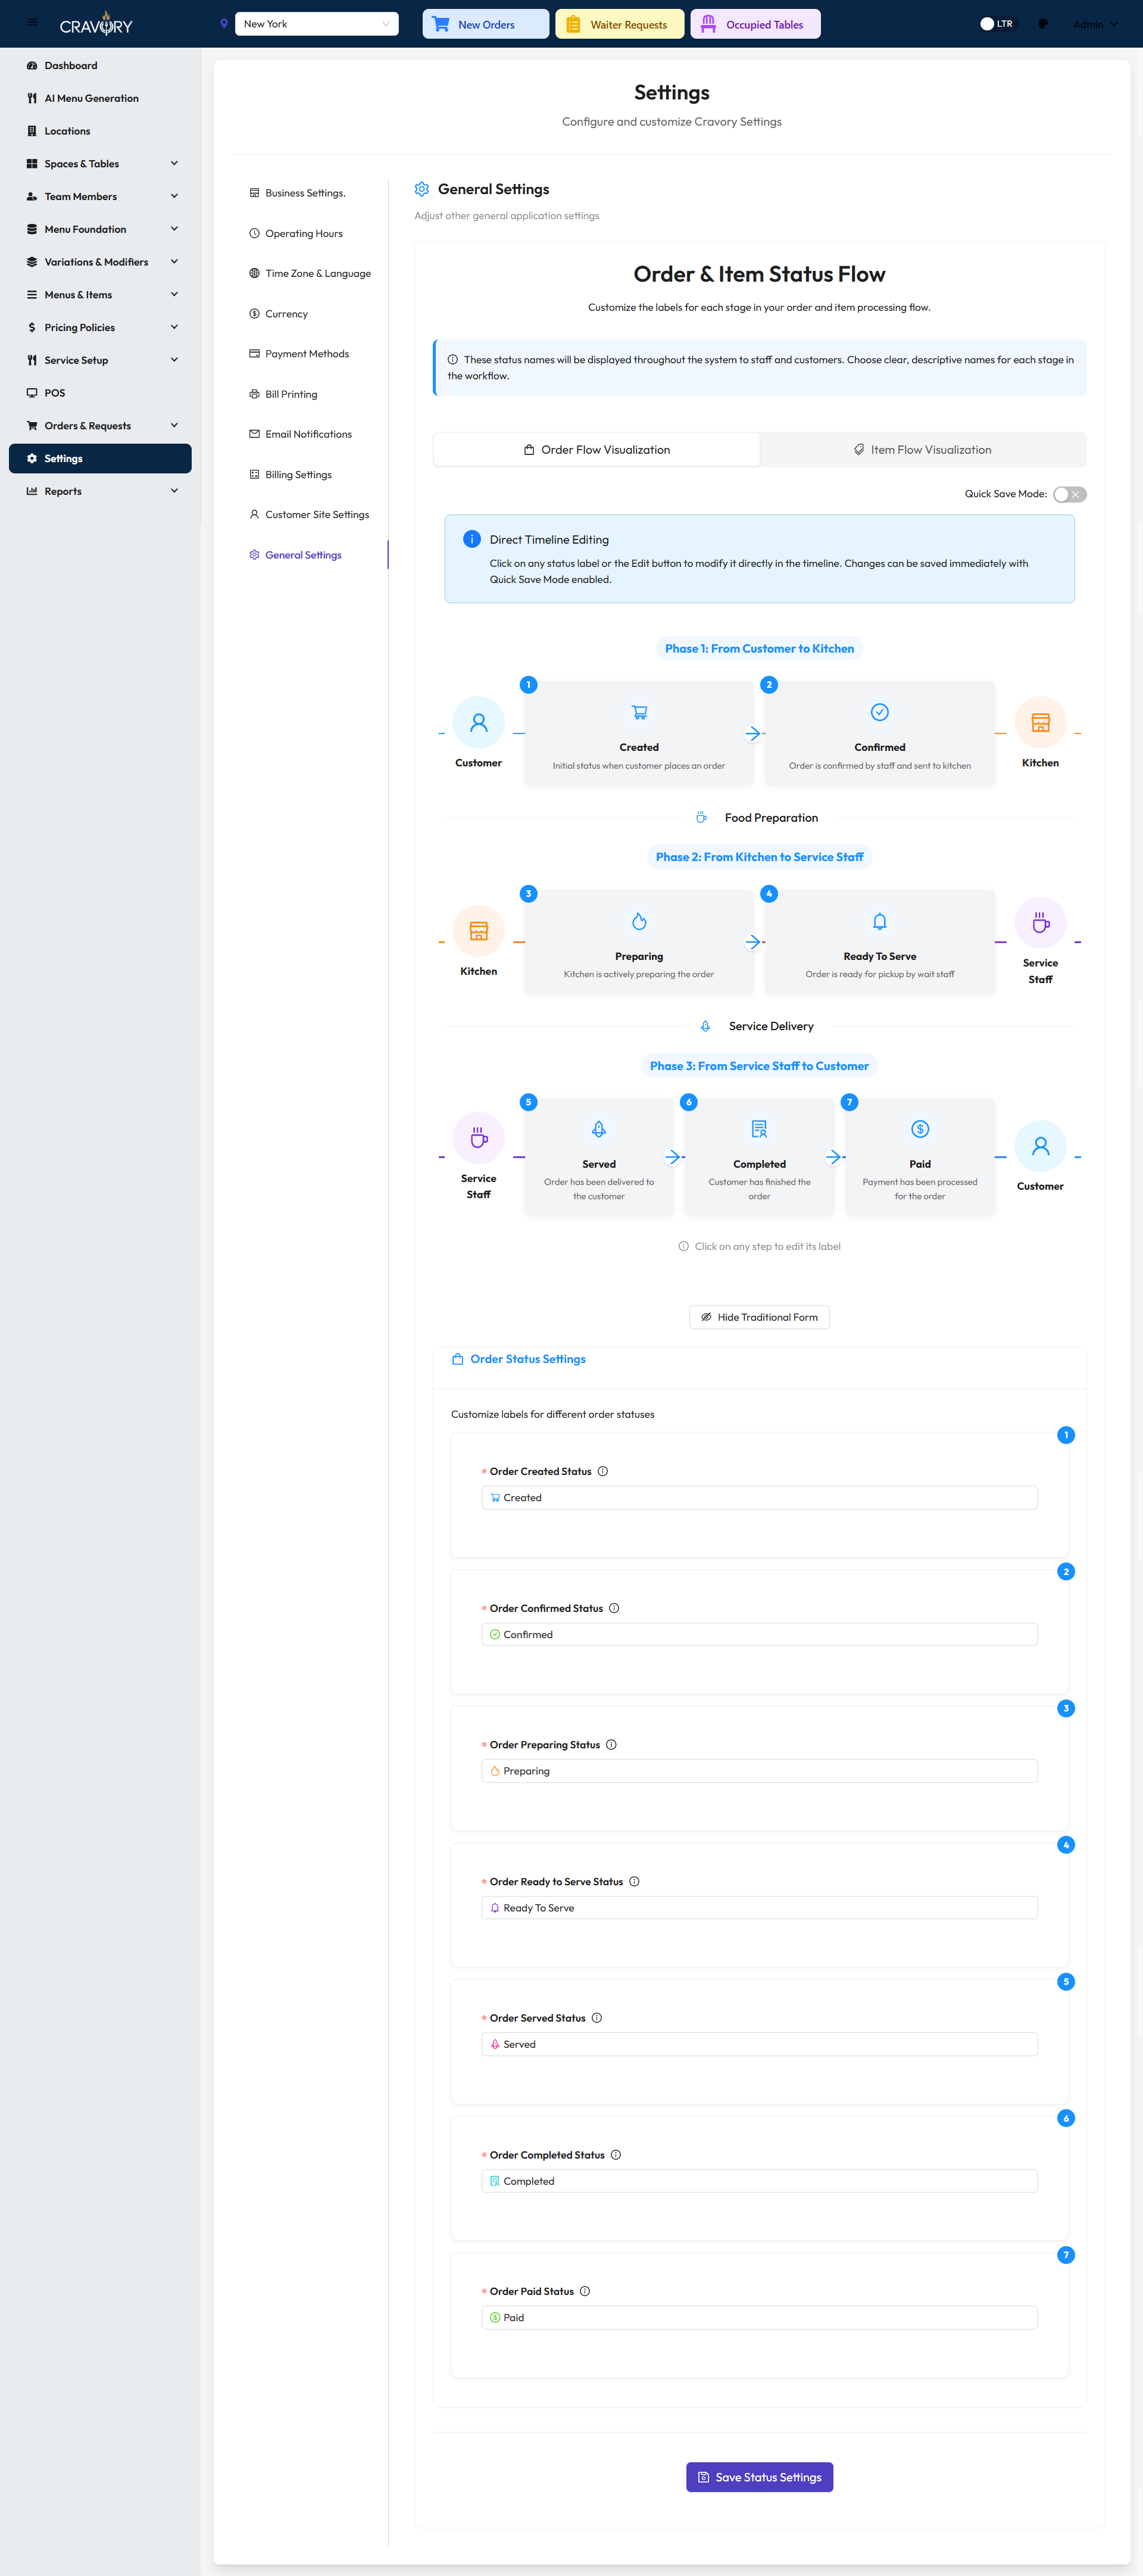
Traditional UI for Order Status Text Customization
2 Item Status Text: Similarly, customize the text displayed for individual item statuses through the traditional interface.
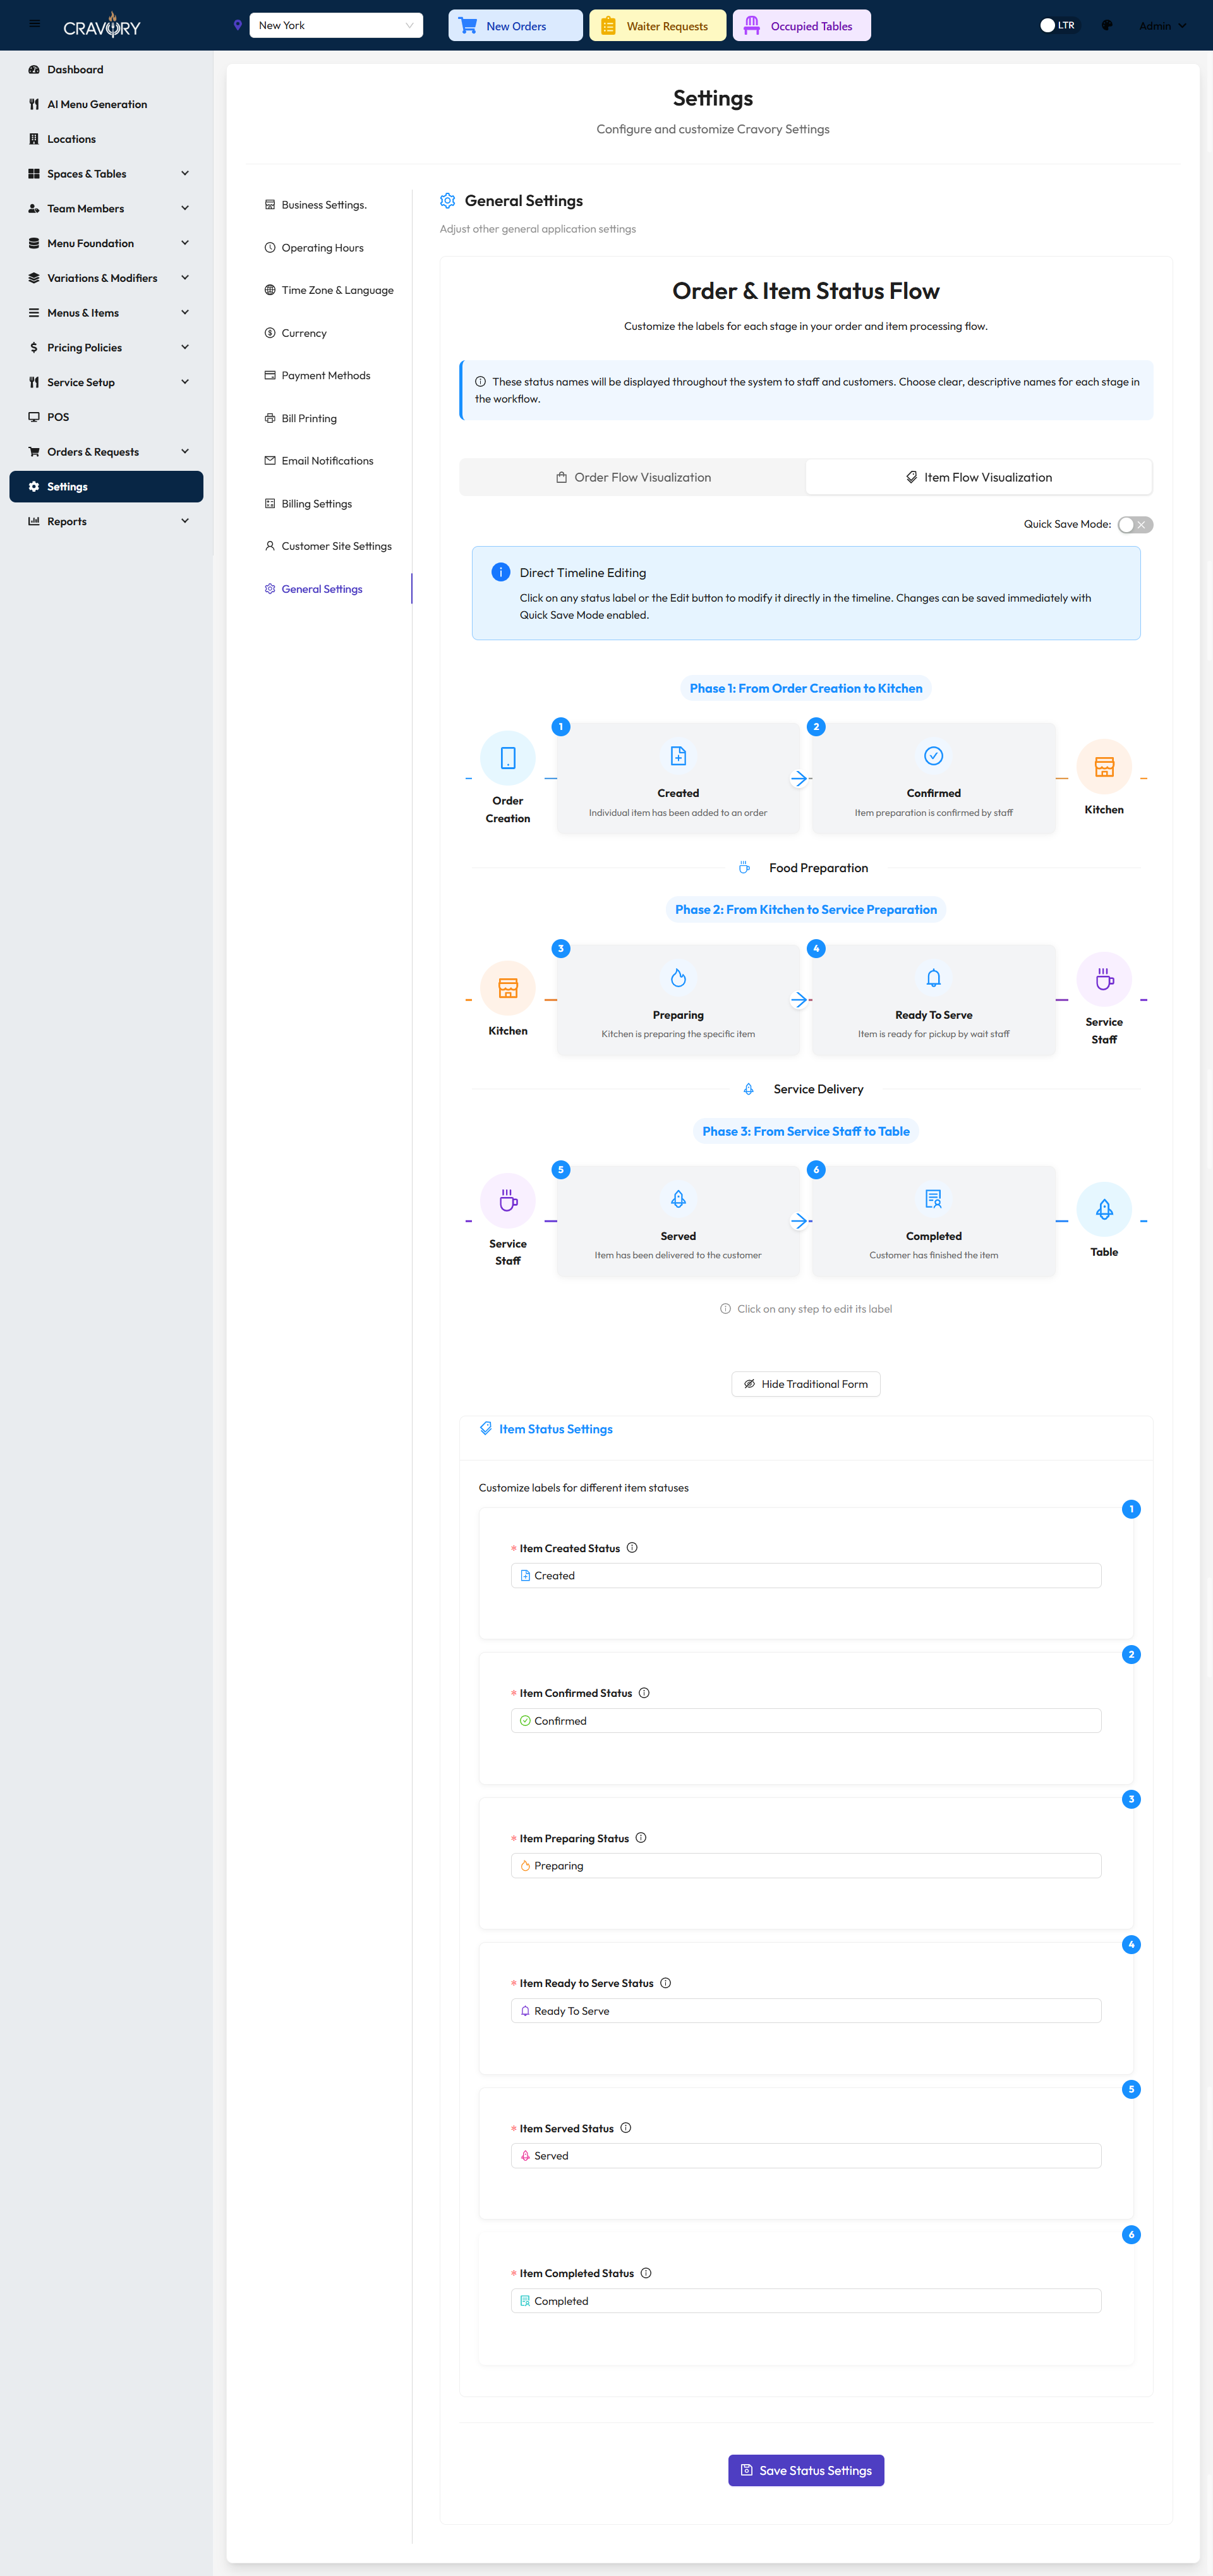
Traditional UI for Item Status Text Customization
Quick Access: The traditional UI is ideal for making quick text changes without the need for detailed context. Access these settings through Settings > General > Order Status Text.
Rich Visual Representation for Order Status
The rich visual interface provides additional context for each status, showing where and how the status messages appear in the customer and staff interfaces.
1 Order Created: This status appears when an order is created by users from the customer website, POS manager, or waiter.
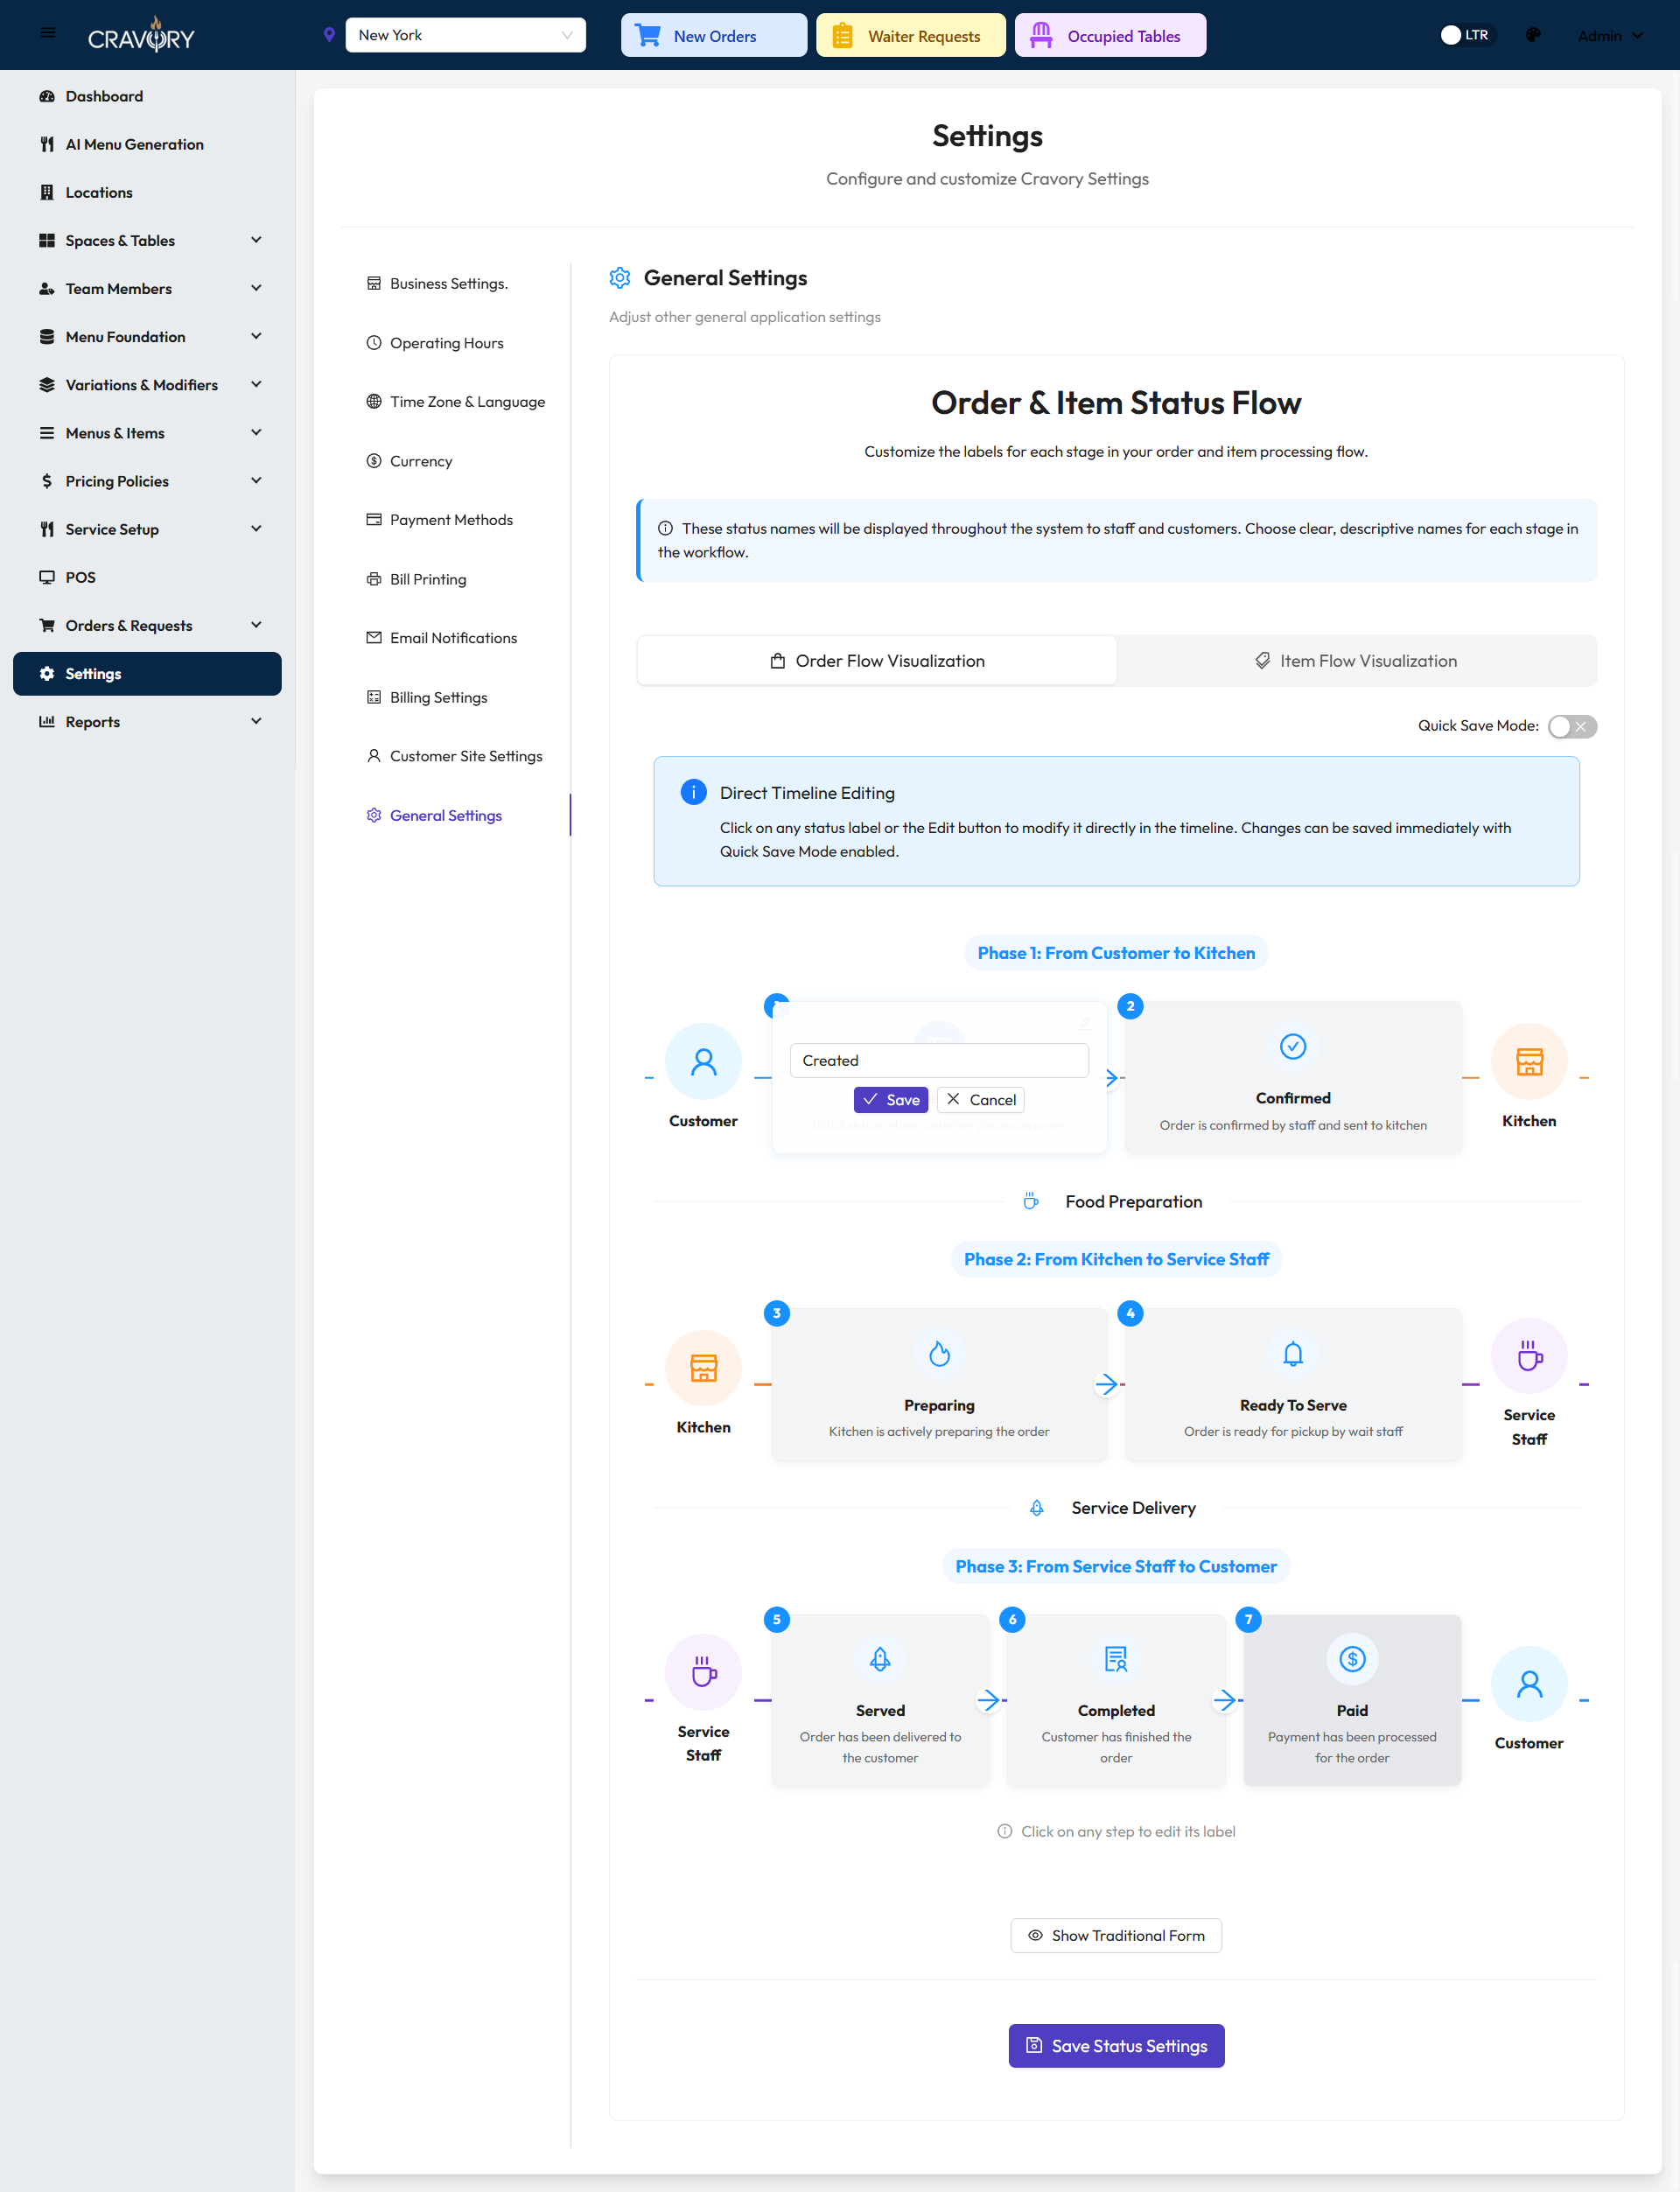
Rich UI for "Order Created" Status Text
2 Order Confirmed: This status appears when an order is confirmed by a manager or waiter.
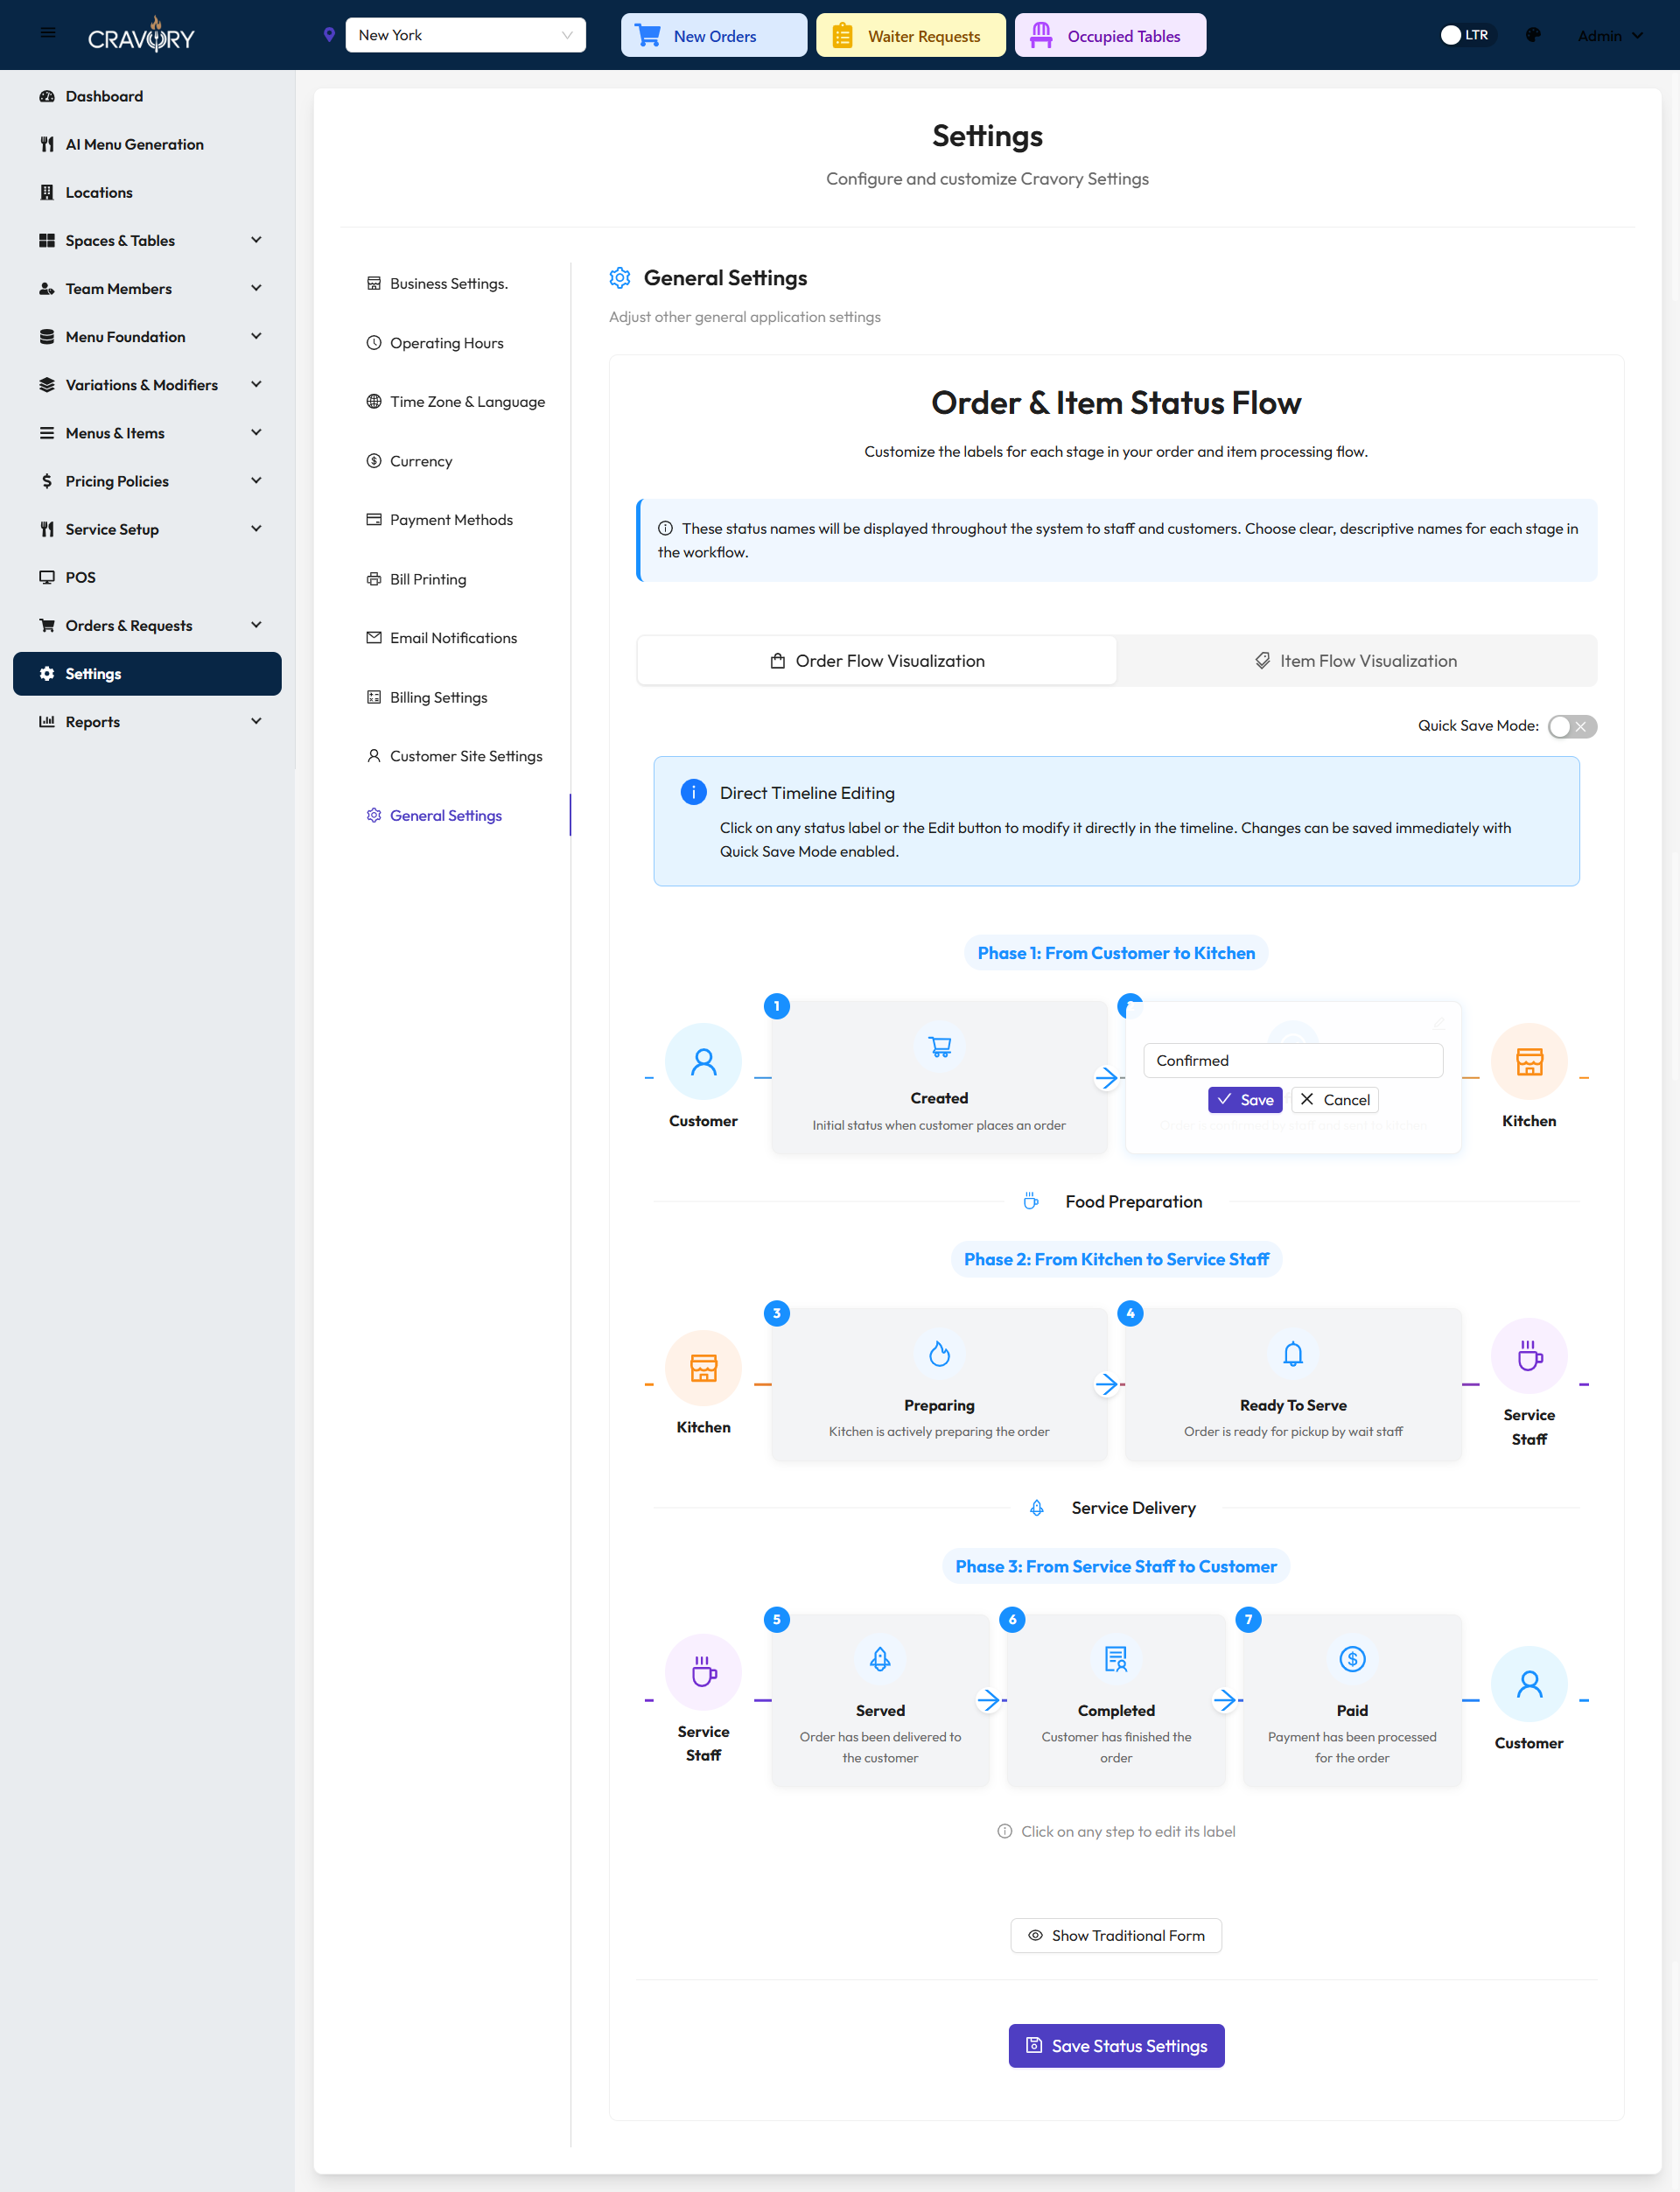
Rich UI for "Order Confirmed" Status Text
3 Order Preparing: This status appears when an order is sent to the kitchen.
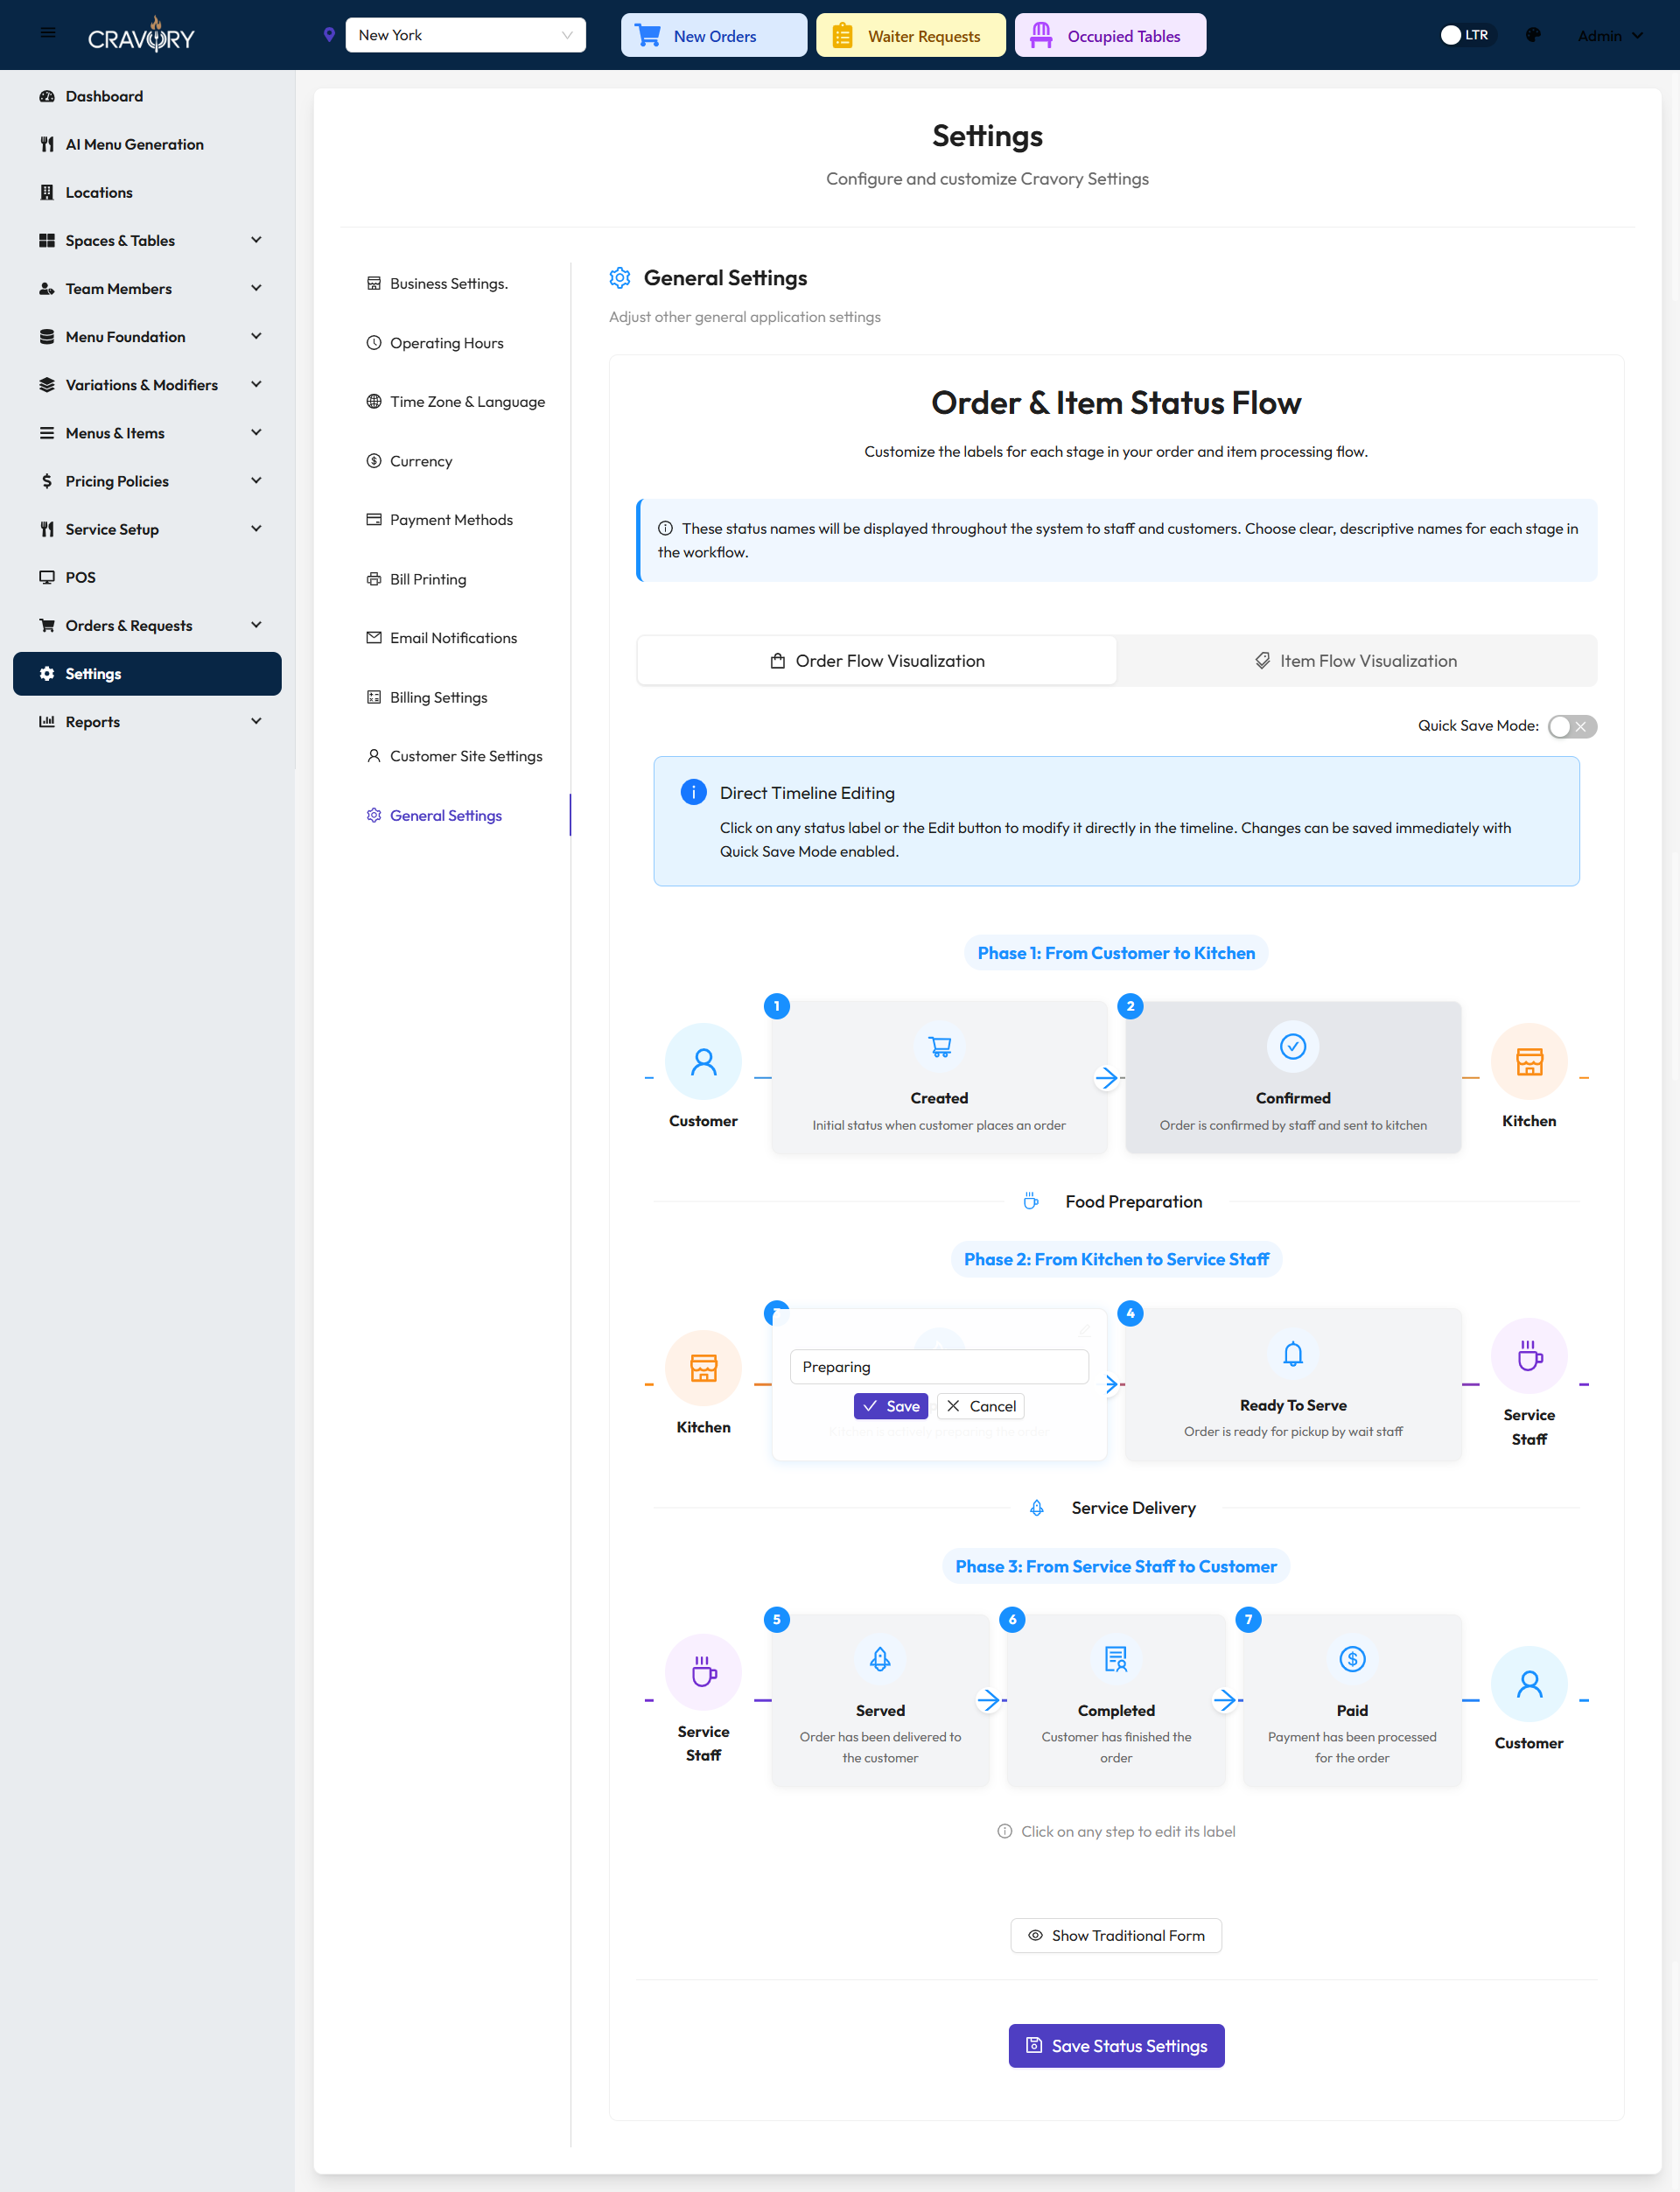
Rich UI for "Order Preparing" Status Text
4 Ready to Serve: This status indicates that the kitchen has prepared the order and it's ready to be served.
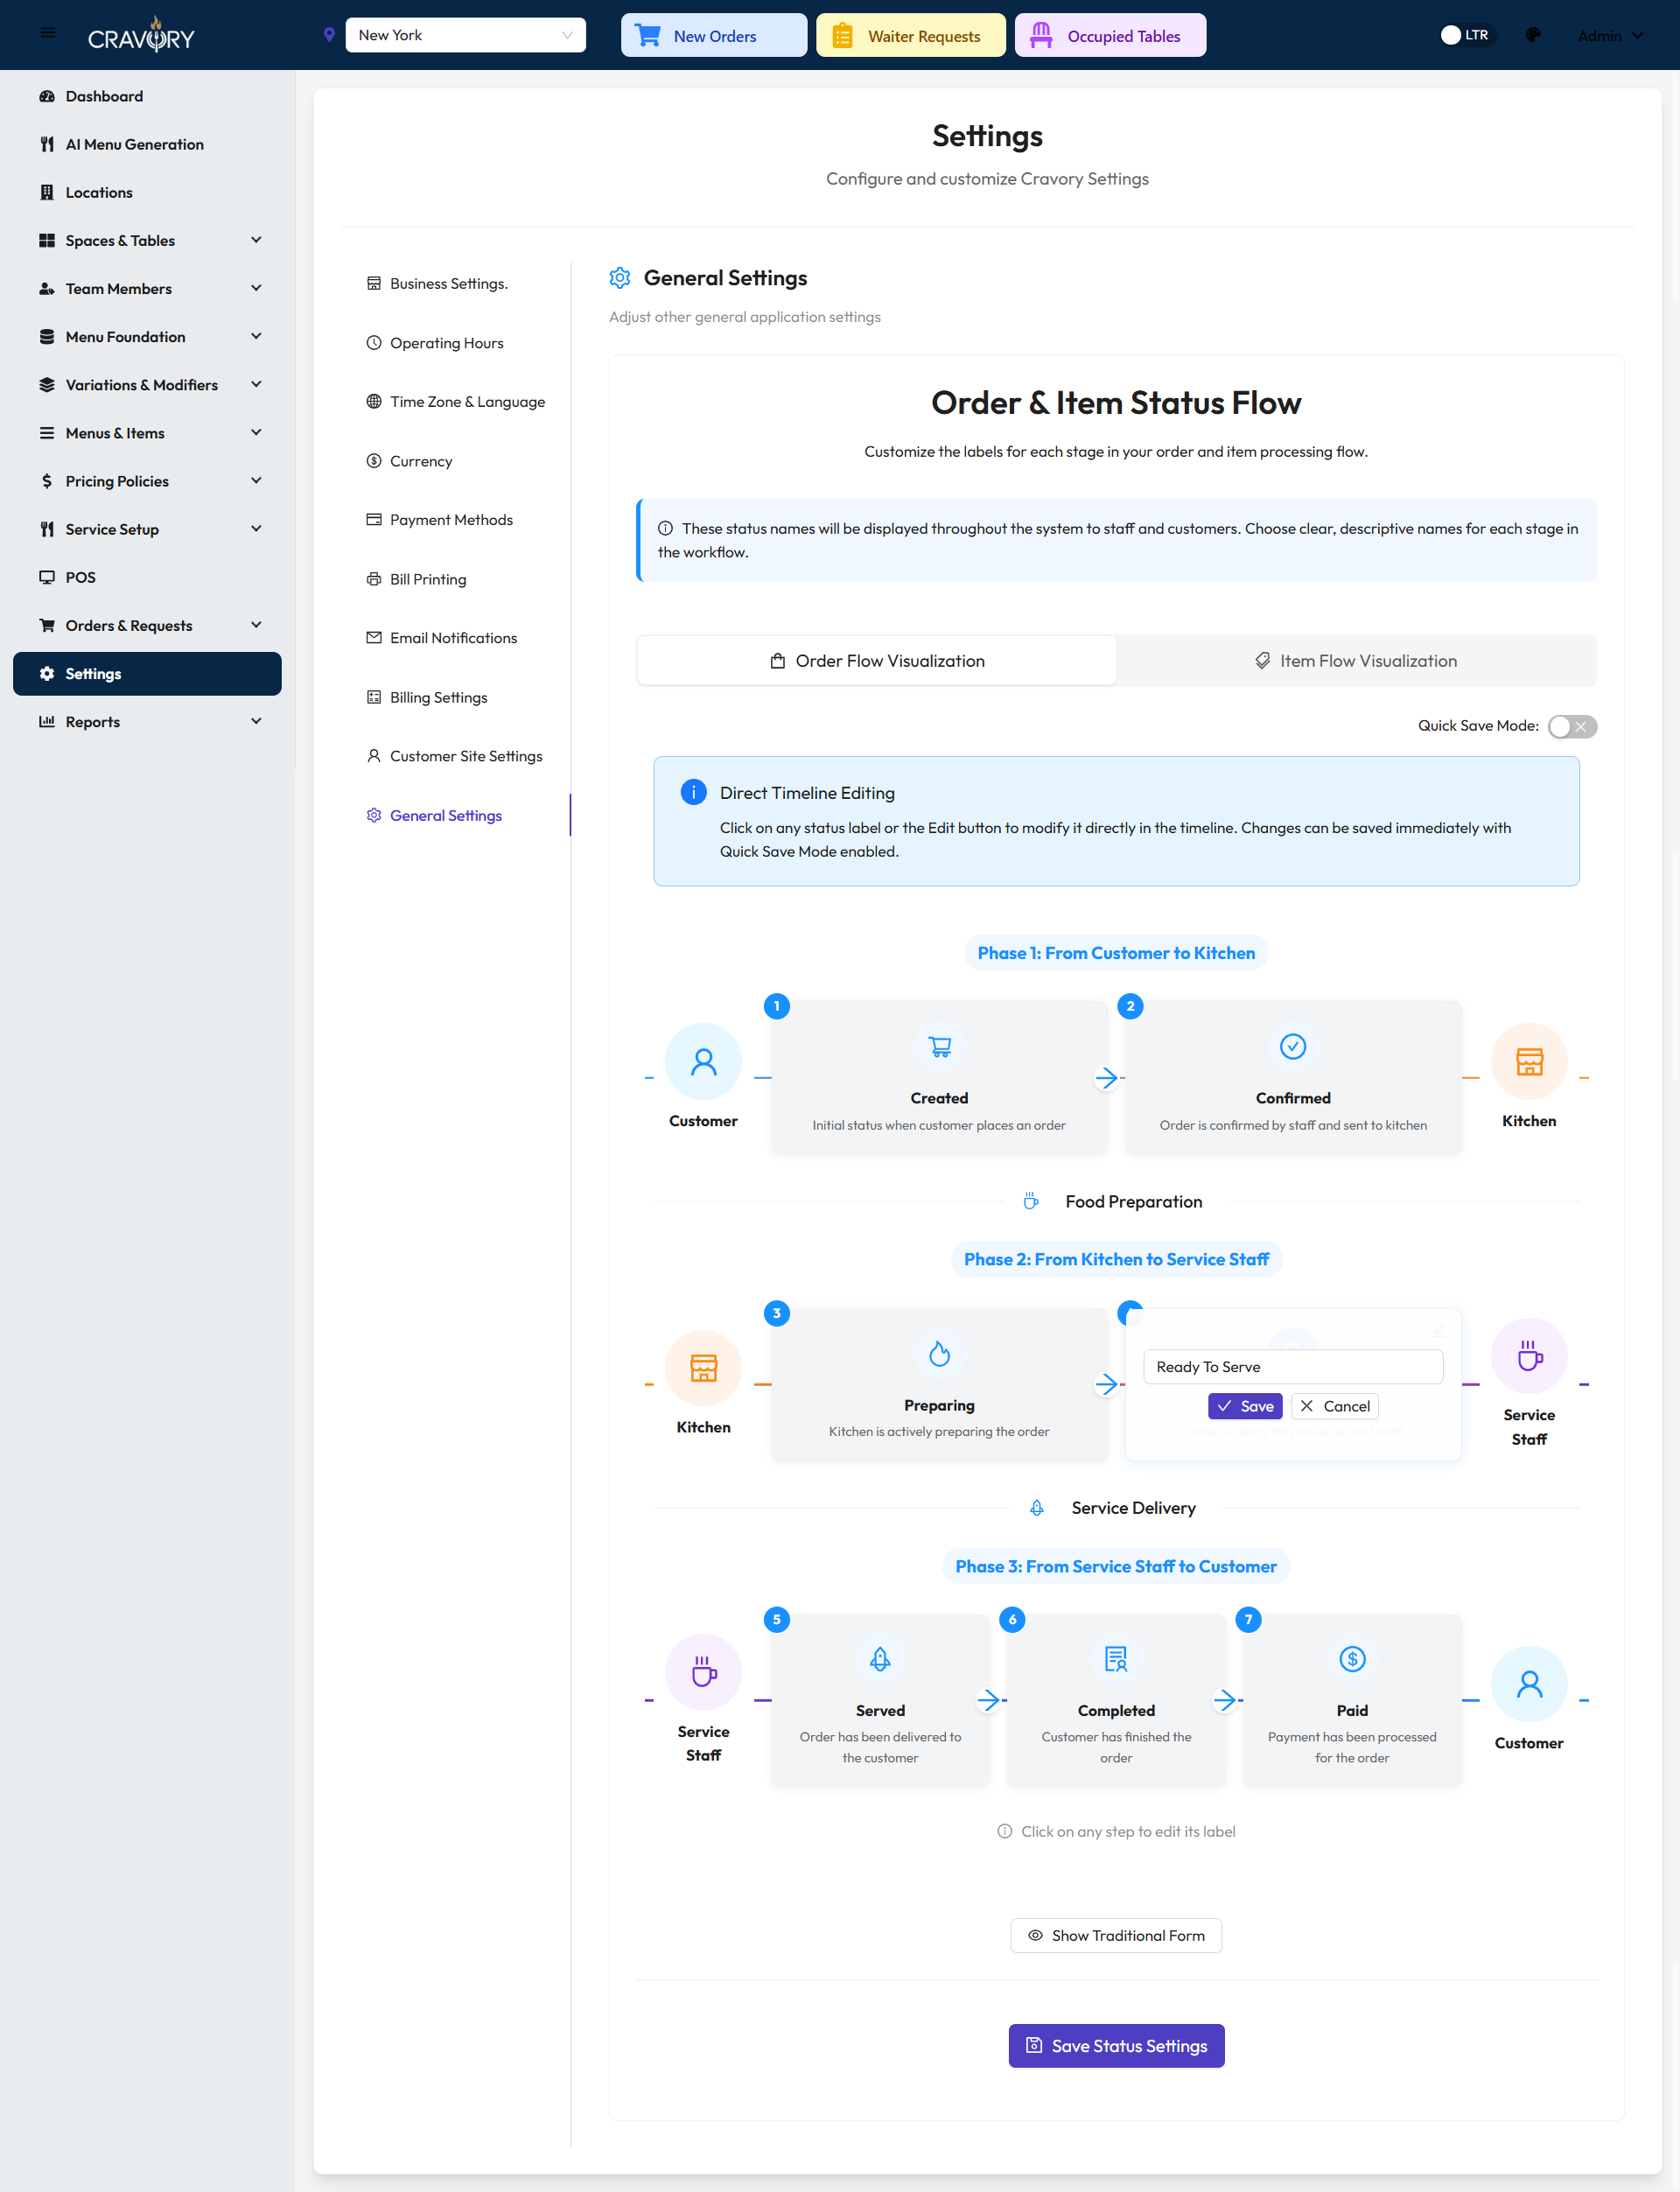
Rich UI for "Ready to Serve" Status Text
5 Order Served: This status is set by waiters or managers when the order has been delivered to the customer.
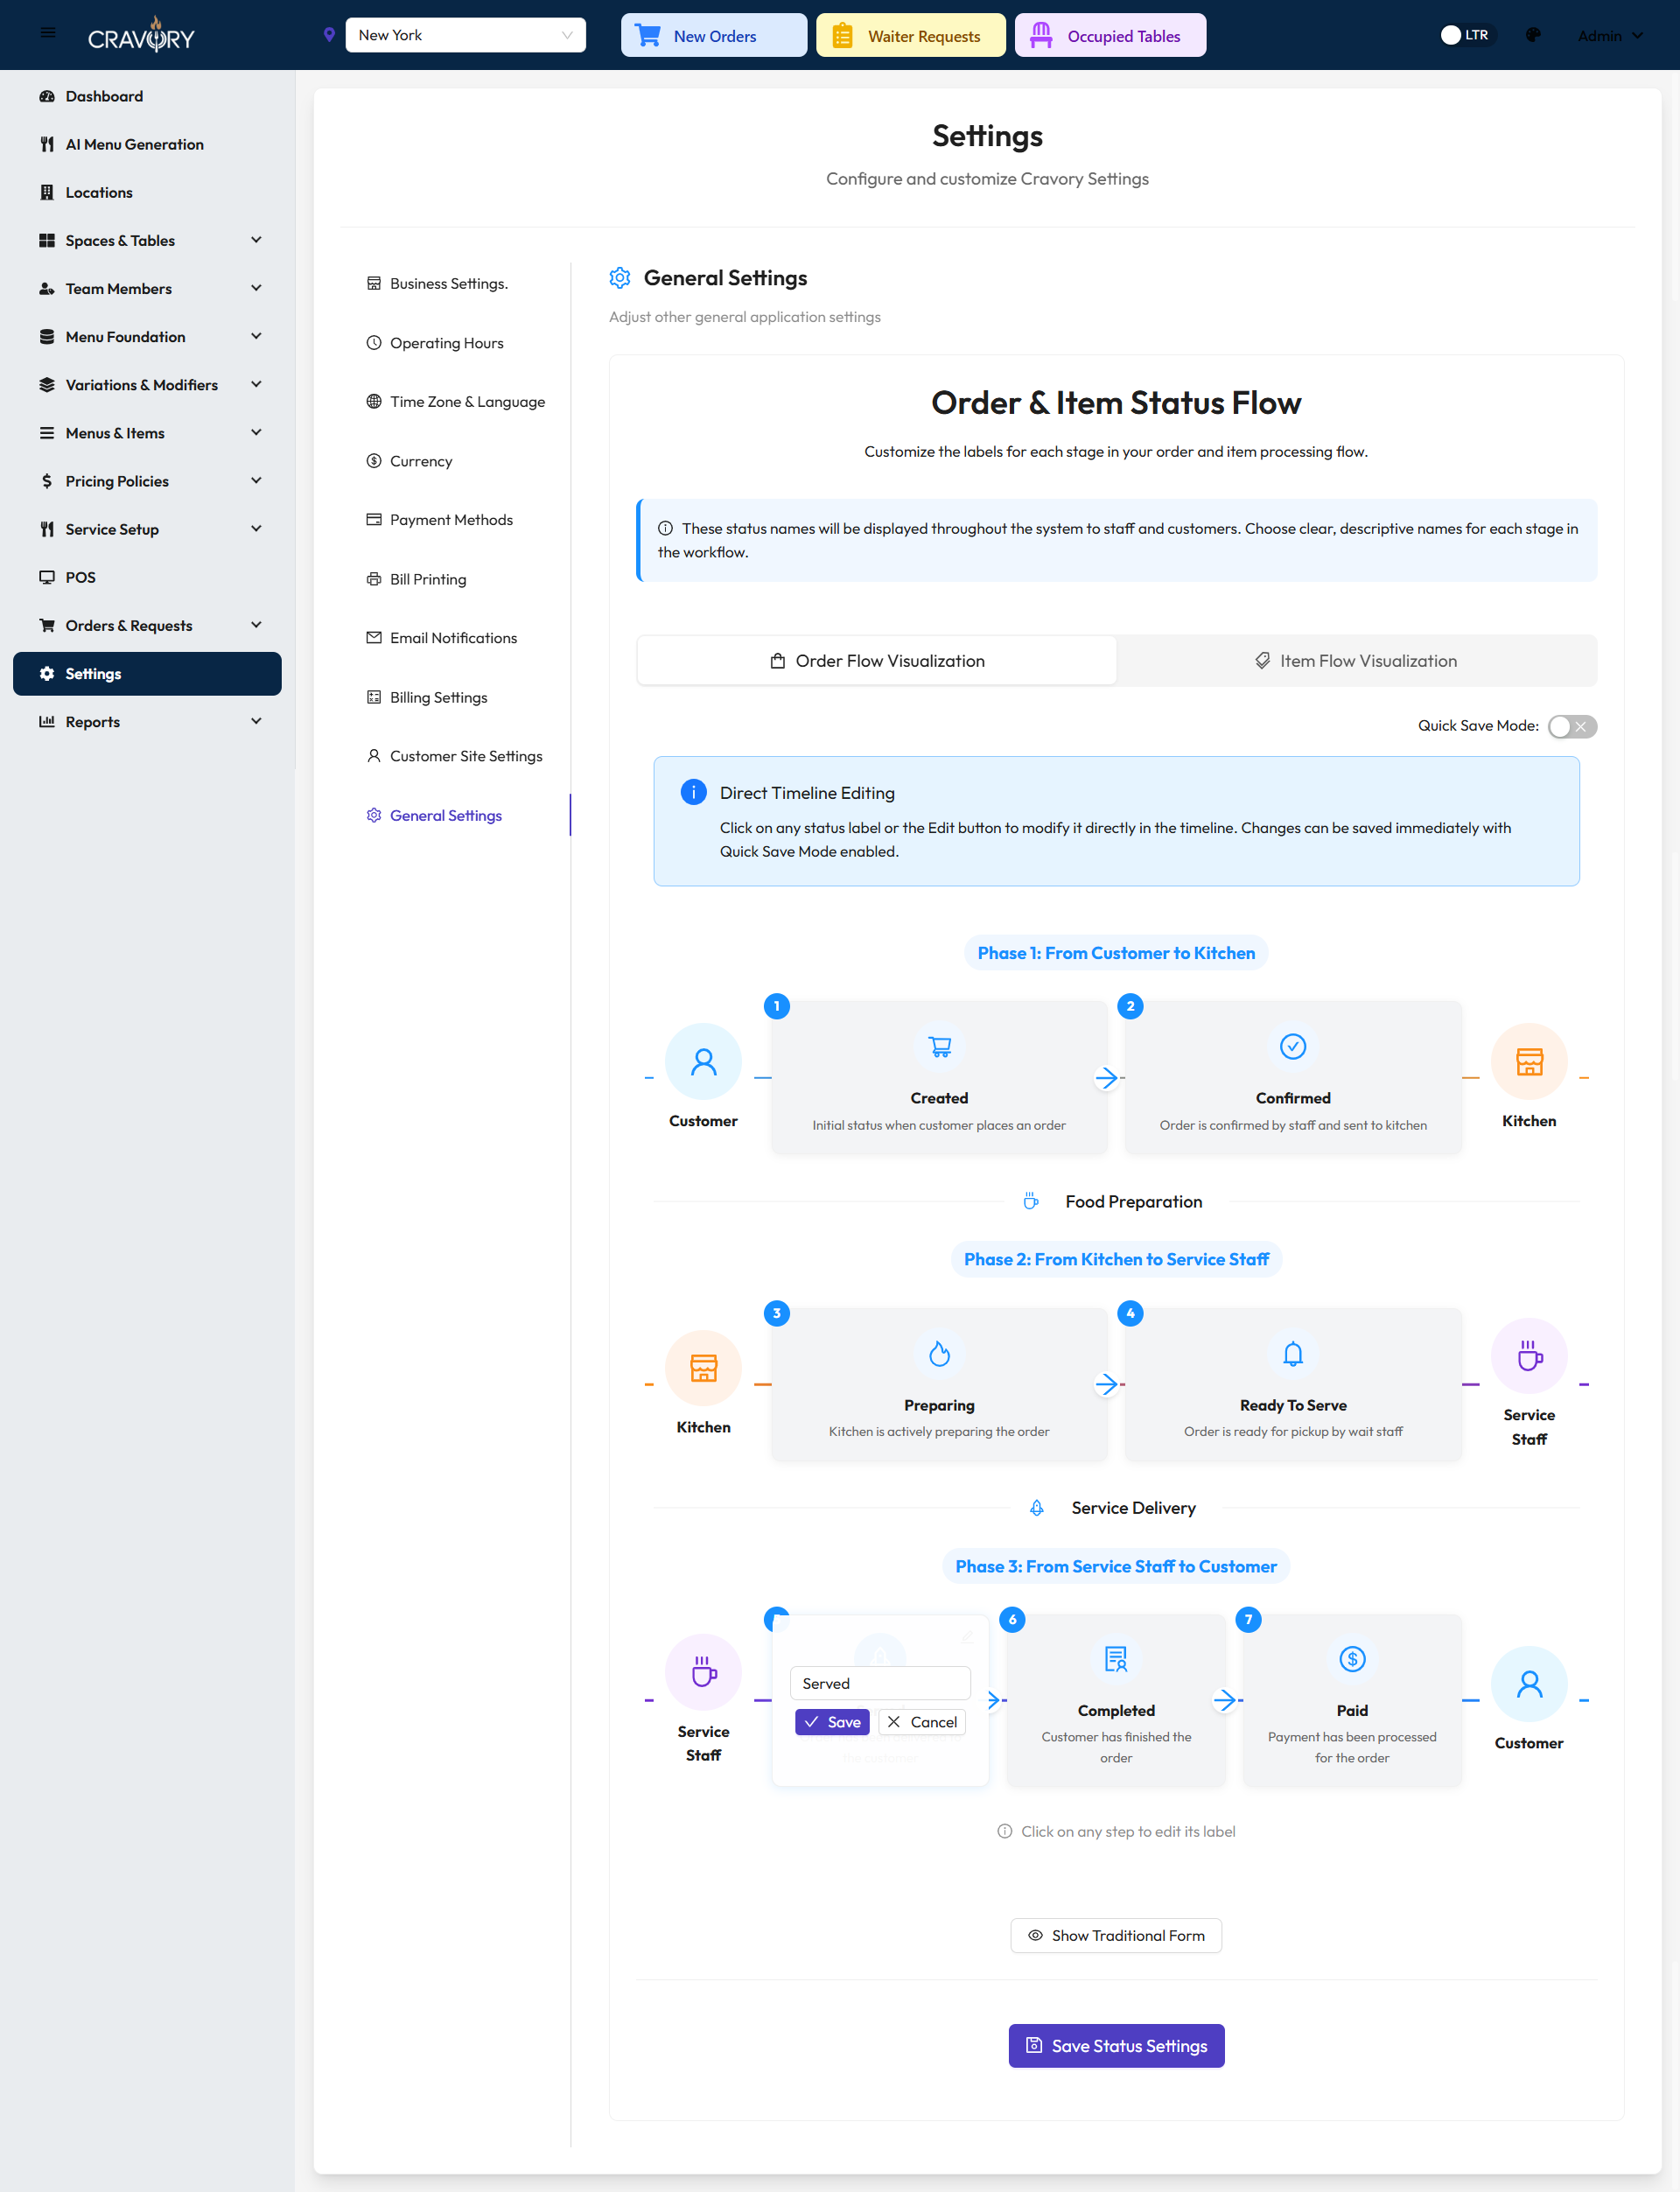
Rich UI for "Order Served" Status Text
6 Order Completed: This status is changed by waiters or managers when an order is fully completed.
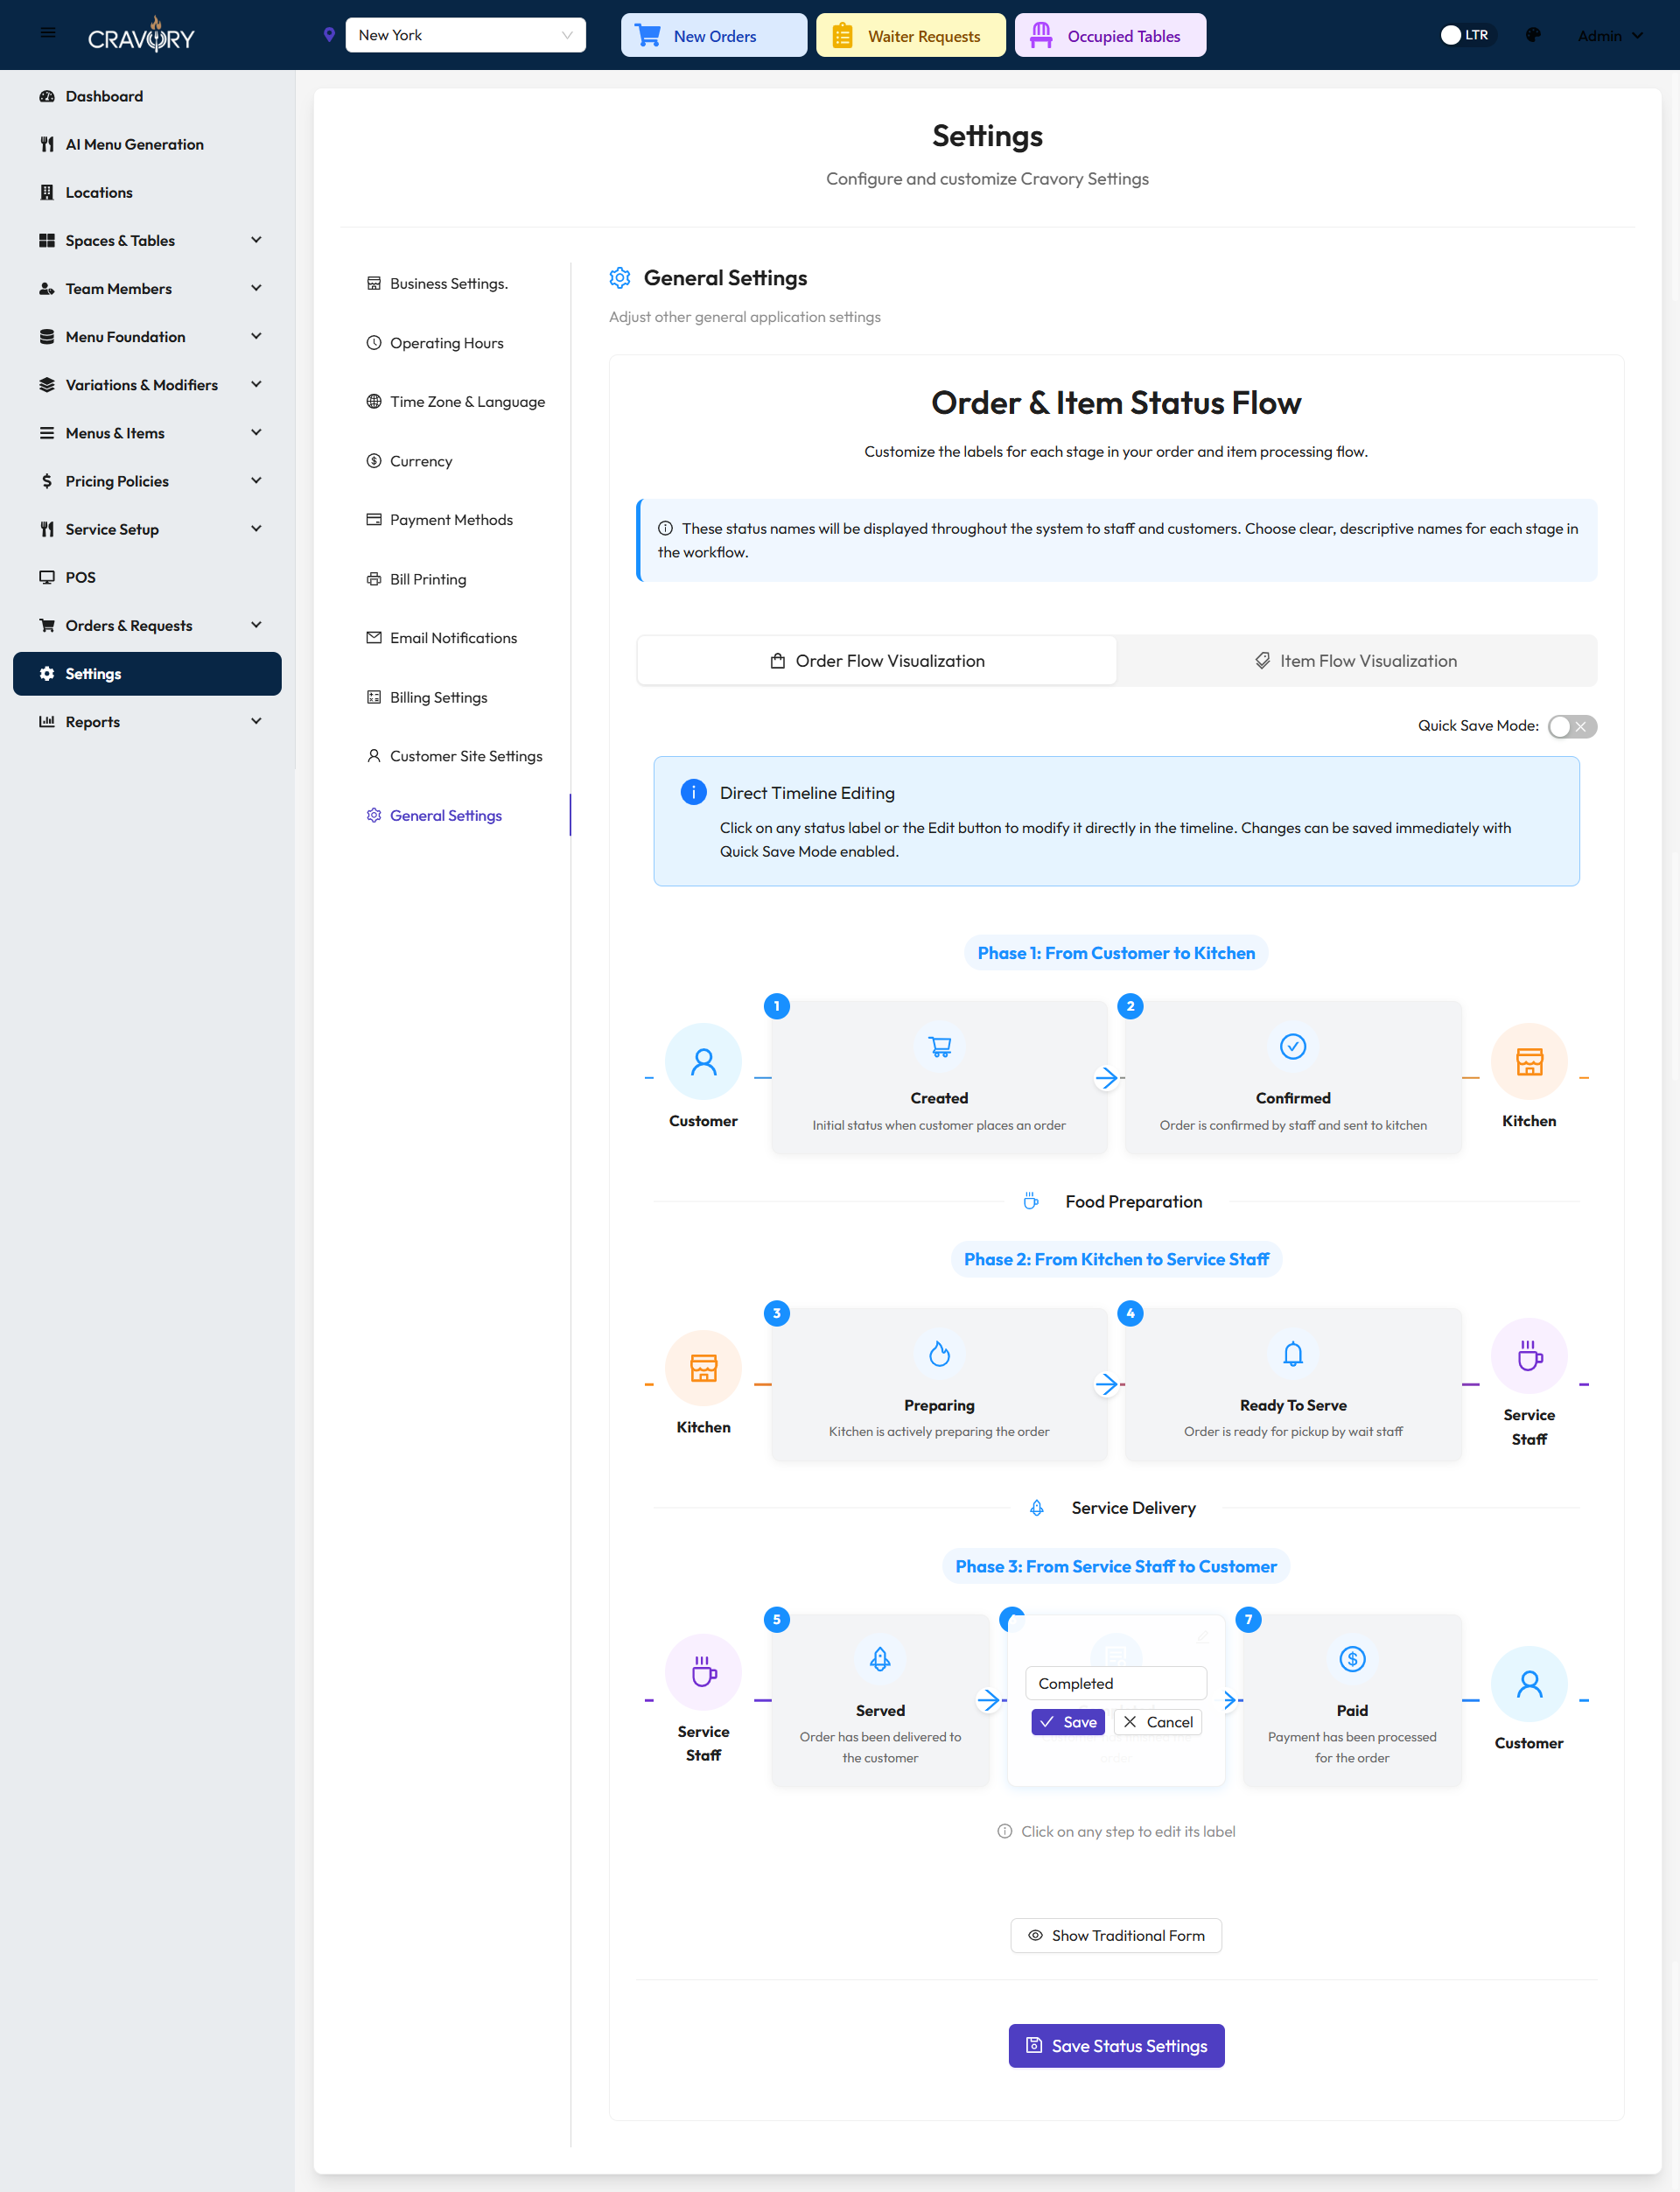
Rich UI for "Order Completed" Status Text
7 Order Paid: This status is changed by managers when payment for an order has been received.
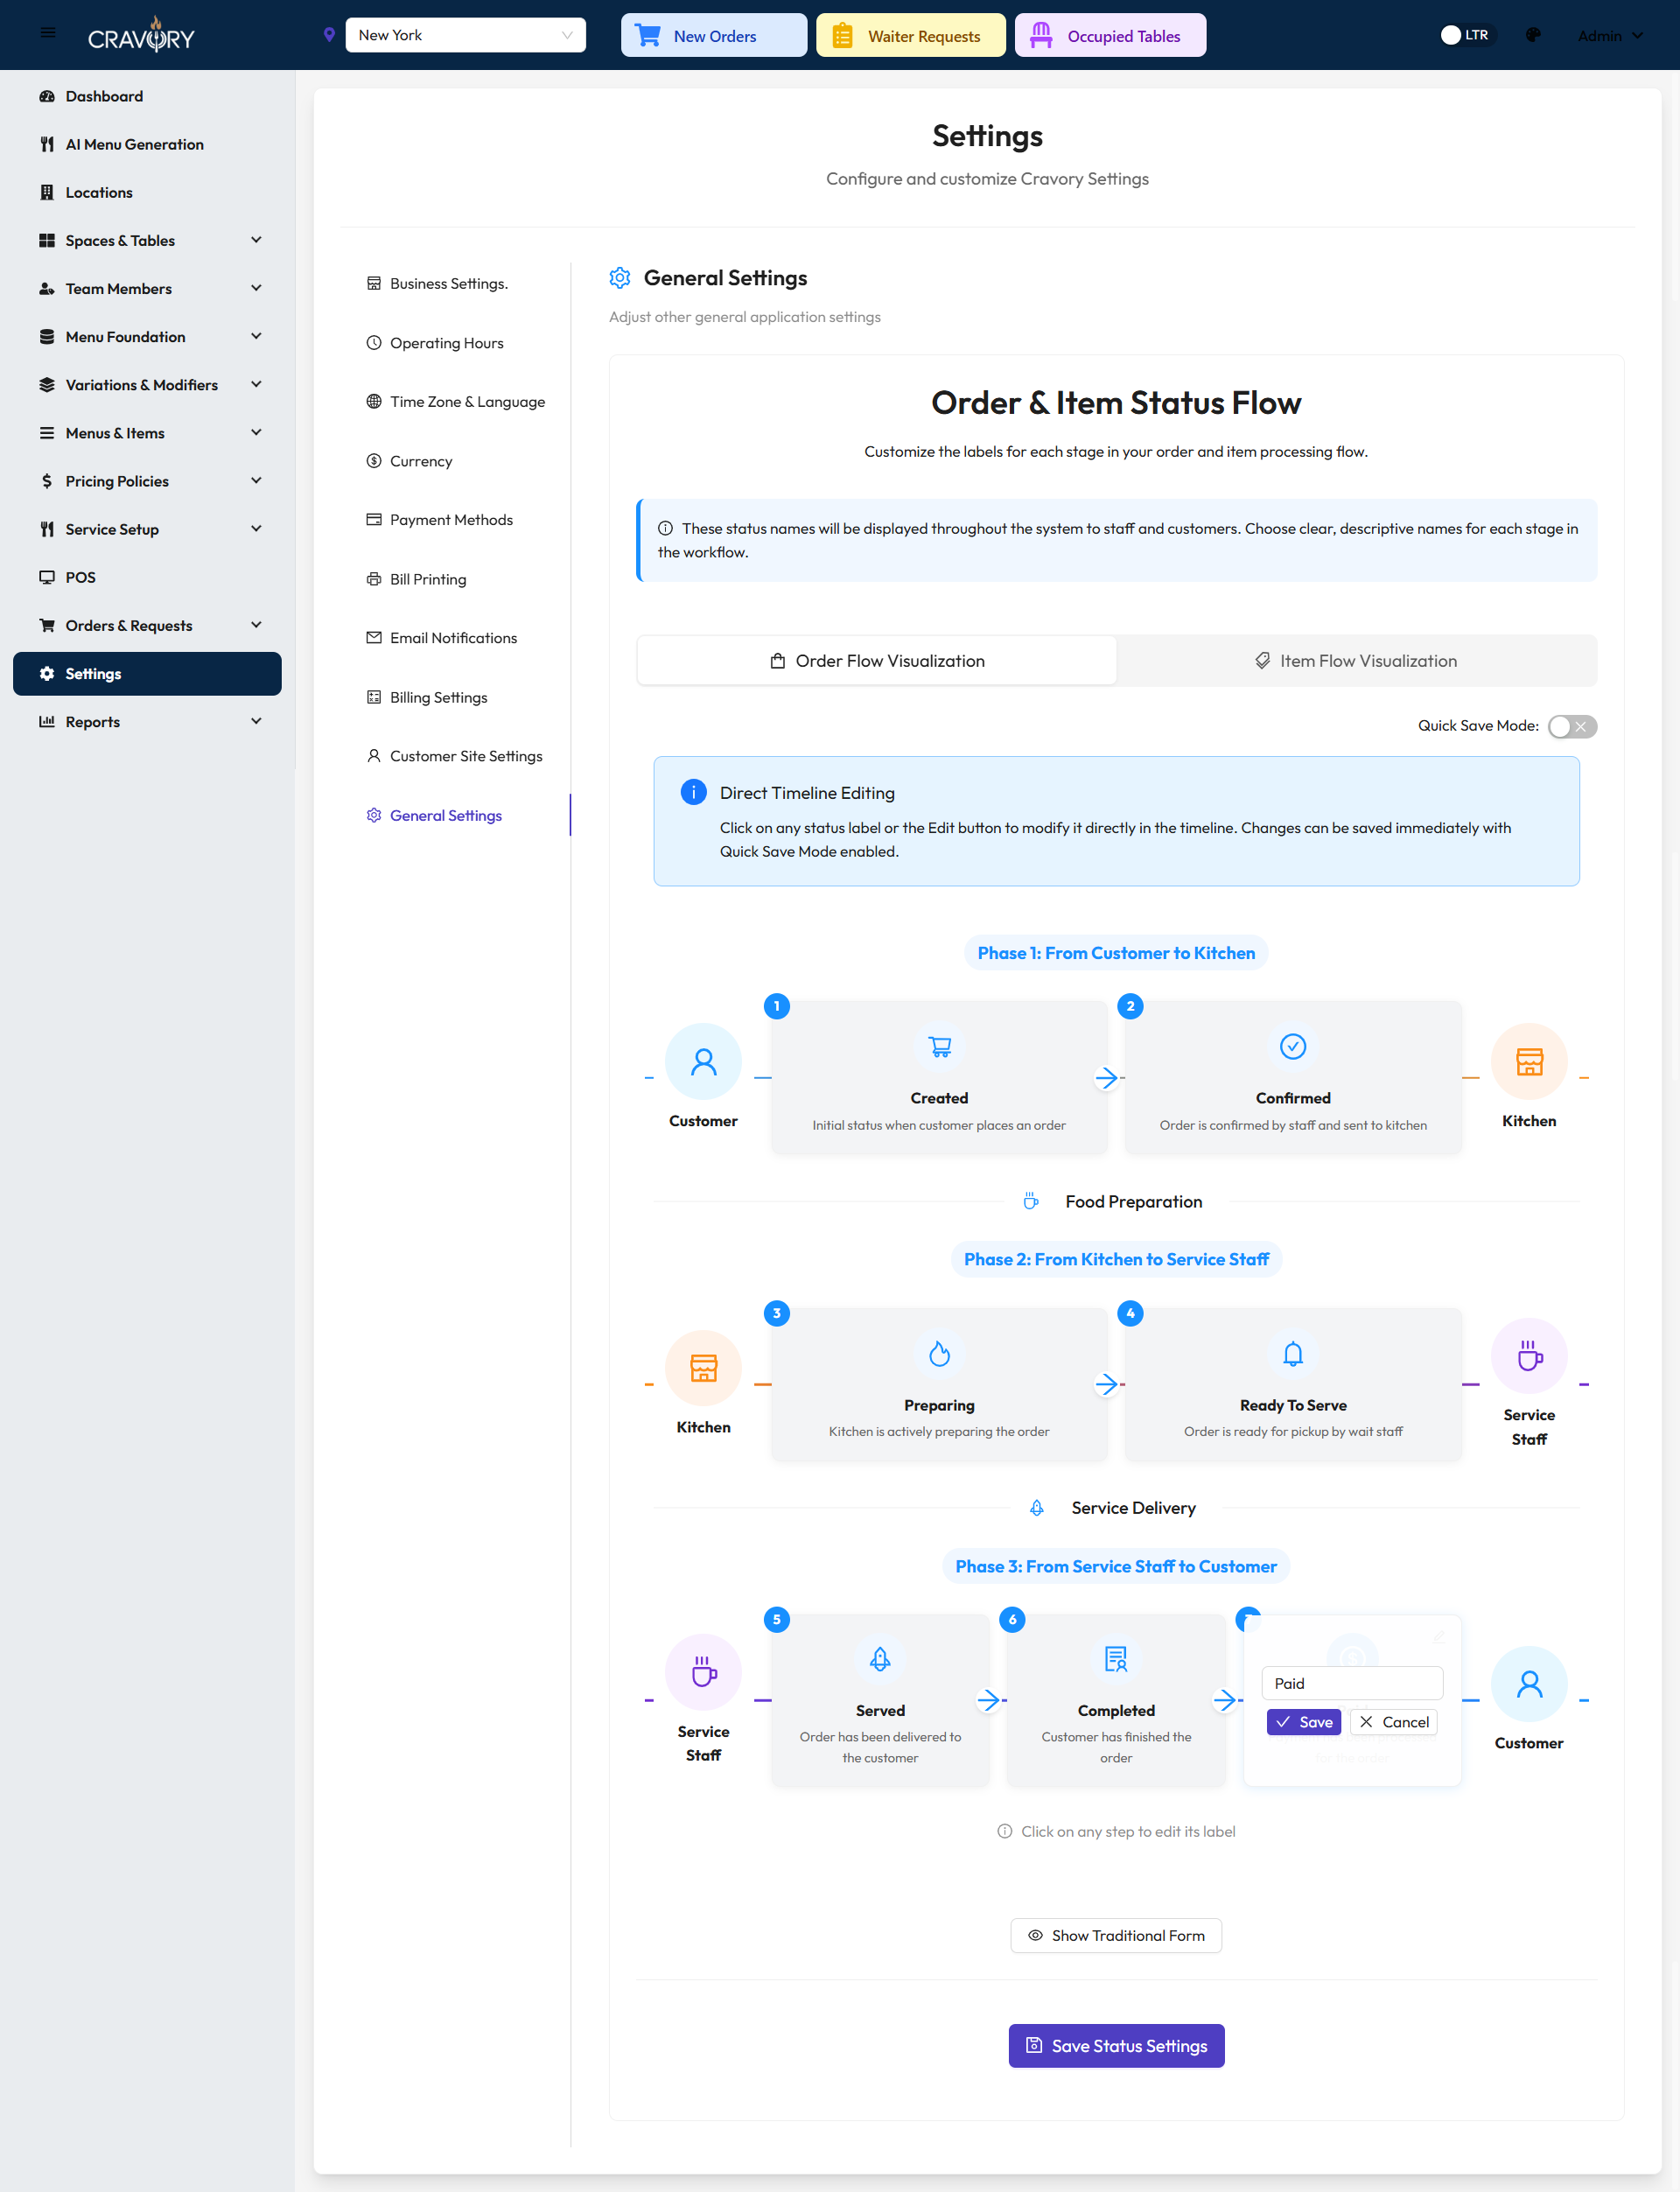
Rich UI for "Order Paid" Status Text
Rich Visual Representation for Item Status
The visual interface also allows you to customize status messages for individual items within an order, providing granular control over customer communications.
1 Items Created: This status appears when items are added to an order during order creation.
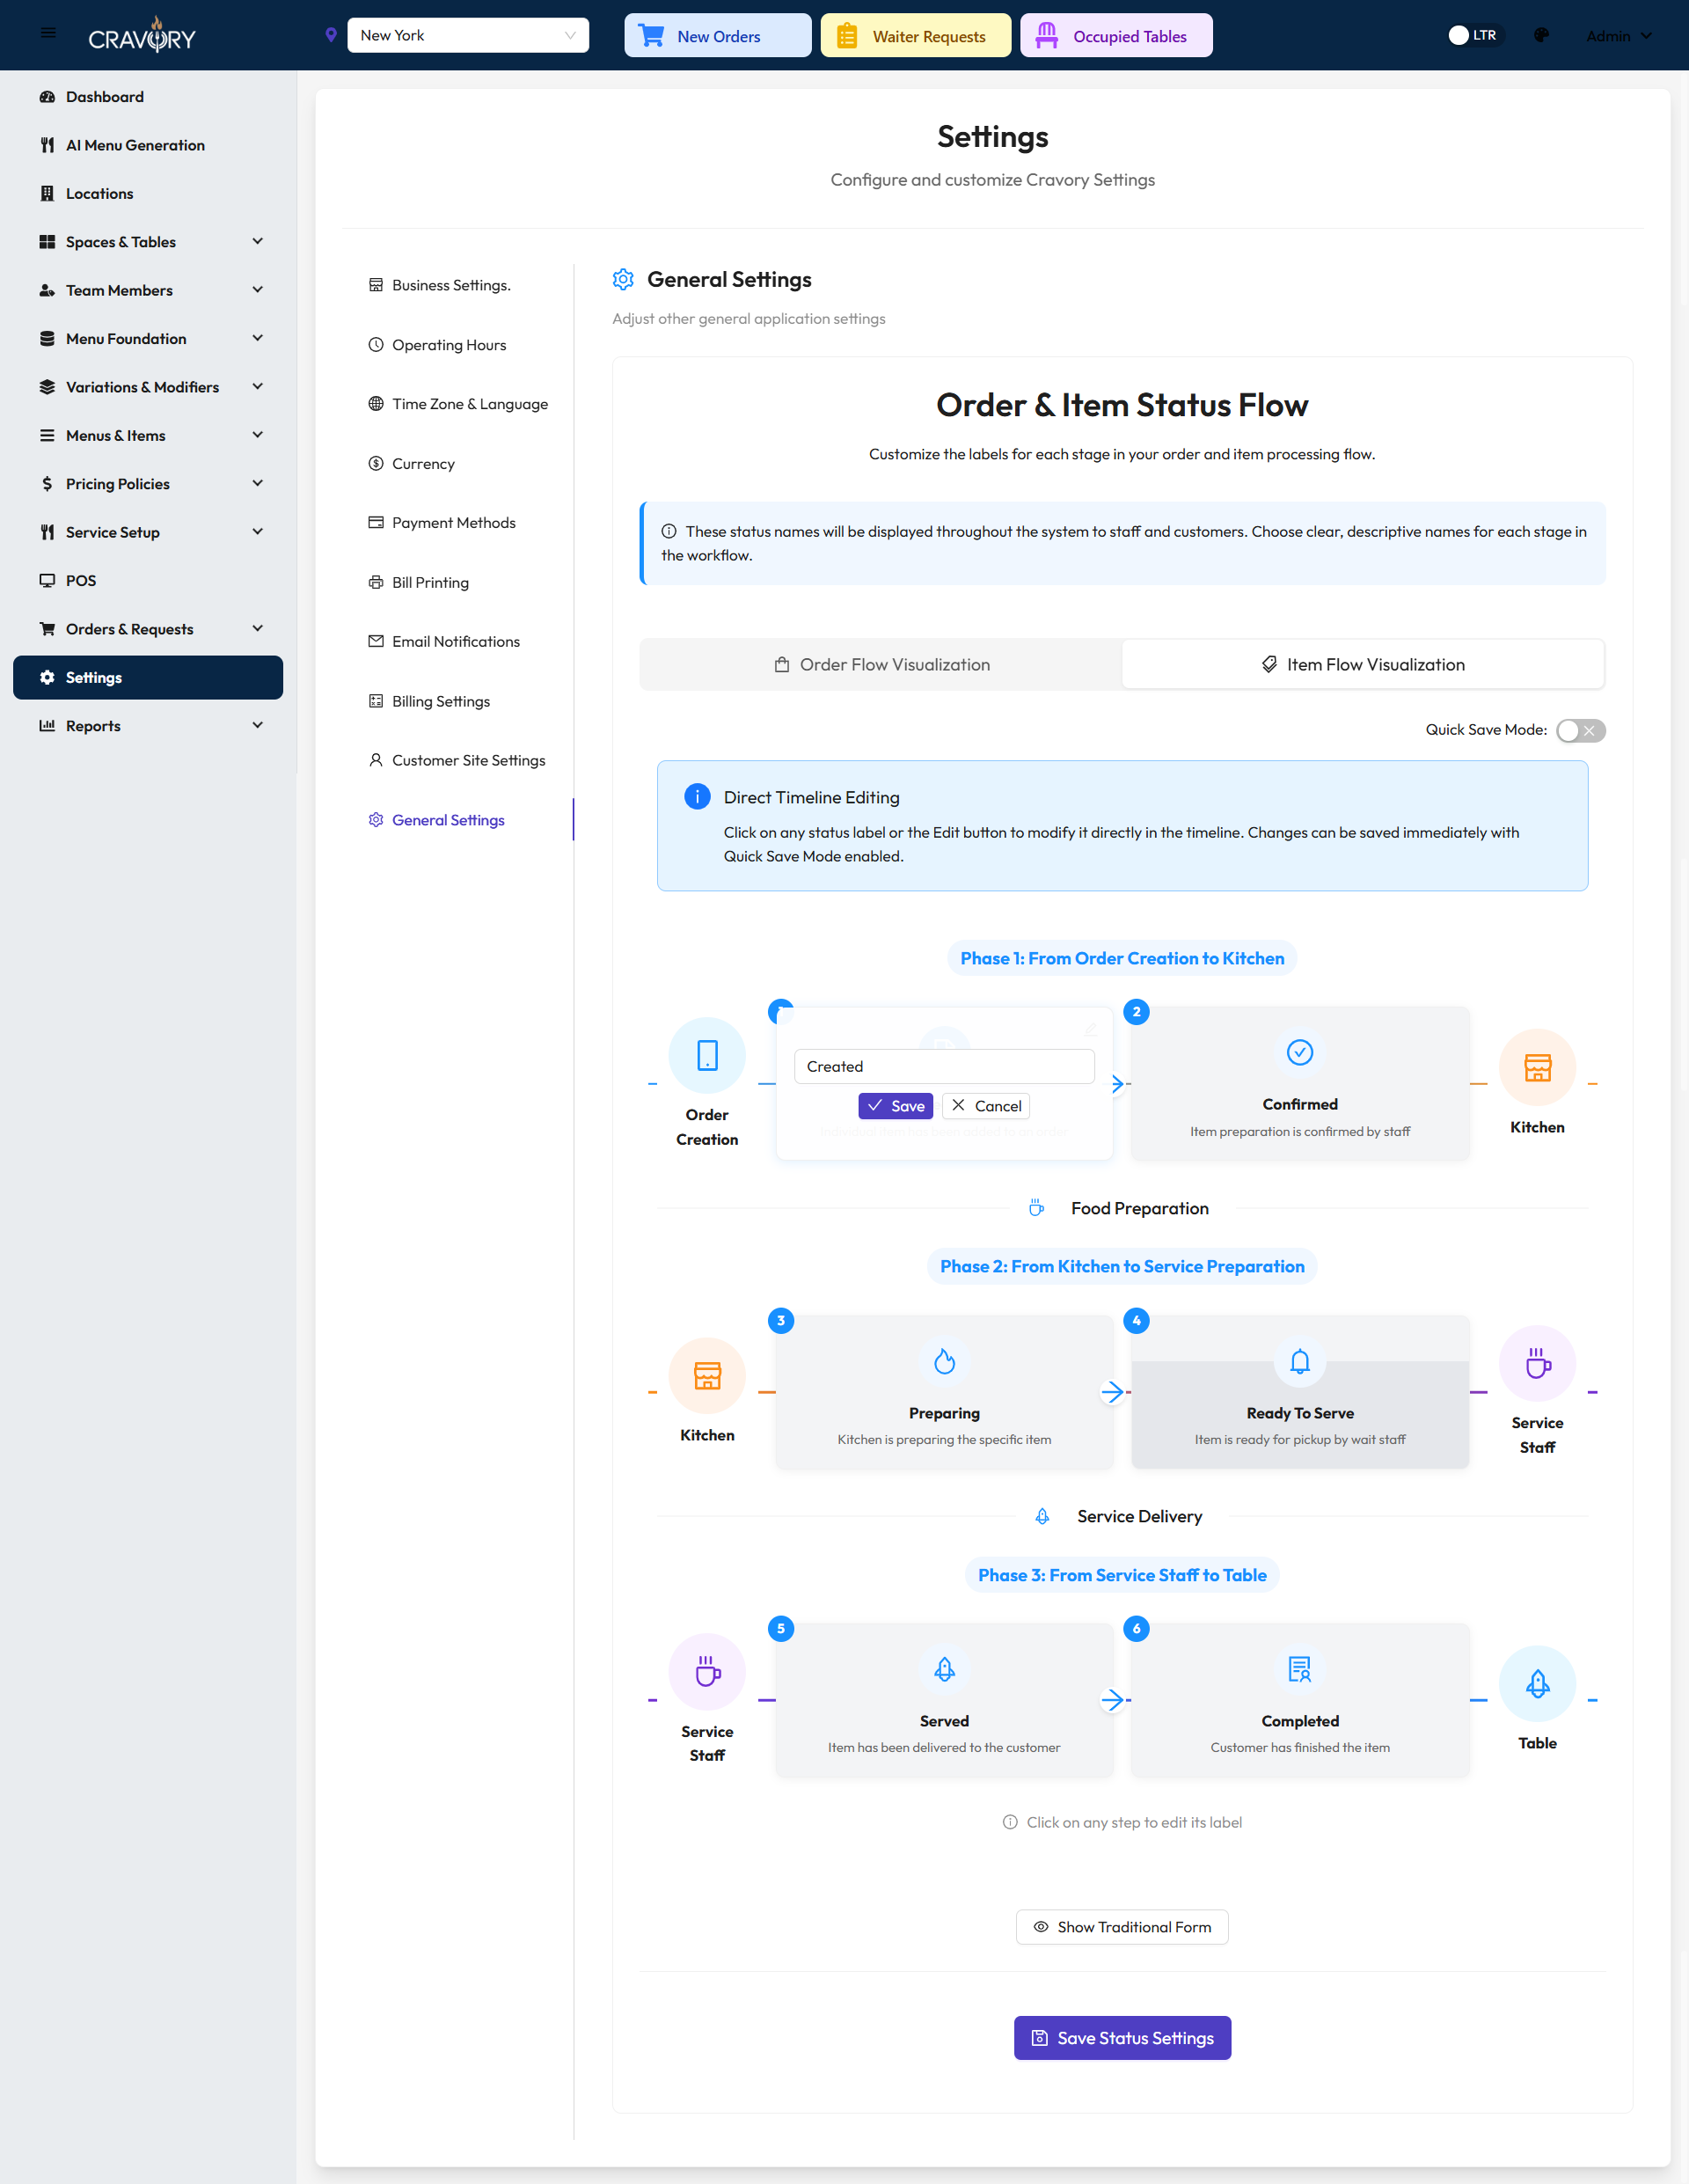
Rich UI for "Items Created" Status Text
2 Items Confirmed: When an order is confirmed, the items within that order will display this status.
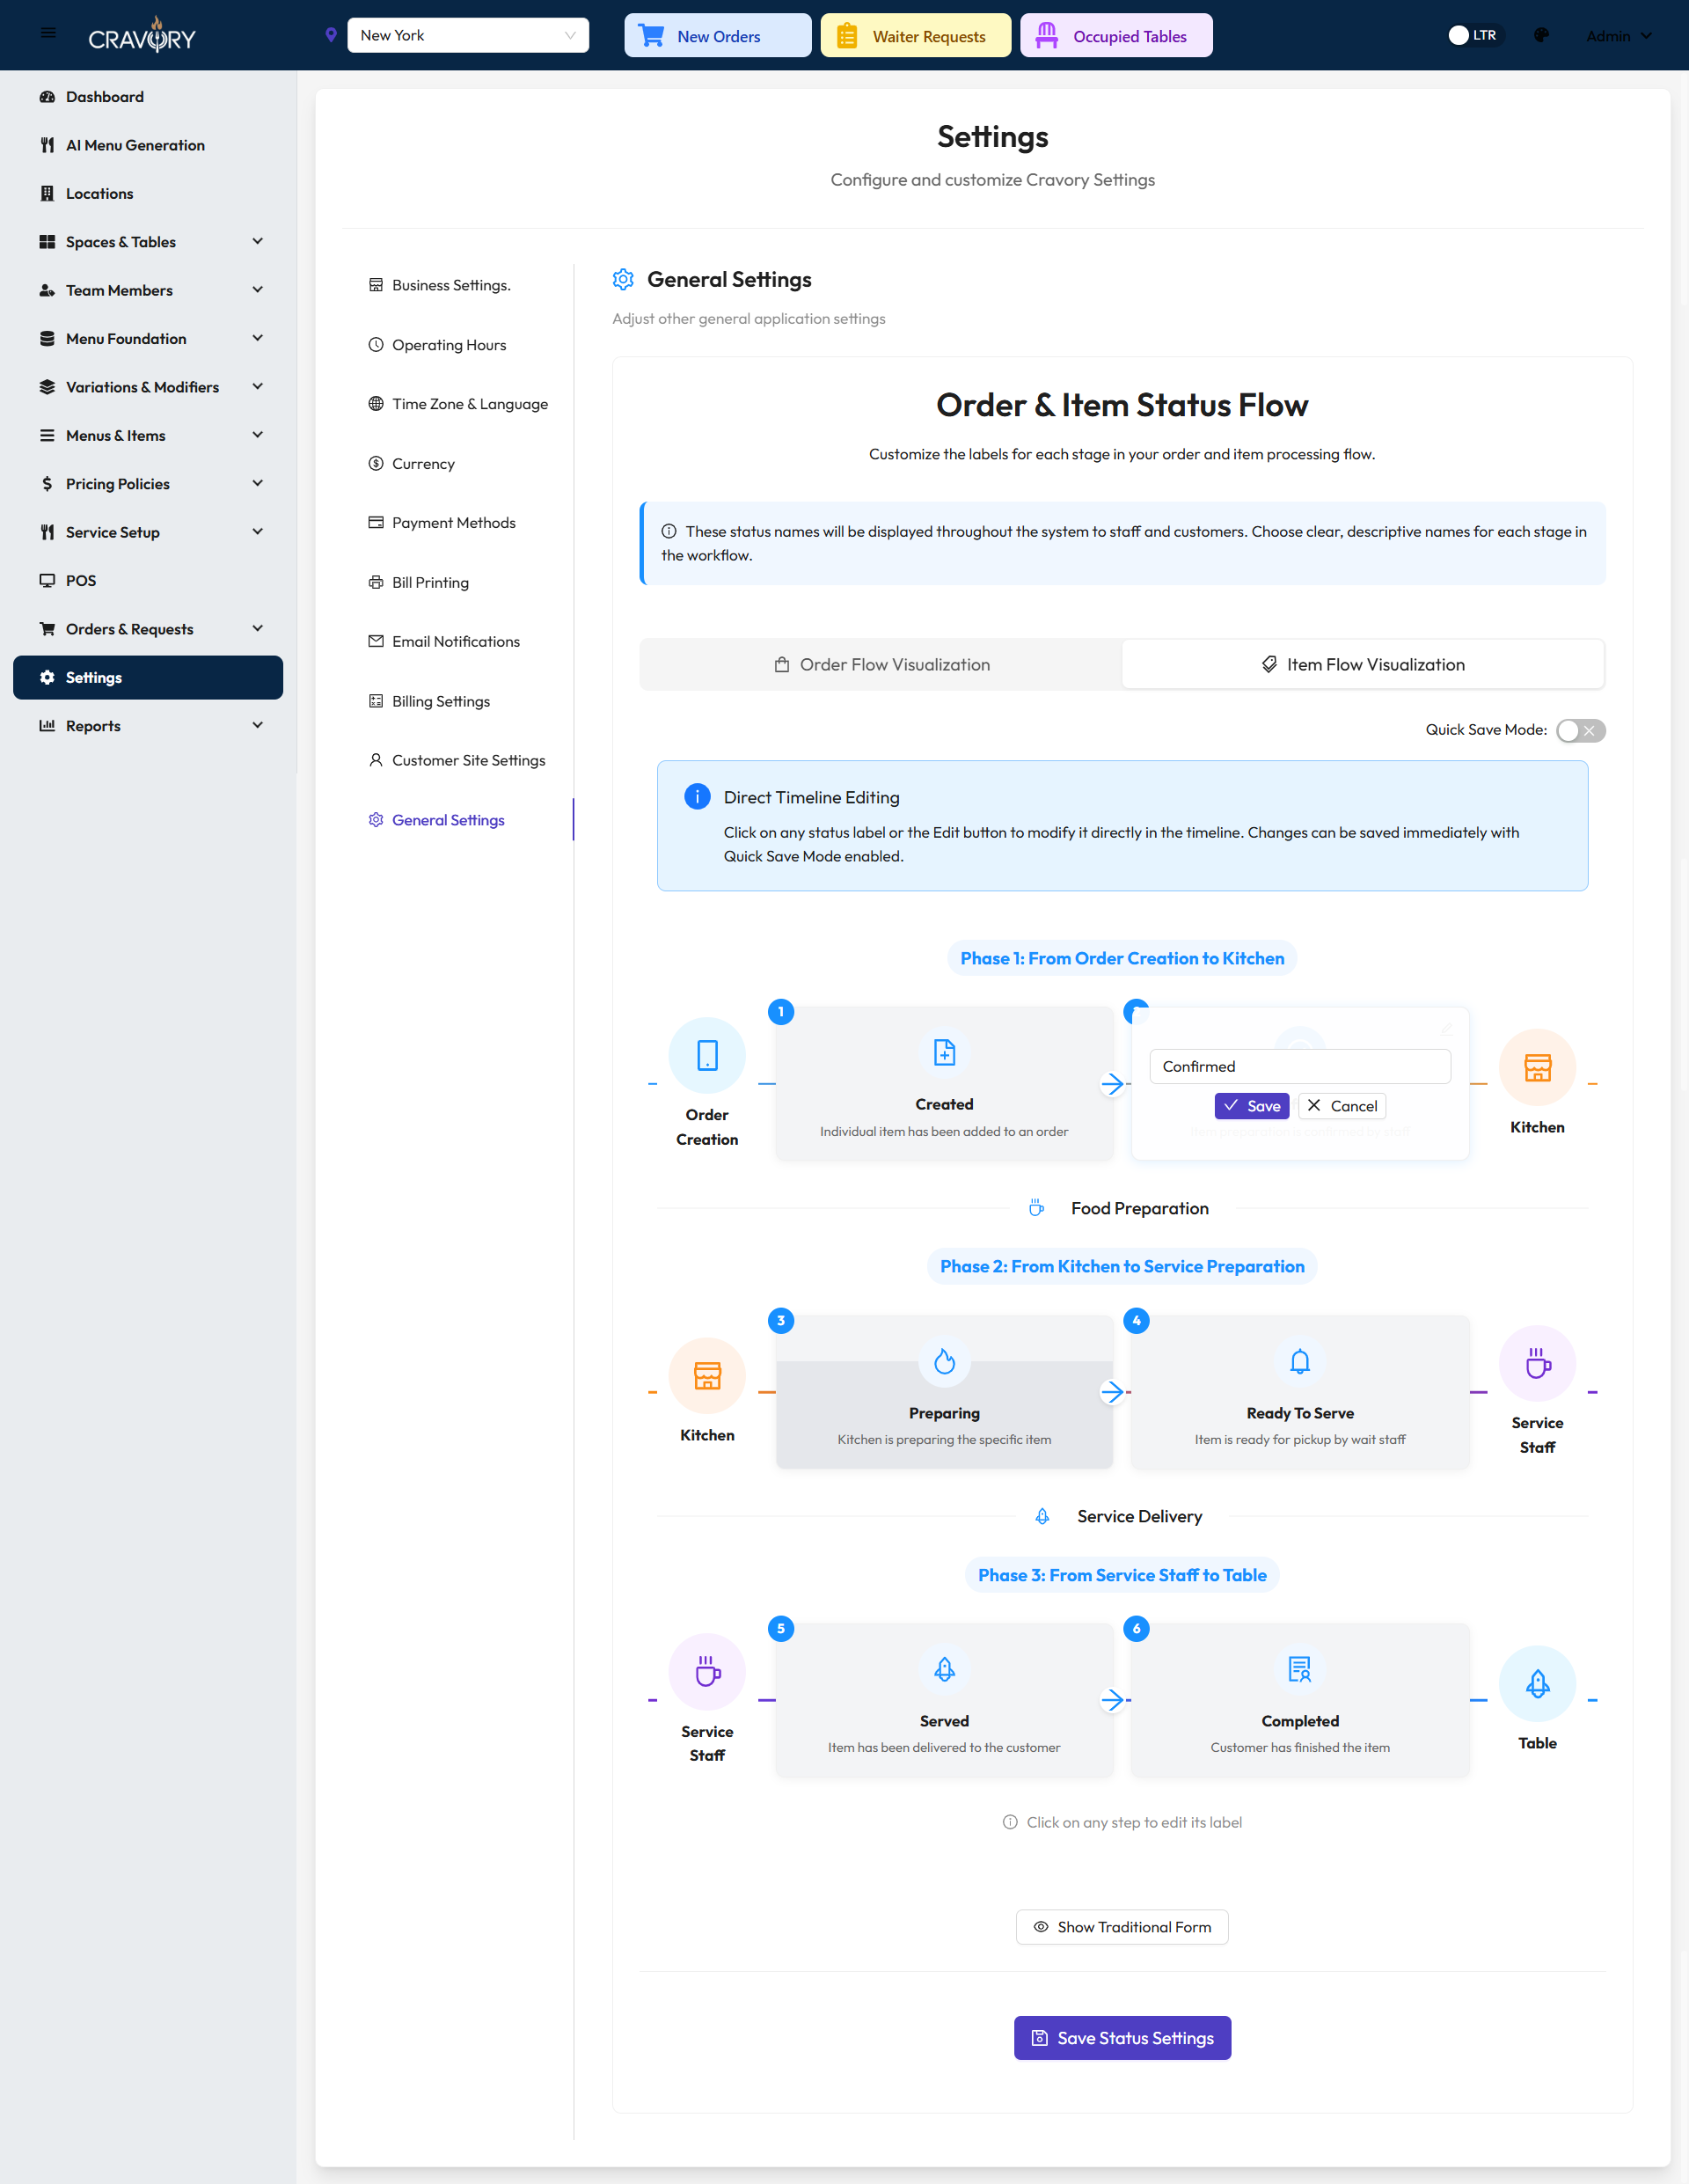
Rich UI for "Items Confirmed" Status Text
3 Items Preparing: This status is shown when items have been sent to the kitchen for preparation.
Rich UI for "Items Preparing" Status Text
4 Items Ready to Serve: When kitchen staff marks individual items as prepared, they receive this status.
Rich UI for "Items Ready to Serve" Status Text
5 Items Served: Waiters or managers can mark individual items as served to the customer.
Rich UI for "Items Served" Status Text
6 Items Completed: This status indicates that items have been fully processed and completed.
Rich UI for "Items Completed" Status Text
Choosing the Right Interface
- Use Traditional UI when you need to make quick text updates to multiple statuses at once.
- Use Rich Visual UI when you want to see exactly how and where each status message appears in context.
Both interfaces update the same settings, so your changes will be consistent regardless of which method you choose.
Pro Tip: Use clear, concise language for each status to avoid confusion. Consider adding estimated times when applicable (e.g., "Your order is being prepared and will be ready in approximately 15-20 minutes").